Table of Contents
Advertisement
Quick Links
25EO-X
Low-Lift Order Picker
Operator's Manual
WARNING
Do not operate the tow order picker before
reading and understanding the operating
instructions.
NOTE:
• Please check product type and
parameters of your truck in this
manual as well as on the ID-plate.
• Keep this instruction manual for
future reference.
Advertisement
Table of Contents

Related Manuals for Noblelift 25EO-X


Summary of Contents for Noblelift 25EO-X
- Page 1 25EO-X Low-Lift Order Picker Operator’s Manual WARNING Do not operate the tow order picker before reading and understanding the operating instructions. NOTE: • Please check product type and parameters of your truck in this manual as well as on the ID-plate.
-
Page 2: Note: In This Manual, The Symbol On The Left Indicates Warning And Danger, Which May Lead To Death Or Serious Injury If Not Followed
FOREWORD Before operating the order picker, please read this instruction manual carefully and understand the usage of the truck completely. All instructions in this manual should be seriously followed, otherwise warranty will be invalid by default, and our company shall not be liable for any losses arising therefrom. If the customer or a third party modifies the order picker without manufacturer's permission, the warranty will be invalid by default, and our company shall not be liable for any loss arising therefrom. -
Page 3: Table Of Contents
TROUBLE SHOOTING ........................28 10. WIRING/ CIRCUIT DIAGRAM ......................29 Standard 25EO-X Lithium Battery circuit diagram..............29 Standard 25EO-X Lead-acid Battery circuit diagram ..............31 Platform 25EO-X Lithium battery circuit diagram ................ 33 Platform 25EO-X Lead-acid battery circuit diagram ..............35 Hydraulic circuit .......................... -
Page 4: Correct Application
CORRECT APPLICATION The order picker described in this manual is standing low-lift order picker , which possess functions such as: electrically powered low lift of forks, electrically powered lift of man-up platform (optional), electrically powered walking and steering, and electromagnetic braking. It is only allowed to use the order picker following the instructions of this manual. -
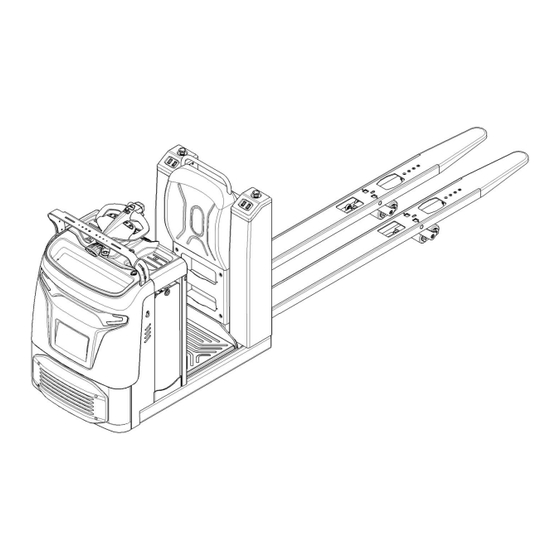
Page 5: Description Of The Order Picker
2. DESCRIPTION OF THE ORDER PICKER Definition of directions Definition of directions Note Front Driving side Rear Loading side Left Right... -
Page 6: Overview Of The Main Parts
Overview of the main parts Description Description ○ Entry-roller ● Chassis ● Tandem load wheels ● Lead-acid battery ○ Single load wheel ○ Lithium battery ○ Exit-roller ● Rubber mat ● Fork ● Platform ● Backrest ○ Platform (man-up) ● Right cover ●... -
Page 7: Main Technical Data
Main technical data... - Page 8 Type sheet for industrial order picker according to VDI 2198 25EO-X Model Electric Drive Order pickers Type (Manual,pedestrian,stand-on,seated,order picker) Q(kg) 2500 Load capacity/rated load C(mm) 1200 Load center distance Load distance X(mm) 1535 Wheelbase Y(mm) 2723 Net weight without battery...
-
Page 9: Description Of The Safety Devices And Warning Stickers (Europe And Other, Excepting Usa)
Description of the safety devices and warning stickers Capacity sticker Identification plate (ID plate) Crane hook sticker Hydraulic oil adding sticker The order picker is equipped with 3 emergency buttons (23), pressing any one of the three buttons can turn off all the functions of the order picker . -
Page 10: Warnings, Residual Risk And Safety Instructions
This order picker is not designed to be water-resistant, do not operate it outdoors in rainy days. If the order picker has malfunctions, check chapter 6 for details. 4. COMMISSIONING, TRANSPORTING, DECOMMISSIONING Commissioning 25EO-X Type 1400(3086) Commissioning weight [kg] Around... -
Page 11: Lift/ Transportation
Lift/ transportation For transportation, remove the loads and lower the forks to the lowest position, use proper crane equipment or forklift to place the order picker on the vehicle or other equipment for transportation, and fix the order picker as required. Lift The operation of loading and unloading to the order picker shall be carried out only by personnel that has... -
Page 12: Daily Inspection
5. DAILY INSPECTION This chapter describes pre-checks before operating the order picker. Remove loads from order picker and lower the forks to the lowest position. Daily inspection is effective to find the malfunctions or faults on this order picker. Check the following items before operation. -
Page 13: Starting
put the additional ID card close to the pin-code lock and take it away. Press "×" button, the yellow indicator will be off and exit the mode of registering additional ID card, or wait for 5 seconds after the card is successfully registered, then the system will exit the current mode automatically. Password entry: in standby mode, correctly enter the administrator password, press "√"... -
Page 14: Lifting
Turn the accelerator button to the desired direction forward ‘Fw.’ or backwards Bw.’. Carefully operate the accelerator knob (28) to control the driving speed to the desired speed. If the accelerator knob is back to the neutral position, the controller will slow the order picker until it stops. -
Page 15: Steering
Press lowering button (29) or (30) and the forks will be lowered. If the platform can be lifted, the lift button (30) on the tiller can control the lowering of the platform, and the lift button (29) on the tiller can control the lowering of the forks. -
Page 16: Emergency
Emergency If emergency button (23) is pressed during driving operation, the order picker will be stopped with maximum braking power, so the loads may drop off from the order picker or trailer, so emergency button (23) cannot be used as the brake during driving. Emergency button (23) can only be used under dangerous conditions during driving. -
Page 17: Replacement
Park the order picker securely and switch off the order picker with pressing the emergency button (23). Press lock catch (34) and lift the tiller (7) to open the console. Unplug the battery connector (37) and connect it to the charger for charging. Battery assembling is in the opposite order. Replacement Take out the battery and place it on the equipment for battery replacement safely, and ensures that the battery replacement device does not move during the battery replacement. -
Page 18: Description Of The Lithium-Ion Battery
Description of the lithium-ion battery The lithium-ion battery is a battery with rechargeable cells, the battery is designed for industrial trucks and can withstand related vibrations during operation. The battery is equipped with special connections for charging and discharging operations. Do not try to install or connect improper connectors to the battery. The battery is equipped with BMS –... - Page 19 Battery Decals Item Description Item Description Manufacturer logo b.14 Rechargeable logo Battery model b.15 Vertical upward packing, transportation Nominal voltage of battery b.16 No putting into ordinary garbage bins Rated capacity of battery b.17 No long-term exposure to sunshine Battery energy of battery b.18 Stay away from fire Weight of battery...
- Page 20 Do not try to make any repairs or servicing of lithium batteries. Replacement of parts is not assumed. Risk of electric shock and burning The battery’s charging and discharging connectors have open terminals, avoid any body contacts, contamination or direct contacts with objects which can cause short circuit connection of terminals. Use necessary pre-cautions and protective caps to secure the open terminals.
- Page 21 Potential hazards If equipment is used according to its design purpose, following the correct operations procedures, there are no hazards anticipated. The following hazards can arise in the event of improper use: Physical damage to the battery in case a battery falls or is deformed through impacts. Mechanical •...
- Page 22 Symbols - Safety and Warnings Used lithium-ion batteries must be treated as hazardous waste. Lithium-ion batteries marked with the recycling symbol and the sign showing a crossed-out waste bin must not be disposed of with ordinary household waste. Avoid fire and short circuits causing overheating. Do not ignite or locate batteries close to open flame, heat sources or sparks.
- Page 23 Water (not on mechanically opened or damaged batteries) • Unsuitable extinguishing agents Foam • • Grease fire extinguishing agents Powder extinguishers • Metal fire extinguishers (PM 12i extinguishers) • • Metal fire powder PL-9/78 (DIN EN 3SP-44/95) Dry sand • Instructions for cooling an overheated, non-physically damaged battery This type of damage may be caused by a short circuit inside the battery, which may result in leakage of harmful materials, fire or battery explosion.
- Page 24 Battery lifetime, maintenance and storage The lithium-ion batteries are maintenance-free. Deep discharge can damage the battery Self-discharge without periodical recharge can lead the battery to fully discharged state. Full discharge shortens the service life of the battery and can cause deep discharge and activation of related safety protocols when battery will not be able to be charged anymore.
-
Page 25: Regular Maintenance
Do not open the battery or attempt to repair it. Disposal and transport of a lithium-ion battery Instructions for disposal Lithium-ion batteries must be disposed in accordance with the relevant national environmental protection regulations. Batteries must be treated as hazardous waste. Batteries must not be disposed with ordinary waste. -
Page 26: Maintenance Checklist
Maintenance checklist MAINTENANCE CHECK LIST Interval (Month) Hydraulic system Check the hydraulic cylinder(s), piston for damage noise and leakage • Check the hydraulic joints and hose for damage and leakage • Inspect the hydraulic oil level, refill if necessary • Refill the hydraulic oil ( 12 month or 1500 working hours ) •... -
Page 27: Lubricating Points
34 Check the air gap of the electromagnetic brake • 35 Test the emergency braking • 36 Test the reverse and regenerative braking • 37 Test the safety (belly) button function • 38 Check the steering function • 39 Check the lifting and lowering function •... -
Page 28: Checking Electrical Components And Fuses
Checking electrical components and fuses Remove the front panel, the fuses are located as shown in the following figure. Fuse Specification 10 A 10 A 15 A FU01 350 A FU02 30 A FU03 200 A... -
Page 29: Trouble Shooting
9. TROUBLE SHOOTING Fault Possible cause Solution Battery connector is not connected well Check and well-connected the connector The emergency switch is pressed Release emergency switch The truck The pin-code lock is not activated Activate the pin-code lock cannot move Low battery Check SOC and must charge the battery Protection device is damaged... -
Page 30: Wiring/ Circuit Diagram
10. WIRING/ CIRCUIT DIAGRAM a. Standard 25EO-X(Lithium Battery) circuit diagram... - Page 31 Code Name Code Name Password lock Traction controller SM1、SM2、SM3 Stop switch Limit switch FU02 Fuse15A Fuse30A Main contactor Elec. brake Fuse350A Traction motor Main contactor Position sensor FU01 Fuse10A Potentiometer Li Battery Li Battery Capacitance Warning lamp Horn Blue lamp Steering controller S1、S2、S3、S4 Dot switch...
-
Page 32: Standard 25Eo-X Lead-Acid Battery Circuit Diagram
Standard 25EO-X (Lead-acid battery) circuit diagram... - Page 33 Code Name Code Name Password lock Traction controller SM1、SM2、SM3 Stop switch Limit switch FU02 Fuse15A Fuse30A Main contactor Elec. brake Fuse350A Traction motor Main contactor Position sensor FU01 Fuse10A Potentiometer Battery Capacitance Warning lamp Horn Blue lamp Steering controller S1、S2、S3、S4 Dot switch HL10、HL11 Headlamp...
-
Page 34: Platform 25Eo-X Lithium Battery Circuit Diagram
Platform lifting 25EO-X (Lithium battery)circuit diagram... - Page 35 Code Name Code Name Password lock Traction controller SM1、SM2、SM3 Stop switch Limit switch FU02 Fuse15A Fuse30A Main contactor Elec. brake Fuse350A Traction motor Main contactor Position sensor FU01 Fuse10A Potentiometer Li Battery Li Battery Capacitance Warning lamp Horn Blue lamp Steering controller S1、S2、S3、S4、S5 Dot switch...
-
Page 36: Platform 25Eo-X Lead-Acid Battery Circuit Diagram
Platform lifting 25EO-X(Lead-acid battery)circuit diagram... - Page 37 Code Name Code Name Password lock Traction controller SM1、SM2、SM3 Stop switch Limit switch FU02 Fuse15A Fuse30A Main contactor Elec. brake Fuse350A Traction motor Main contactor Position sensor FU01 Fuse10A Potentiometer Battery Capacitance Warning lamp Horn Blue lamp Steering controller S1、S2、S3、S4 Dot switch HL10、HL11 Headlamp...
-
Page 38: Hydraulic Circuit
Hydraulic circuit Lift cylinder Lowering valve Throttle valve Pressure valve Hydraulic power pack (motor and pump) Oil tank... -
Page 39: Declaration Of Conformity (Valid If Sold Within Eu Area)
DECLARATION OF CONFORMITY (valid if sold within EU area) CE-DD-003 [GB] Original CE Declaration of conformity The signatory hereby declares that the specified machine conforms to the EC Directive 2006/42/EC (Machine Directive), and 2014/30/EU (Electro-Magnetic Compatibility, EMC) including their amendments as translated into national legislation of the member countries. The signatory is individually authorized to compile the technical documents and declares that the following standards, including the normative procedures contained therein, have been applied: [D] Original EG- Konformitätserklärung Der Unterzeichner erklärt hiermit, dass die angegebene Maschine den EG-Richtlinien 2006/42/EG (Maschinenrichtlinie) und 2014/30/EU (Elektromagnetische... - Page 40 XXXXXXXX (2) Serial No: your declaration is YYYY (3) Year of constr.: (4) Manufacturer: Noblelift Intelligent Equipment Co., Ltd. not complete. 528 Changzhou Road, Taihu Sub-district, Changxing, 313100, PR China (5) Res : <Company name>, ponsible for compiling the technical documentation In this case ask for <Company Address>...
Need help?
Do you have a question about the 25EO-X and is the answer not in the manual?
Questions and answers