Table of Contents
Advertisement
Advertisement
Table of Contents

Related Manuals for Genius P210


Summary of Contents for Genius P210
- Page 1 English...
- Page 2 Consult the dealer or an experienced radio/TV technician for help Use of shielded cable is required to comply with Class B limits in Subpart B of Part 15 of the FCC rules. Do not make any changes or modifications to the equipment unless otherwise specified in the manual.
- Page 3 2. The product and accessories that come with your camera may be different from those described in this manual. This is due to the fact that different retailers often specify slightly different product inclusions and accessories to suit their market requirements, customer demographics, and geographical preferences.
- Page 4 English WARNINGS Do not use this camera if it is emitting smoke (or an unusual odor), if it becomes unusually hot to the touch, produces a peculiar noise, or exhibits any other abnormal conditions. Operating the camera in any of these circumstances may cause a fire or an electrical shock. Stop using the camera immediately, turn the camera off and remove the batteries.
- Page 5 Do not cover or wrap the camera with a cloth or quilt. This may cause heat to build up and distort the camera case and cause a fire. Always use the camera and accessories in well- ventilated locations.
-
Page 6: Table Of Contents
User’s Manual English Table of Contents Introduction..................08 Package Contents Getting to Know the Camera..............09 Front View Top View Rear View Bottom View Side View Image LCD Display Icons Input/Output Connectors Getting Started..................11 Power - Inserting Batteries Using an AC Power Adapter... - Page 7 Step 3: Downloading Images/Video Clips Using the Camera as a PC Camera............30 System Requirements for Videoconferencing Step 1: Installing the PC camera driver Step 2: Connecting the Camera to Your Computer Step 3: Running Software Application (for example: Windows Netmeeting) Specifications..................32...
-
Page 8: Introduction
English Introduction Thank you for the purchase of the digital camera. With the camera, you will live a whole new camera experience and make photo shooting more interesting and fun. Here below we will guide you through the whole picture taking process, please keep this manual on hand and enjoy your time. -
Page 9: Getting To Know The Camera
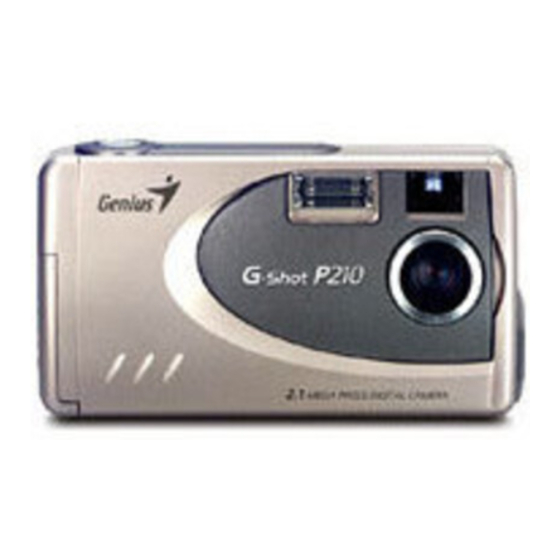
Getting to Know the Camera Front View 1. Viewfinder window 2. Lens 3. Self-timer indicator 4. Built-in flash Top View 1. Shutter button 2. Hand strap holder Rear View Power button Menu button Arrow button (up) Self-timer button Arrow button (down) -
Page 10: Image Lcd Display Icons
+1.0ev +1.0ev Multi Media Card(MMC) (No indication: 0.0) Display Icons- Movie Mode: Movie Mode Possible recording time Display Icons- Still Image Playback Mode: Playback Mode DCF Directory-file number (Still image) DPOF indicator Display icons- Video(movie) Playback Mode: Playback Mode (Video clip) Input/Output Connectors 1.USB connector... -
Page 11: Getting Started
3. Close the battery cover. Do not mix battery (use only one battery type at a time) as this may cause poor camera performance fire or explosion. Batteries should be inserted in the battery compartment with the “+” and “-” sides facing correctly. -
Page 12: Using A Memory Card
Make sure the memory card has fully seated allowing the cover to be closed. 4. Close the battery/card cover. To remove a memory card, press on the edge of the card momentarily, and release. Setting the Date and Time Follow these steps to set the correct date and time: 1. -
Page 13: Basic Operations
1. Power on the camera. 2. Toggle the button to select the mode. 3. Look at the image on the image LCD display or viewfinder to compose your shot. 4. Press the shutter button. Recording a Video Clip To record a video clip, perform the following: 1. -
Page 14: Viewing Still Image/Video Clip
In the mode, you can view still images/video clips stored in the camera’s internal or card memory on the image LCD display. You can also connect the camera to the TV monitor in this mode to playback the still images/video clips. -
Page 15: Erasing Still Image/ Video Clip
To erase the pictures recorded in the camera (internal memory), do not insert any memory card or the camera will not be able to read the internal data with an external memory card attached. External memory (memory card) always has priority over internal memory - whenever a memory card is inserted into the camera ,the camera will use the memory card for both capture and playback. -
Page 16: Erase All
These settings affect the number of images that can be stored in the memory, or on a memory card. As you get to know the camera, it is recom- mended that you try each quality and resolution setting to get an appreciation for the effects that these settings will have on your images. -
Page 17: Flash
You can take an image using a flash mode suitable to your circumstances. If you change the flash mode, the camera will retain that setting even if the camera is turned off. 1. Power on the camera, and toggle the button to select the mode. -
Page 18: Digital Zoom
3 seconds. After an image is taken using self-timer, the self-timer mode is turned off. If you wish to take another image using the self-timer, repeat these steps. -
Page 19: Displaying Thumbnail Images
You can adjust the slideshow display interval within the range of 1 sec. to 9 sec. For interval setting, refer to SLIDE SHOW in the PLAY MENU. Displaying Thumbnail Images This function allows you to view nine thumbnail images on the image LCD display simulta- neously so you may search for a particular image. -
Page 20: Camera Menus
The image resolution (size) determines the size of your image and how many images can be stored in the internal memory or on the memory card. The higher resolution (larger size) produces the large size image but takes up more space in memory. Lower resolution (smaller size) takes up less memory space, suitable for sharing images via email or the Internet. -
Page 21: Ev Compensation
QUICK VIEW If Quickview is enabled, each image will be displayed on the LCD momentarily after it is captured. If disabled, each image will not be displayed immediately after capture. 1. Follow steps 1 through 2 in access... - Page 22 EV COMPENSATION The camera will automatically adjust the camera shutter speed for the proper exposure of each scene. Occasionally, it is desirable to manually override the automatic exposure value (EV) to accommodate special scene circumstances.
- Page 23 This option allows you to delete one image/video clip or delete all images/video clips the memory at one time. If you wish to delete the images or video clips in the internal memory, ensure that the memory card is not inserted in the camera. Otherwise, you will delete the images or video clips stored in the memory card.
- Page 24 DPOF allows you to embed printing information on your memory card. Using DPOF you can select an image to be printed and then specify how many prints to you would like. Take your memory card to a DPOF enabled printer that accepts memory cards. The DPOF/card- compatible printer will read the embedded information on the memory card and print your images as specified.
- Page 25 DATE/TIME Sets the date and time. Refer to section in this manual titled SETTING THE DATE AND TIME for further detail. LANGUAGE Sets the OSD menu language. 1. Follow steps 1 through 3 in FACTORY SETUP section.
- Page 26 Sets video output type. The camera provides 2 different video output types for your selection: NTSC and PAL. Select the correct video type for the connected device (e.g. NTSC TV or PAL TV). 1. Follow steps 1 through 3 in FACTORY...
- Page 27 FREQUENCY,and then press the button. 60 Hz 3. Use the button again to select the DISABLE desired setting. 4. Press the button to confirm the selection. Before taking pictures, preview the image with both 50Hz and 60Hz and compare the results.
- Page 28 You can share recorded images/video clips with your family or friends via e-mail or post them on the Web. Before doing those things, you need to connect the camera to your computer by using the USB cable and then transfer the images/video clips.
- Page 29 Step 3:Downloading Images/Video Clips When the camera is turned on and connected to your computer, it is considered to be one disk drive. You can download images/video clips by copying them from the “removable disk” (“untitled” disk on a Macintosh) to your hard drive or other storage disk.
- Page 30 English Using This Camera as a PC Camera This camera can act as a PC camera, allowing you to hold a videoconference and talk to business associates over the Internet or corporate Intranet, or conduct real-time conversa- tion with friends or family.
- Page 31 2. Click the Start Video button to view live video. 3. Click the Place Call button. 4. Type the e-mail address or the network address of the computer that you are calling. 5. Click Call. The person you are calling must have Windows NetMeeting running and also accept your call to start the videoconference.
- Page 32 Auto, Tungsten, Fluorescent, Shade(Cloudy), Daylight Interface AC adapter connector, USB connector, Video output connector (NTSC or PAL) Power 2 AA Alkaline (1.5V) or Ni-MH (1.5V) batteries, one CRV3 Lithium battery pack (3V), or AC power adapter (2.5A/3.3V) Dimensions 108mm x 56mm x 37mm Weight 125g *Design and specifications are subject to change without notice.
Need help?
Do you have a question about the P210 and is the answer not in the manual?
Questions and answers