
Subscribe to Our Youtube Channel
Related Manuals for Catler ES 910


Summary of Contents for Catler ES 910
- Page 1 Instructions for use ESPRESSO COFFEE MAKER Návod k obsluze PÁKOVÝ KÁVOVAR Návod na obsluhu PÁKOVÝ KÁVOVAR Használati útmutató KAROS KÁVÉFŐZŐ Instrukcja obsługi EKSPRES KOLBOWY ES 910...
- Page 2 ESPRESSO COFFEE MAKER...
-
Page 3: Table Of Contents
Inserting/Removing the Coffee Bean Hopper Filling the Coffee Bean Hopper Grinding Coarseness Regulator Inserting the Strainer into the Handle THE FIRST USE OF THE COFFEE MACHINE ES 910 Flushing the Brew Head Flushing the Hot Water Dispensing Jet Flushing the Steam Jet... - Page 4 CARE AND CLEANING Clean after every use Cleaning the Handle and Strainer Cleaning the Steam Jet Cleaning the Water Tank Cleaning the Drip Tray Outer Surface of the Coffee Machine Cleaning the Internal System (CLEAN ME) Removing Lime Scale Deposits Cleaning the Grinder TROUBLESHOOTING Error messages...
- Page 5 Congratulations on the purchase of your espresso coffee maker ES 910. CONGRATULATIONS...
-
Page 6: Catler Recommends Safety First
CATLER RECOMMENDS SAFETY FIRST We understand the importance of safety and that is why we put your safety first from the initial design concept to the production itself. Nevertheless, please be careful and follow the instructions below when using this appliance. - Page 7 • The appliance must not be placed in a cabinet when in use. WARNING: The filling hole must not be opened during use. • Do not do immerse the power cord, plug or appliance in water or any other liquid. CATLER RECOMMENDS SAFETY FIRST...
- Page 8 Ensure that the power cord does not come into contact with a hot surface. • When disconnecting the appliance from the power socket, always pull the plug, not the power cord. Otherwise, damage to the power cord or the socket may occur. CATLER RECOMMENDS SAFETY FIRST...
- Page 9 All repairs or adjustments must be performed at the nearest Catler authorised service centre. • Any maintenance other than routine cleaning must be entrusted to an authorised Catler service centre. •...
-
Page 10: Meet Your Coffee Machine Es 910
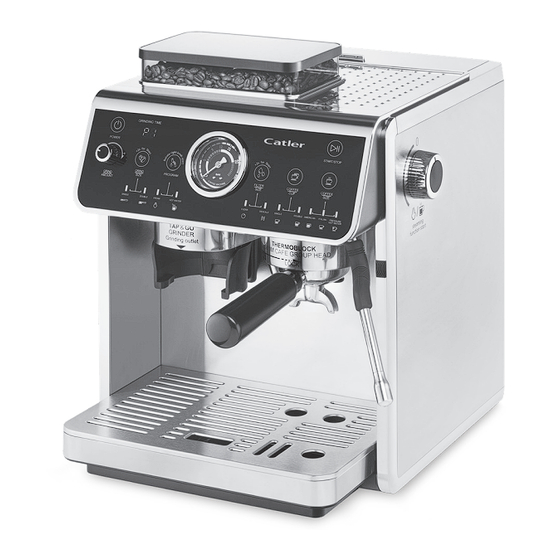
MEET YOUR COFFEE MACHINE ES 910 DESCRIPTION OF THE COFFEE MACHINE 1. Strainer for coffee preparation (for 1 and 2 cups) 2. Handle 3. Drip tray grid 4. Drip tray 5. Full drip tray indicator 6. Holder for inserting the handle 7. -
Page 11: Description Of The Control Panel
8. Button : selection and start of cleaning or descaling 9. Button : selection of strainer for 1 or 2 cups 10. Button : selection of coffee type: Italian espresso, americano or hot water dispensing MEET YOUR COFFEE MACHINE ES 910... -
Page 12: Preparing The Coffee Machine Es 910 For Use
PREPARING THE COFFEE MACHINE ES 910 FOR USE BEFORE FIRST USE Before first use, remove all packaging and advertising labels/stickers from the appliance. Remove the water tank and the drip tray with the grid from the coffee machine. Wash the water tank, drip tray, grid, tamper, handle and strainers in warm water with a little dishwashing detergent. -
Page 13: Inserting/Removing The Coffee Bean Hopper
1. Remove the coffee bean hopper lid. 2. Pour the roasted coffee beans into the hopper and replace the lid. Do not leave the hopper open, otherwise the coffee beans will lose their aroma more quickly. PREPARING THE COFFEE MACHINE ES 910 FOR USE... -
Page 14: Grinding Coarseness Regulator
INSERTING THE STRAINER INTO THE HANDLE Select the strainer according to the number of cups you will be preparing. Insert the strainer in the handle. Push gently so that the strainer fits well into the handle. PREPARING THE COFFEE MACHINE ES 910 FOR USE... -
Page 15: The First Use Of The Coffee Machine Es 910
THE FIRST USE OF THE COFFEE MACHINE ES 910 When using the coffee machine for the first time, or if you have not used it for a long time, you must flush the internal circuit of the coffee machine, the steam jet and the hot water dispensing jets. -
Page 16: Flushing The Hot Water Dispensing Jet
5. Wipe the steam jet with a dry cloth. 6. Pour out the contents of the bowl. 7. Remove the drip tray and pour out any contents. Rinse with clean water, wipe dry and replace in the coffee machine. THE FIRST USE OF THE COFFEE MACHINE ES 910... -
Page 17: Coffee Grinding
COFFEE GRINDING The coffee machine is equipped with a grinder and allows you to grind coffee directly into the strainer in the handle. Before starting the grinding process, make sure the coffee bean hopper is correctly inserted in the coffee machine and filled with coffee beans. Set the desired grinding coarseness –... -
Page 18: Restoring The Original Default Grinding Time
If you need your adjusted preset grinding time to remain in memory, proceed as follows: 1. After adjusting the grinding time (step 3. above), simultaneously press and hold the and buttons for approximately 2 seconds. 2. The coffee machine beeps briefly and “GS” flashes briefly twice on the display. This indicates that the adjusted grinding time has remained stored in the coffee machine's memory. -
Page 19: Inserting The Handle In The Brew Head
INSERTING THE HANDLE IN THE BREW HEAD 1. Insert the handle with the coffee tempered under the brew head so that the grip of the handle is aligned with the "INSERT" inscription on the brew head. 2. Insert the handle from underneath to the brew head and turn the grip to the right in the direction of the arrow to the “LOCK”... -
Page 20: Using The Coffee Machine Es 910
USING THE COFFEE MACHINE ES 910 SWITCHING THE COFFEE MACHINE ON AND OFF Before switching the coffee machine on, check that: – The coffee machine is correctly assembled and no parts are damaged. – Water is in the tank and the lid is closed. -
Page 21: Italian Espresso Preparation (1 Cup And 2 Cups)
10. The coffee machine automatically stops brewing when the preset amount of coffee has been poured into the cup. For 1 cup this is approximately 30 ml, for 2 cups this is approximately 60 ml. USING THE COFFEE MACHINE ES 910... -
Page 22: Hot Water Dispensing (Hot Water Dispensing Jet)
The maximum hot water dispensing time is 2 minutes. After that, water dispensing will automatically stop. Turn the steam/hot water dispensing control to position 0. This is a protective function against overheating of the internal system and consequent damage to the coffee machine. USING THE COFFEE MACHINE ES 910... -
Page 23: Milk Frothing
DO NOT REMOVE THE STEAM JET FROM THE MILK WHEN STEAM IS BEING DISPENSED. THERE IS A RISK OF MILK SPLASHING. WARNING! THE STEAM IS DISPENSED UNDER PRES- SURE AND THERE IS A RISK OF SERIOUS INJU- RY IF NOT HANDLED CORRECTLY. USING THE COFFEE MACHINE ES 910... -
Page 24: Refilling The Water Tank
The drip tray is equipped with a float. When the water level in the drip tray is too high, the float will rise above the hole in the grid, it is necessary to pour out the water to avoid overflowing the drip tray. USING THE COFFEE MACHINE ES 910... -
Page 25: Tips For Making A Good Cup Of Coffee
Use fresh water. Change the water in the tank regularly. Do not leave it for more than one day. – Carry out regular cleaning, descaling and other maintenance. – Use full-fat and properly cooled milk to froth the milk. USING THE COFFEE MACHINE ES 910... -
Page 26: Advanced Coffee Machine Es 910 Setting
ADVANCED COFFEE MACHINE ES 910 SETTING COFFEE VOLUME ADJUSTMENT (ITALIAN ESPRESSO) 1. Follow steps 1 to 7 in the section “Italian Espresso Preparation (1 cup and 2 cups)”. 2. Simultaneously press the and buttons. 3. The and buttons will start to flash. The “SINGLE” indicator lamp will start to flash (if you have selected 1 cup) or the “DOUBLE”... -
Page 27: Restoring The Factory Settings Of The Entire Coffee Machine
If you need to perform a factory reset, proceed as follows: 1. Simultaneously press and buttons. 2. The grinding time display will show “rF” and a short beep will sound. 3. The factory reset has been successfully performed. ADVANCED COFFEE MACHINE ES 910 SETTING... -
Page 28: Care And Cleaning
CARE AND CLEANING Before cleaning the appliance, always disconnect the plug of the power cord from the mains socket and let it to cool down properly. WARNING! DO NOT WASH THE APPLIANCE, MAINS CORD AND PLUG UNDER RUNNING WATER AND DO NOT IMMERSE IT IN WATER OR ANY OTHER LIQUID. -
Page 29: Cleaning The Steam Jet
CLEANING THE STEAM JET 1. After frothing the milk, wipe the end of the steam jet with a soft sponge slightly dampened with warm water. 2. Direct the steam jet away from the opening in the drip tray grid and run the steam dispensing for a few seconds to remove any milk residue from the steam jet. -
Page 30: Outer Surface Of The Coffee Machine
WARNING! THE WATER IN THE DRIP TRAY MAY BE VERY HOT. BE CAREFUL WHEN HANDLING A FULL DRIP TRAY. THERE IS A RISK OF SERI- OUS BURNS. OUTER SURFACE OF THE COFFEE MACHINE Regularly clean the outer surface of the coffee machine, especially the wall behind the brew head. -
Page 31: Removing Lime Scale Deposits
WARNING! TAKE EXTRA CARE DURING CLEANING. THE WATER DISPENSED IS VERY HOT AND THERE IS A RISK OF SERIOUS BURNS IF HAN- DLED INCORRECTLY. NOTE: You can stop the cleaning process at any time by pressing the button. REMOVING LIME SCALE DEPOSITS The coffee machine is equipped with a descaling alert system and its own descaling programme, which can be easily started by the user. -
Page 32: Cleaning The Grinder
Descaling Process 1. Place the bowls of at least 1 litre each under the brew head and steam jet. 2. Make sure that the steam/hot water dispensing control is in position 0. 3. Press the button for about 2 seconds. 4. - Page 33 3. Remove the ground coffee residue from the upper grinding stone, the lower grinding stone and the grinding chamber with a brush. 4. Clean the ground coffee dispensing hole with a brush. 5. Insert the coffee bean hopper. 6. Press and hold the button to start the grinder.
-
Page 34: Troubleshooting
TROUBLESHOOTING This chapter describes the most common problems you may encounter while using this appliance. If your problem is not listed here or is listed and persists, stop using the appliance, unplug the power cord from the power outlet and contact an authorised service centre. -
Page 35: Error Messages
Problem Meaning Solution The coffee machine does not The coffee machine has not Wait for the coffee machine dispense steam. yet warmed up sufficiently to to warm up. steam temperature. The steam jet is clogged. Clean the steam jet. ERROR MESSAGES Error message Meaning Solution... - Page 36 INSTRUCTIONS AND INFORMATION ON DISPOSAL OF USED PACKAGING MATERIAL Dispose of used packaging material at a site designated for waste in your municipality. DISPOSING OF USED ELECTRICAL AND ELECTRONIC EQUIPMENT This symbol on products or original documents means that used electric or electronic products must not be added to ordinary municipal waste.
Need help?
Do you have a question about the ES 910 and is the answer not in the manual?
Questions and answers