Advertisement
Instructions for use
CAPSULE COFFEE MACHINE
Návod k obsluze
KÁVOVAR NA KAPSLE
Návod na obsluhu
KÁVOVAR NA KAPSULY
Használati útmutató
KAPSZULÁS KÁVÉFŐZŐ
Instrukcja obsługi
EKSPRES DO KAWY
NA KAPSUŁKI
ES 700 PORTO BG
ES 701 PORTO BH
ES 702 PORTO W
ES 703 PORTO B
ES 720 PORTO W
ES 721 PORTO B
ES 700 | ES 701 | ES 702 | ES 703 | ES 720 | ES 721
Advertisement

Related Manuals for Catler ES 700 PORTO BG


Summary of Contents for Catler ES 700 PORTO BG
- Page 1 KÁVOVAR NA KAPSULY Használati útmutató KAPSZULÁS KÁVÉFŐZŐ Instrukcja obsługi EKSPRES DO KAWY NA KAPSUŁKI ES 700 PORTO BG ES 701 PORTO BH ES 702 PORTO W ES 703 PORTO B ES 720 PORTO W ES 721 PORTO B ES 700 | ES 701 | ES 702 | ES 703 | ES 720 | ES 721...
- Page 2 CAPSULE COFFEE MACHINE...
-
Page 3: Table Of Contents
TABLE OF CONTENTS Catler Recommends Safety First Know Your Coffee Machine Using Your Coffee Machine Care and Cleaning Troubleshooting TABLE OF CONTENTS... - Page 4 Congratulations on the purchase of your new capsule coffee machine. CONGRATULATIONS...
-
Page 5: Catler Recommends Safety First
CATLER RECOMMENDS SAFETY FIRST We understand the importance of safety and that’s why we put your safety first from the initial design concept to the production itself. Nevertheless, we ask you to be careful when using electrical equipment and to observe the following guidelines: •... - Page 6 Connect the appliance only to a grounded socket. For safety reasons, we don’t recommend using adaptor plugs or extension cords. • Do not place the appliance on windowsills, sink drip tray or unstable surfaces. Always place the appliance on an stable, flat and dry surface. CATLER RECOMMENDS SAFETY FIRST...
- Page 7 We recommend that you check your appliance regularly. Do not use the appliance if it is damaged in any way or if the power cord or plug is defective. All repairs or adjustments must be performed at the nearest Catler authorised service centre. CATLER RECOMMENDS SAFETY FIRST...
- Page 8 • Any maintenance other than routine cleaning must be entrusted to an authorised Catler service centre. • We recommend to install a residual current device (standard safety switches in your power outlet) to provide a higher level of protection when using the appliance. We recommend to install a residual current device (with a nominal residual operating current of no more...
-
Page 9: Know Your Coffee Machine
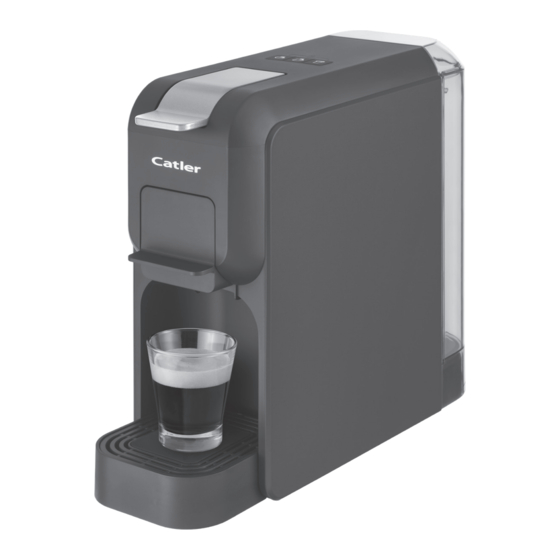
KNOW YOUR COFFEE MACHINE DESCRIPTION OF THE COFFEE MACHINE 1. Control buttons 6. Removable drip tray 2. Cover 7. Lid of the water tank 3. Capsule holder / sieve 8. Water tank 4. Coffee dispensing 9. Capsule storage box 5. Drip tray grill (ES 720 and ES 721 models only) KNOW YOUR COFFEE MACHINE... - Page 10 CONTROL BUTTONS Small cup Medium cup Large cup SUPPLIED HOLDERS 1. S size holder, Ø 36 mm, compatible with Nespresso capsules 2. M size holder, Ø 44 mm, compatible with Cafissimo / Tchibo capsules 3. L size holder, Ø 70 mm, compatible with Dolce Gusto capsules 4.
-
Page 11: Using Your Coffee Machine
USING YOUR COFFEE MACHINE BEFORE FIRST USE WARNING! Before first use, remove all packaging The maximum tank and advertising labels/stickers from the capacity is 0.8 litres of appliance. Place the coffee machine on a flat, water. Do not overfill it. When filling, firm and stable surface well away from the always observe the minimum and mains socket. - Page 12 GR holder for ground 2. Insert the mains cord plug into a power socket. coffee sieve 3. Press any button to switch the machine on. The control buttons flash and the machine starts to preheat. The preheating time takes about 35 seconds. 4.
- Page 13 ADVANCED COFFEE MACHINE SETTINGS 11. Open the cover and pull out the holder. Dispose of the used capsule The coffee maker allows you to adjust the environmentally according to the coffee volume setting to your personal manufacturer's instructions. Remove the preferences. The volume of each coffee can sieve with the used ground coffee and be adjusted.
- Page 14 RESTORING FACTORY DEFAULTS When you restore the factory settings, all the settings you have made will return to the factory defaults. 1. Turn off the coffee machine and disconnect the power plug from the power socket. Place a cup under the outlet hole.
-
Page 15: Care And Cleaning
CARE AND CLEANING Before cleaning the appliance, always WARNING! disconnect the plug of the power cord from the mains socket and let it to cool down Do not insert your hands properly. into the top of the interior Clean the coffee machine after each use. of the machine when the holder is removed. - Page 16 For decalcification, use the special decalcification tablets that are designed for this type of coffee machine. 1. Make sure the coffee machine is switched off and unplugged from the mains socket. 2. Open the cover and insert the ground coffee holder, but without the strainer. Close the cover.
-
Page 17: Troubleshooting
TROUBLESHOOTING This chapter describes the most common problems you may encounter while using this appliance. If your problem is either not stated here or persists, stop using the appliance, unplug the power cord and contact your authorized service centre. UNDER NO CONDITION SHOULD YOU REPAIR OR DISASSEMBLE THE APPLIANCE YOURSELVES. - Page 18 INSTRUCTIONS AND INFORMATION ON DISPOSING OF USED PACKAGING MATERIALS Dispose of used packaging material at a site designated for waste in your municipality. DISPOSING OF USED ELECTRICAL AND ELECTRONIC EQUIPMENT This symbol on products or original documents means that used electric or electronic products must not be added to ordinary municipal waste.
- Page 19 NOTES...
Need help?
Do you have a question about the ES 700 PORTO BG and is the answer not in the manual?
Questions and answers