
Related Manuals for Catler ES 4050


Summary of Contents for Catler ES 4050
-
Page 1: Espresso Machine
ESPRESSO MACHINE Instructions for use ESPRESSO ES 4050 OPERATING YOUR CONTROL GRIP SB 4010 OPERATING YOUR CONTROL GRIP SB 4010... - Page 2 E S P R E S S O M A C H I N E OPERATING YOUR CONTROL GRIP SB 4010...
-
Page 3: Table Of Contents
CONTENT Congratulations Catler recommends safety fi rst Know your espresso machine ES 4050 Operating your espresso machine ES 4050 Coff ee making tips Care & Cleaning Trouble shooting guide CONTENT... -
Page 4: Congratulations
Congratulations on the purchase of your new espresso machine ES 4050. CONGRATULATIONS... -
Page 5: Catler Recommends Safety First
CATLER RECOMMENDS SAFETY FIRST At Catler we are very safety conscious. We design and manufacture consumer products with the safety of you, our valued customer, foremost in mind. In addition we ask that you exercise a degree of care when using any electrical appliance and adhere to the following precautions. - Page 6 Any procedure not • Do not let the cord hang over listed in this instruction booklet the edge of a bench or table, should be performed at an touch hot surfaces, or become authorised Service Centre. knotted. CATLER RECOMMENDS SAFETY FIRST...
- Page 7 • For the security reasons, we • Children should be supervised recommend to plug the Catler to ensure they do not play with Espresso Machine directly to the appliance. its own circuit, separate from •...
- Page 8 DO NOT MOVE THE APPLIANCE WHILE IT IS SWITCHED THE POWER PLUG WHEN PLUGGED MUST REMAIN ACCESSIBLE FOR EASY REMOVING. KEEP THE MANUAL ON A SAFE PLACE. WARNING: BURN HAZARD PRESSURISED STEAM CHILDREN MUST ALWAYS BE SUPERVISED! CATLER RECOMMENDS SAFETY FIRST...
-
Page 9: Know Your Espresso Machine Es 4050
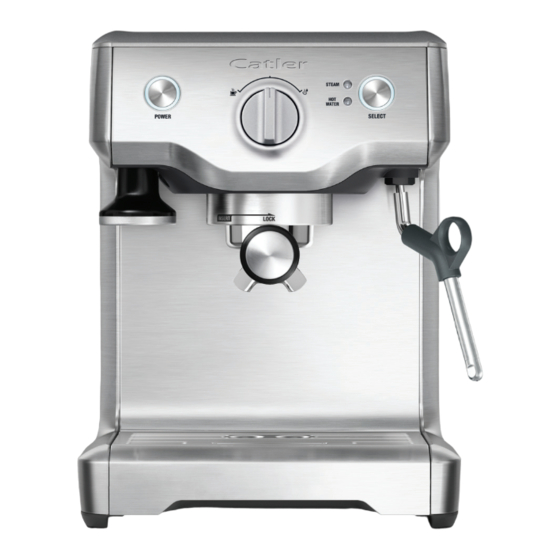
KNOW YOUR ESPRESSO MACHINE ES 4050 A. POWER button surround illuminates NOT SHOWN when machine is switched on. • Removable 1.8L water tank fi lled from B. Thermocoil heating system accurately the top with integrated water fi ltration. controls water temperature. -
Page 10: Operating Your Espresso Machine Es 4050
OPERATING YOUR ESPRESSO MACHINE ES 4050 BEFORE FIRST USE Do not clean any of the part or accessories in the dishwasher. Machine Preparation Remove and discard all labelling and NOTE packaging materials attached to your espresso machine. Ensure you have removed... - Page 11 30 sec of extraction. minimise under or over dosing the coff ee. • Wipe excess coff ee from the rim of the fi lter basket to ensure a proper seal in the group head is achieved. OPERATING YOUR ESPRESSO MACHINE ES 4050...
- Page 12 NOTE When the espresso machine creates steam, a pumping noise can be heard. This is the TEXTURING MILK normal operation of the 15 bar Italian pump. Espresso machine Catler ES 4050 is NOTE equipped with a commercial style steam wand. • Before inserting the steam wand into the milk, it is recommended to purge the steam wand.
- Page 13 Your espresso will always be extracted at the optimal temperature ensuring only the best fl avours are extracted. OPERATING YOUR ESPRESSO MACHINE ES 4050...
-
Page 14: Coffee Making Tips
COFFEE MAKING TIPS Pre-heating cup or glass A warm cup will help maintain the coff ee’s optimal temperature. Preheat your cup by rinsing with hot water and place on the cup warming tray. Heating the portafi lter and fi lter basket 1 cup 2 cups A cold portafi lter and fi lter basket can reduce the extraction temperature enough... - Page 15 Insert the Razor™ into the coff ee basket until its shoulders rest on the rim of the fi lter basket. The blade of the dosing tool should penetrate the surface of the tamped coff ee. Rotate the Razor™ dosing tool back and forth while holding the portafi lter on an angle over the knock box to trim off excess coff ee.
- Page 16 PURGING THE GROUP HEAD just one at a time can help to achieve the taste of your preference. Before placing the portafi lter into the group head, run a short fl ow of water through the TEXTURING MILK group head, turning the Control Dial to the There are two phases to texturing milk.
- Page 17 vortex. Texture the milk until suffi cient volume is obtained. • Lower the tip beneath the surface, but keep the vortex of milk spinning. The milk is at the correct temperature (60-65°C) when the jug is hot to touch. • Turn the Control Dial to the position before taking the tip out of the milk.
-
Page 18: Care & Cleaning
CARE & CLEANING WARNING ENSURE THE APPLIANCE IS SWITCHED OFF, COOLED DOWN AND UNPLUGGED FROM THE POWER OUTLET BEFORE CLEANING. DO NOT USE PETROL, SOLVENTS, ALCALIC AGENTS OR ANY OTHER SIMILAR LIQUIDS FOR CLEANING. FOLLOW THE INSTRUCTIONS STATED IN THIS CHAPTER. INSLATALLING/REPLACING THE FILTER IN THE WATER TANK REPLACEMENT DUE Soak the water fi... - Page 19 DECALCIFYING DECALCIFYING THE MACHINE After regular use, hard water can cause mineral build up in and on many of the • Ensure the Control Dial is in the ‘I’ internal components, reducing water fl ow, position, the Power On/Off button is off power of the machine, and aff ecting the and the machine is switched off at the quality of coff ee.
- Page 20 CLEANING THE STEAM WAND Run steam to clean milk from Wipe steam wand after each use. Clean hole with pin. Remove tip. Soak tip overnight then re-attach. wand after texturing. CLEANING FILTER BASKETS CLEANING THE STORAGE TRAY Should the fi ne holes in the fi lters become The storage tray can be removed after the blocked follow the steps below: drip tray is removed then cleaned with a soft,...
-
Page 21: Trouble Shooting Guide
TROUBLE SHOOTING GUIDE This chapter shows the most common troubles you might notice during the espresso machine using. If the trouble is not stated in the table below or if it persists, stop using the espresso machine, unplug from the power outlet and contact the authorised service centre. - Page 22 PROBLEM POSSIBLE CAUSE WHAT TO DO No crema. • Coff ee is not tamped Refer to ‘Coff ee Dose and, Tamping’ part. fi rmly enough. • Coff ee grind is too Ensure you use a suitable espresso grind. Refer coarse. to ‘The Grind’ part. •...
- Page 23 PROBLEM POSSIBLE CAUSE WHAT TO DO Coff ee drips • The water tank is Refer to ‘Filling The Water Tank’ part. from the empty or low. portafi lter • Coff ee grind is too Ensure you use a suitable espresso grind. spouts fi ne.
- Page 24 PROBLEM POSSIBLE CAUSE WHAT TO DO No hot water. • Empty tank. Fill tank. • Steam Wand is Use the pin on the cleaning tool to clear blocked. the opening. If the steam wand continues to be blocked remove the tip of the steam wand using the spanner in the middle of the cleaning tool.
- Page 25 INSTRUCTIONS AND INFORMATION REGARDING THE DISPOSAL OF USED PACKAGING MATERIALS Dispose of packaging material at a public waste disposal site. DISPOSAL OF USED ELECTRICAL AND ELECTRONIC APPLIANCES The meaning of the symbol on the product, its accessory or packaging indicates that this product shall not be treated as household waste.
- Page 26 NOTES...
- Page 27 NOTES...
- Page 28 ESPRESSO MACHINE Due to continued product im- provement, the products illus- trated/photographed in this bro- chure may vary slightly from the actual product. W W W . C A T L E R . E U CUSTOMER SERVICE I N F O @ C A T L E R . E U...