HighPoint SSD6780A Quick Installation Manual
8-bay u.2/ u.3 nvme raid enclosure
Hide thumbs
Also See for SSD6780A:
- Quick installation manual (12 pages) ,
- Installation manual (42 pages) ,
- Manual (32 pages)
Advertisement
Table of Contents
Advertisement
Table of Contents

Related Manuals for HighPoint SSD6780A


Summary of Contents for HighPoint SSD6780A
- Page 1 SSD6780A 8-Bay U.2/ U.3 NVMe RAID Enclosure Quick Installation Guide V1.02...
-
Page 2: System Requirements
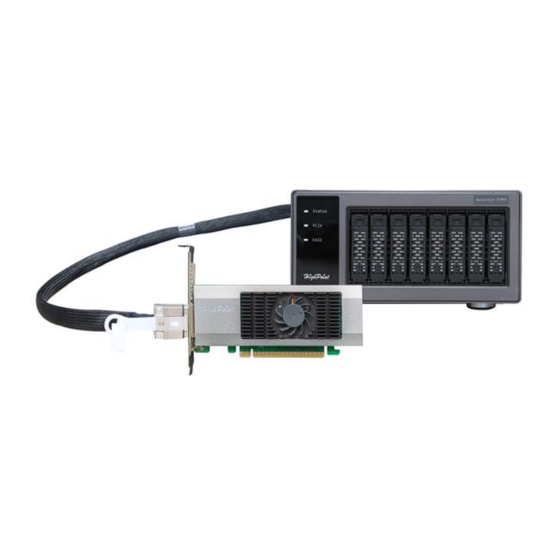
SSD6780A Overview The SSD6780A is a compact, high-performance NVMe RAID storage solution for PC platforms. Each of the 8 drive bays features dedicated PCIe 4.0 x4 bus bandwidth to ensure each NVMe SSD operates at peak performance. System Requirements Windows 11, 10 / Server 2022, 2019, 2016 / Microsoft Hyper-V ... - Page 3 SSD6780A Hardware Controller card Right Status LED Left Status LED PCIe 4.0 x16 Host Interface CDFP Connector Right Status LED No light: The controller card is powered off Flash Green: The CDFP cable is not connected correctly Solid Green: The CDFP cable is connected correctly Solid Red: The controller card and the enclosure is a mismatch ...
- Page 4 Enclosure Panel Layout-Front View Drive tray eject button Tray LED HighPoint logo LED HighPoint logo LED No light: The enclosure is powered off Solid Blue: The CDFP cable is connected Flash Yellow: The CDFP cable is not connected ...
- Page 5 Enclosure Panel Layout-Rear View Chip Selector Switch CDFP Connector USB-C Port Mute Button 100M Ethernet RJ45 Port Kensington Lock Power Switch AC Power IN Power Switch: Enclosure power switch Mute Button: Mute the internal Enclosure alarm buzzer Chip Selector Switch: M487 chip (switch to 1)/ M88048 chip (switch to 2) ...
-
Page 6: Drive Tray
100M Ethernet RJ45 Port: Can be used monitor the SSD6780A via an internet connection DHCP / Static: Support DHCP to allocate the IP Address and could assign the IP Address manually SSDP embedded: device will report IP/Mac/SN/Name to the local network... - Page 7 SSD6780A Hardware Installation 1. Use a wired ESD wrist strap that is properly grounded. 2. Unpack and remove the SSD6780A and check it for damage. If it appears damaged, please get in touch with HighPoint Technical Support. 3. Press the drive tray eject button to eject the eject mechanisms.
- Page 8 5. Carefully insert the U.2/ U.3 NVMe SSD into the drive tray. 6. Secure it with the provided mounting screws. 7. Slide the drive tray into the SSD6780A slot and push it to the rear of the SSD6780A.
- Page 9 8. Close the eject mechanisms to lock the drive tray. 9. Connect the CDFP cable to the controller card’s external port. 10. Connect the other end of the CDFP cable to the Enclosure’s CDFP port (rear panel).
- Page 10 11. Connect the UL power cord to the rear of the Enclosure and connect it to an AC power source. 12. Insert the controller card into the motherboard’s PCIe x16 slot. 13. Switch on the Enclosure power switch to power up the Enclosure, then power up the motherboard.
-
Page 11: Customer Support
Resources Various manuals, guides, and FAQs are available for the SSD6780A RAID Enclosure. In addition, we recommend visiting the Software Downloads webpage for the latest drivers, management interfaces, and installation guides. Software Download: https://www.highpoint-tech.com/nvme4/ssd6780a Certified Accessories: https://www.highpoint-tech.com/nvme-accessories FAQ & Troubleshooting: FAQ - HighPoint Technologies, Inc.
Need help?
Do you have a question about the SSD6780A and is the answer not in the manual?
Questions and answers