Table of Contents
Advertisement
Quick Links
Advertisement
Table of Contents

Related Manuals for BluStream MV41


Summary of Contents for BluStream MV41
- Page 1 MV41 User Manual REVA1_MV41_User_Manual...
-
Page 2: Table Of Contents
MV41 USER MANUAL Contents Introduction Thank you for purchasing this product. Features For optimum performance and safety, please read these instructions care- Front Panel Description fully before connecting, operating or adjusting this product. Please keep this Rear Panel Description manual for future reference. - Page 3 USER MANUAL Introduction Our MV41 is an advanced 4x1 HDMI multi-view switcher. The MV41 allows up to 4x HDMI 2.0 sources to be output to a single display at the same time, with pre-defined and customisable video layouts, and seamless switching. The MV41 also supports HDMI loop-through for all HDMI inputs allowing cascading of original source signals for further distribution.
-
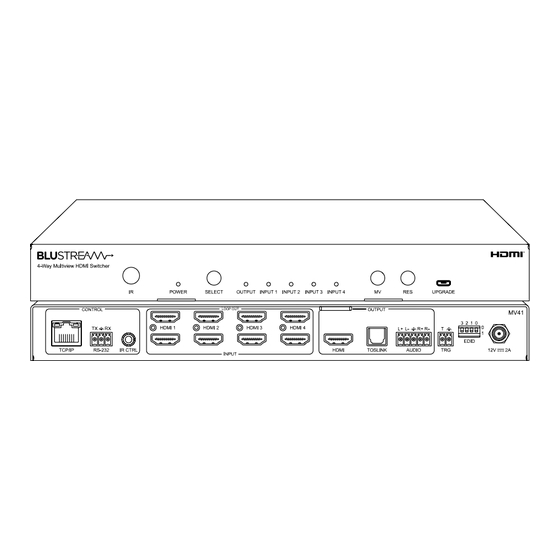
Page 4: Front Panel Description
PC (Phoenix block included) channel audio for the analogue output to work. Please note: External IR port - connect supplied Blustream 5v IR receiver, the MV41 does not down-mix multi-channel audio signals or control processor to control the Switcher... -
Page 5: Edid Management
25 : HDMI 4K@60Hz 4:4:4, 10-bit (inc DV), Audio 5.1ch DTS/DOLBY 26 : HDMI 4K@60Hz 4:4:4, 10-bit (inc DV), Audio 7.1ch DTS/DOLBY Please note: when using the web-GUI of the MV41 to 27 : HDMI 4K@60Hz 4:4:4, 12-bit (inc DV), Audio 2ch PCM configure individual EDID settings per input device, 28 : HDMI 4K@60Hz 4:4:4, 12-bit (inc DV), Audio 5.1ch DTS/DOLBY... -
Page 6: Multi-View
USER MANUAL Multi-view The MV41 provides advanced multi-view functionality to allow 4 x sources to be displayed simultaneously on a HDMI display. The MV41’s web-GUI provides an easy-to-use interface, to allow Users full control of the multi-view functionality. The unit provides the following key functionality: •... -
Page 7: Front Panel Buttons
Resolution (RES) Button - Press to toggle between output resolutions. The output resolution is only for the main HDMI output of the MV41, and not for the Loop Out ports on the unit. The scaled outputs of the Loop Out ports can be adjusted within the web-GUI, or from an API command. - Page 8 This following pages will take you through the operation of the units web-GUI. You must connect the TCP/IP RJ45 socket to your local network, or directly from your computer to the MV41, in order to access the products web-GUI. By default the Switcher is set to DHCP, however if a DHCP server (eg: network router) is not installed the Switchers IP...
-
Page 9: Guest Control Page
If the Guest User has been enabled (disabled by default), following the Admin, or a unique User having logging out of the GUI, or navigating to the IP address or Domain Name of the MV41, the Guest Control page will be displayed. -
Page 10: Input Configuration Page
The Input configuration page allows the Admin to name and select the required EDID for each input source device to the MV41. Clicking the ‘Update’ button to the right of each input allows for the name of the source to be entered. This name is updated in the Control page for simpler selection of inputs by a User. -
Page 11: Output Configuration Page
The Output configuration page allows you to name and select the scaled output resolution of each of the 5 x HDMI output ports on the MV41. Clicking the ‘Update’ button to the right of each output allows for the name of the connection to be entered. -
Page 12: Layout Configuration Page
MV41 USER MANUAL Layout Configuration Page The Layout configuration page allows for the Admin to pre-define which input sources are displayed in each window of the differing multi-view layouts, and save these as customised layouts. The switching of inputs to each window is the same as in the main Control page of the web-GUI, with the 16 x default multi-view layouts all displayed at the bottom of the screen. - Page 13 MV41 USER MANUAL Layout Configuration Page continued... Clicking on the ‘Custom’ layout at the bottom of the page, opens up the advanced features for the Admin to fully customise the layout of the output. The right hand side of the screen allows for each window to be individually configured: •...
-
Page 14: Preset Configuration Page
When recalling this preset, the multi-view layout, and the inputs to the specified windows will be recalled from one single command. It is possible to save up to 8 x Presets to the MV41 for differing scenarios. To amend a Preset, click on the Update button for the Preset you wish to amend in the Preset Configuration page. -
Page 15: Users
Users To simplify control from the web-GUI of the MV41, it is possible to create multiple Users that have different permissions based on what the User requires access to. All Users will have a Username and Password that need to be entered to gain control of the MV41. - Page 16 MV41 USER MANUAL Settings Page The Settings Page allows for the Admin to configure various functionality of how the MV41 is going to be used. • Reset System Settings: click this button to reset the MV41 back to factory default •...
- Page 17 1 x 2-pin Phoenix connector • IR Input Ports: 1 x 3.5mm stereo jack • Rack Mount Kit: wings for mounting MV41 into a 19” rack • Casing Dimensions (W x H x D): 265mm x 30mm x 152mm (without connections) • Shipping Weight: 1.5kg...
- Page 18 \r or 0D (in hex) • Spaces – Blustream commands do not require space between commands unless specified. There may be some programs that require spacing in order to work. - How the string should look is as follows OUTON - How the string may look if spaces are required: OUT{Space}ON •...
- Page 19 MV41 USER MANUAL RS-232 Configuration and Telnet Commands COMMAND ACTION COMMAND ACTION ? / HELP Print help information Set Trigger To yy yy=[00]: Off STATUS Print system status and port status yy=[01]: Low Level (0V) TRG yy yy=[02]: High Level (5-12V)
- Page 20 MV41 USER MANUAL RS-232 Configuration and Telnet Commands COMMAND ACTION COMMAND ACTION Set Output Video Mode yy Set Input:xx EDID To Default EDID:zz yy=[01]: Auto xx=00: Select All Input Port yy=[02]: 3840x2160p60Hz(2160p60) xx=[01...04]: Select One Input Port yy=[03]: 3840x2160p50Hz(2160p50) zz=00: HDMI 1080p@60Hz, Audio 2CH PCM (default) yy=[04]: 4096x2160p60Hz zz=01: HDMI 1080p@60Hz, Audio 5.1CH DTS/DOLBY...
- Page 21 MV41 USER MANUAL RS-232 Configuration and Telnet Commands COMMAND ACTION zz=28: HDMI 4K@60Hz 4:4:4, HDR 12-bit (Inc DV), Audio 5.1CH DTS/DOLBY zz=29: HDMI 4K@60Hz 4:4:4, HDR 12-bit (Inc DV), Audio 7.1CH DTS/DOLBY/HD zz=30: DVI 1280x1024@60Hz, Audio None EDID xx DF zz...
- Page 22 MV41 USER MANUAL Schematic www.blustream.com.au www.blustream-us.com www.blustream.co.uk...
- Page 23 MV41 USER MANUAL Certifications FCC Notice This equipment has been tested and found to comply with the limits for a Class B digital device, pursuant to part 15 of the FCC Rules. These limits are designed to provide reasonable protection against harmful interference in a residential installation.
- Page 24 www.blustream.co.uk...
Need help?
Do you have a question about the MV41 and is the answer not in the manual?
Questions and answers