
Subscribe to Our Youtube Channel
Related Manuals for Schmidt HSTGA Series


Summary of Contents for Schmidt HSTGA Series
- Page 1 Thickness Gauge S C H M I D T c o n t r o l i n s t r u m e n t s HSTGA Series Operating instructions Thickness Gauge HSTGA...
-
Page 2: Table Of Contents
Content Important hints for the user/intended purpose ................3 Description/overview ........................4 Notes for installation ........................5 Connecting and adjusting of Gauge ....................5 Thickness Measuring ........................6 Extension of measuring range with a 10 mm slip block ..............6 Mounting of cable release and lifting device .................. -
Page 3: Important Hints For The User/Intended Purpose
1. Important hints for the user/intended purpose In order to achieve the best use of this instrument it is most important that you read the operating instructions first. We reserve the right to make changes and supplements to our products, expecially due to technical improvements and further developments and documentations. -
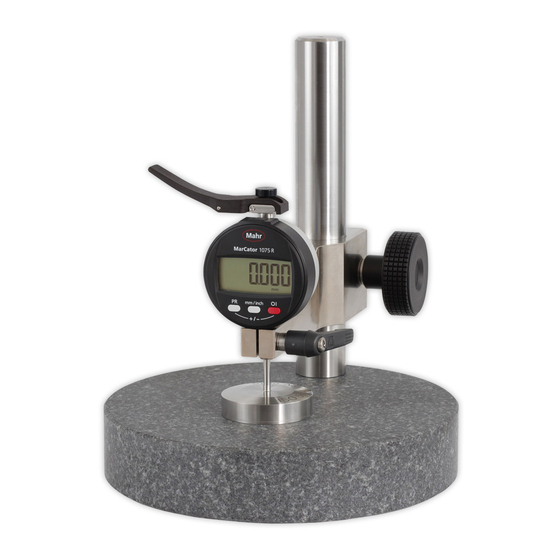
Page 4: Description/Overview
2. Description/overview No. Description Granite base Column Lever Gauge Knob for height adjustment Knob for clamping the Gauge Weight (optional, according to each version) Contact point (optional, according to each version) Lifting device (according to each version) Cable release (according to each version) Thread for cable release Battery tray Data output... -
Page 5: Notes For Installation
3. Notes for installation The Thickness Gauge must be placed on a rigid and vibration free surface. Avoid direct solar radiation and air flow and maintain a constant temperature of 23 °C or to the respective standard (chapter 1, chart „Applications of Thickness Gauges HSTGA“). 4. -
Page 6: Thickness Measuring
5. Thickness Measuring You have to do the procedure in chapter 4 „Connecting and adjusting of Gauge“. Press and hold the Lifting device (9a) or Cable release (9b). The contact point (8) lifts upwards. Put the sample below the contact point (8) on the granite base (1). Release slowly the Lifting device (9a) or Cable release (9b). -
Page 7: Mounting Of Cable Release And Lifting Device
mm/inch 10 mm slip gauge 7. Mounting of cable release and lifting device Cable release 9b Screw the cable release into the thread (A) carefully. Lifting device 9a 1. Remove the cover cap (D) on the Gauge. 2. Screw the sleeve (9.2) carefully with the flange downwards onto the Gauge. 3. -
Page 8: Test Specification
8. Test specification Please take the test specification from the standard of your respective thickness gauge (chapter 1, chart „Applications of Thickness Gauges HSTGA“). 9. Maintenance and care The Thickness Gauge does not require any maintenance. Clean and care the granite base frequently with a suitable cleaner for granite (accessories). -
Page 9: Packaging
10. Packaging Dispatch the Thickness Gauge only with the original packaging. Don`t ship it with the installed Gauge. Remove the weight and contact point by turning it by hand carefully anticlockwise (bottom view on the Gauge). Untighten the knob for clamping the Gauge (6) and remove the Gauge. Is the Thickness Gauge equipped with a cable release (9a) or a lifting device (9b) you have to remove it. -
Page 10: Technical Data
11. Technical data Delivery contents: Thickness Gauge HSTGA Weight and contact point according to each version Cable release/lifting device according to each version Operating instructions Weight: 5,5 kg Dimensions: Ø200 mm x 244 mm 12. Accessories Description: Ceramic slip gauge 10,0 mm Microfibre care cloth for slip gauge... - Page 11 Notizen:...
- Page 12 Yarn Package Durometer and Shore Durometer Sample Cutter Balance Moisture Meter Leak Tester More than 75 years - Worldwide - Hans Schmidt & Co GmbH Mailing address: P. O. B. 11 54 Phone: e-mail: 84464 Waldkraiburg Germany int. + 49 / (0)8638 / 9410-0 info@hans-schmidt.com...
Need help?
Do you have a question about the HSTGA Series and is the answer not in the manual?
Questions and answers