weBoost Office 200 Installation Manual
Cell signal booster
Hide thumbs
Also See for Office 200:
- Installation manual (25 pages) ,
- Install manual (2 pages) ,
- Installation manual (53 pages)

Related Manuals for weBoost Office 200


Summary of Contents for weBoost Office 200
- Page 1 Installation Guide O ce 200 Office 200 Cell Signal Booster Use our weBoost App to guide you through the installation. See inside page for more details.
- Page 2 Download the weBoost App Download the weBoost App Use our app to guide you through setting up a weBoost cell phone signal booster in your home, business, or vehicle. Boost every network, including 5G, right away. Videos to guide you...
-
Page 3: Table Of Contents
Index Key Features ..............1 Package Contents . -
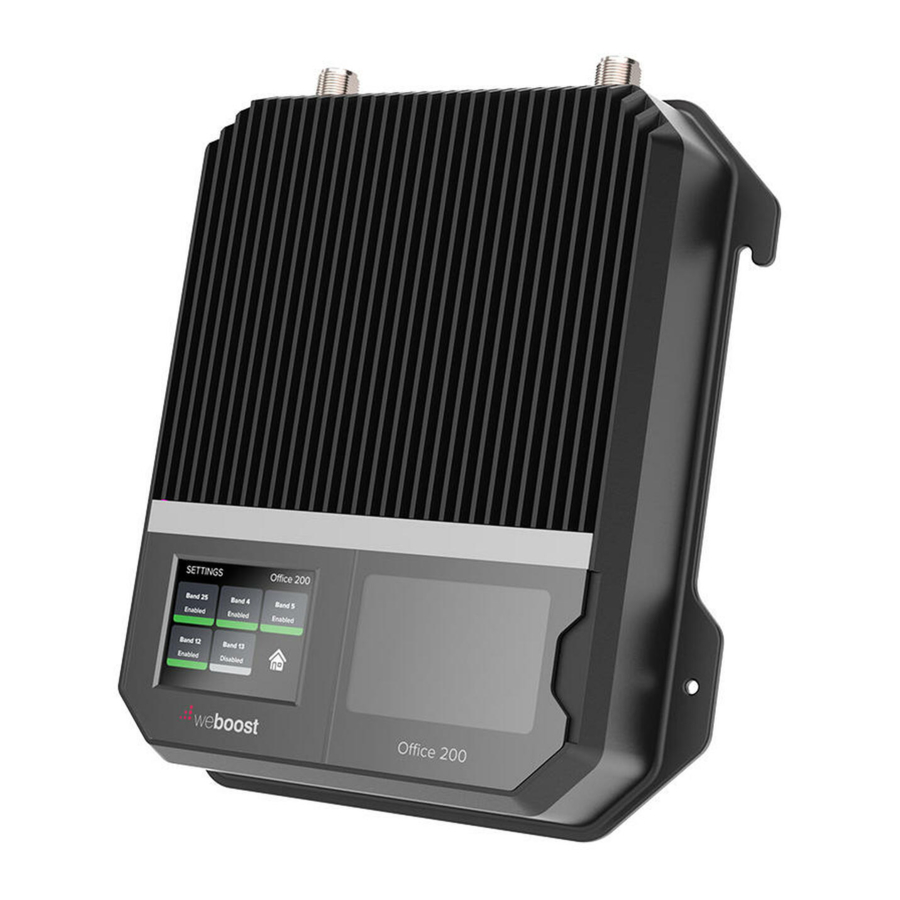
Page 4: Key Features
The amplifier will adjust its gain level up or down as required by the conditions of the immediate signal environment. ■ Color LCD Touch Screen: The Office 200 utilizes a color LCD touch screen for assessing amplifier performance, making adjustments to the outside antenna, and... -
Page 5: Package Contents
Package Contents Booster & Inside Antenna Outside Antenna & 75’ & 60’ Power Supply (w/hardware) Mounting Bracket Wilson 400 Cables, (w/hardware) Cable Clips, & Cable Adapter Pole Mount 2’ Wilson Lightning Surge Assembly 400 Cable Protector... -
Page 6: Installation Overview
Installation Overview Before finalizing the installation, do a soft install and optimize the system for best coverage. 60 FEET HORIZONTAL OR 25 FEET VERTICAL DISTANCE Troubleshooting section recommends increasing distance further if needed. Outside Antenna 75’ Coax Cable Lightning Surge Protector 60’... -
Page 7: Preparation
Preparation You Will Need Make sure the following items are ready for your installation. The tools listed below are not included in your booster kit. 1 to 2 hours ■ Ladder ■ Drill (if routing cable through wall) ■ 1”-2” diameter existing pole for mounting Outside Antenna (#901117 Pole Mount can be purchased separately if needed) ■... -
Page 8: Step 1 Secure Pole Mount Assembly To Flat Surface
STEP 1 Secure Pole Mount Assembly To Flat Surface After finding optimal location for outside Pole antenna, attach wall mount bracket to a flat surface then secure the pipe to wall mount bracket with u-bolt and pole clamp. Pole Clamp U-Bolt Wall Mount Bracket... -
Page 9: Step 2 Mount Outside Antenna Toward Nearest Cell Tower
STEP 2 Mount Outside Antenna Toward Nearest Cell Tower Outside Antenna Pole and mounting hardware are included. Attach the mount to the outside antenna and use the bracket clamp to attach the antenna to the pole provided or existing roof exhaust pipe. -
Page 10: Step 3 Inside Antenna & Booster Placement
STEP 3 Inside Antenna & Booster Placement Place the inside antenna in a area where you need the greatest signal boost and place booster in your desired location at least 24 in. away from inside antenna. NOTE: Do not connect booster to power until the system is fully installed. - Page 11 (STEP 3 cont.) Further instructions on installation are to booster included with low-profile antenna. It’s ceiling mount recommended to do a soft install at this drill or cut 3. in. phase of the installation process. / 76.2 mm dia. hole with two .50 inch diameter tab cutouts 180°opposed...
-
Page 12: Step 4 Route & Connect Outside Antenna To Booster
STEP 4 Route & Connect Outside Outside Antenna to Booster Antenna Lightning Surge Protector Connect 2 ft. coax cable to outside antenna, attach the lightning surge protector, then connect the black 75 ft. coax cable and route into building. 2’ Coax Cable Cable Mounting Clips provided 75’... -
Page 13: Step 5 Route & Connect Inside Antenna To Booster
STEP 5 Route & Connect Inside Antenna to Booster Connect the black 60 ft. coax cable to inside antenna and route to the Office 200 Inside Antenna booster and connect to the port labeled ‘INSIDE ANTENNA’ . 60’ Coax Cable... -
Page 14: Step 6 Power Up The Booster
STEP 6 Power Up the Booster Plug the power supply into wall outlet then connect to end of booster labeled “ ” (turn clockwise to lock connector). NOTE: We strongly recommend using a power strip with surge protection. O ce 200 to power... -
Page 15: Measuring Booster Performance
Measuring Booster Performance & Optimizing the System We've created an easy way to learn your signal strength and compare it before and after a booster. Download our free weBoost app to get accurate decibel measurements to help you get the best performance from your system. - Page 16 (Measuring Booster Performance & Optimizing the System cont.) Signal Strength (dBm) with weBoost system powered OFF: (dBm here) Signal Strength (dBm) with weBoost system powered ON: (dBm here) Compare Results Compare the decibels (dBm) on the chart below to find what signal strength you fall into.
-
Page 17: Menu System
Menu System Start Up Screen The Office 200 takes about 5 seconds to boot up. Once boot up is complete, the home screen will appear, showing the amplification and status of each port and band. Home Screen... - Page 18 ■ YELLOW: A solid yellow light indicates band gain reduction because of an oscillation condition. Reposition antennas (increase separation between indoor and outdoor antennas, and then reboot (turn the unit off & on) the Office 200 to reactivate the band and maximize performance. When adequate separation is achieved, the yellow lights will return to green upon reboot.
- Page 19 (Menu System cont.) Settings Screen Tap icon to view the Settings Screen.
- Page 20 (Menu System cont.) Bands can be disabled/enabled by tapping the desired band. Note: disabling a cell band is not recommended. Bands should only be disabled by expert installers.
- Page 21 (Menu System cont.)
- Page 22 (Menu System cont.) To go back to the home screen tap on the home icon.
- Page 23 (Menu System cont.) To view specific band information (such as the strength of the received uplink & downlink signal, status details and the amplifier gain) tap desired band on the home screen.
- Page 24 (Menu System cont.) By tapping on the desired Band, a more detailed screen will appear for better troubleshooting. Note: If the reduced gain due to oscillation is greater or equal to 60dB, this condition will be displayed as Green instead of Yellow and no action is necessary.
- Page 25 (Menu System cont.)
-
Page 26: Troubleshooting
IF YOU ARE HAPPY WITH THE COVERAGE, THESE LIGHT ISSUES DON’T HAVE TO BE RESOLVED. YOUR CARRIER’S BAND HAS NOT BEEN AFFECTED. If the bands are any color other than green, use the touchscreen LCD and tap any given band that’s not green to see troubleshooting options. 1-866-294-1660 www.weboost.com support@weboost.com... -
Page 27: Safety Guidelines
Inside Panel and Dome Antennas and at least four feet of distance from Desktop Antenna. Use only the Power Supply provided in this package. Use of a non-weBoost product may damage your equipment. The booster should not be installed at a height exceeding 2 meters (79”). - Page 28 (Safety Guidelines cont.) FOR MORE INFORMATION ON REGISTERING YOUR SIGNAL BOOSTER WITH YOUR WIRELESS PROVIDER IN THE U.S., PLEASE GO TO THE LINK BELOW: https://www.weboost.com/carrier-registration...
- Page 29 Antenna Info The following accessories are certified by the FCC to be used with the Office 200 Booster. This radio transmitter 4726A-460047 has been approved by Innovation, Science and Economic Development Canada to operate with the antenna types listed below, with the maximum gain indicated. Antenna types not included in this list that have a gain greater than the maximum gain indicated for any type listed are strictly prohibited for use with this device.
-
Page 30: Specifications
Operation is subject to the following two conditions: (1) This device may not cause interference, and (2) This device must accept any interference, including interference that may cause undesired operation of the device. Changes or modifications not expressly approved by weBoost could void the authority to operate this equipment. -
Page 31: Warranty
DISCLAIMER: The information provided by weBoost is believed to be complete and accurate. However, no responsibility is assumed by weBoost for any business or personal losses arising from its use, or for any infringements of patents or other rights of third parties that may result from its use. - Page 32 3301 East Deseret Drive, St. George, UT 1-866-294-1660 www.weboost.com support@weboost.com Copyright © 2021 weBoost. All rights reserved. weBoost products covered by U.S. patent(s) and pending application(s) For patents go to: weboost.com/us/patents GDE000556_001_10.18.23 NOT AFFILIATED WITH WILSON ANTENNA...
Need help?
Do you have a question about the Office 200 and is the answer not in the manual?
Questions and answers