Advertisement
Teradek User Manual
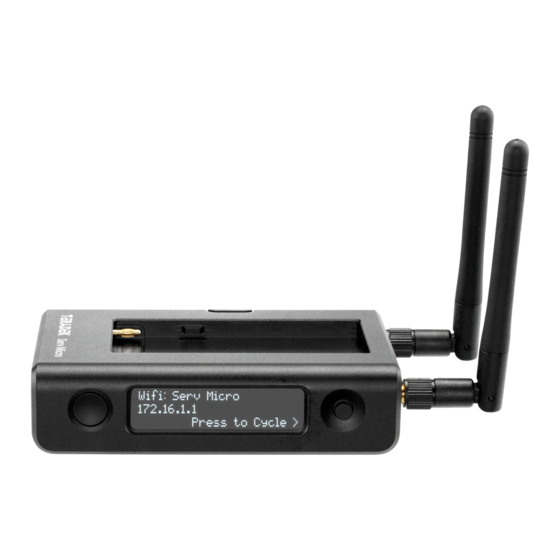
Serv Micro Quick Start Guide
Serv Micro lets you securely stream live camera feeds and instant recordings to anyone, anywhere,
on or off set. See what the camera, editor, and colorist see—from production through final color.
Serv Micro can encode up to 1080p60 video with stunning 8-bit 4:2:0 image fidelity, and can be
connected to Teradek's Core Cloud Platform for even more flexibility.
Serv Micro Quick Start Guide
Page 1
Advertisement
Table of Contents

Subscribe to Our Youtube Channel
Related Manuals for Teradek Serv Micro


Summary of Contents for Teradek Serv Micro
- Page 1 See what the camera, editor, and colorist see—from production through final color. Serv Micro can encode up to 1080p60 video with stunning 8-bit 4:2:0 image fidelity, and can be connected to Teradek’s Core Cloud Platform for even more flexibility.
- Page 2 Teradek User Manual TABLE OF CONTENTS...
-
Page 3: Physical Properties
• 2x Antenna 2dBi WIFI 2.4/5.8GHz POWER AND CONNECT 1. Attach a battery or use the included A/C adapter to connect power to Serv Micro. 2. Attach the two Wi-Fi antennas to the RP-SMA connectors (D). Serv Micro Quick Start Guide... - Page 4 Teradek User Manual 3. Connect the HDMI output from your video source to Serv Micro’s input HDMI connector (E). 4. Turn the Power switch on the back (J) to the ON position. MENU BUTTON OPERATION Use Serv Micro’s Menu and Select/Enter buttons to navigate the status screens and configurable settings.
- Page 5 • Start/Stop Recording (3)- Tap the Recording tab to start/stop recording your stream. NOTE: Recording must be enabled. STATS Tap the Stats button (4) at the top of the screen to display Serv Micro’s serial number, current audio and video bitrates, runtime, recording status, IP address, and network. SETTINGS Tap the Settings button (5) to configure the following options: •...
-
Page 6: Get Online
Teradek User Manual GET ONLINE You can use the front panel interface, web UI, or Serv Manager to control and configure Serv Micro to connect to a network. Connect to a WiFi Network Serv Micro supports two wireless modes: Access Point (AP) Mode (for connecting directly to Serv Micro using WiFi) and Client Mode (for normal Wi-Fi operating and connecting to your local router). - Page 7 Connect via USB Modem 1. Attach a USB modem to Serv Micro’s USB port (L), then press the MENU button on the front panel to navigate to the Modem screen and verify that the modem has been detected and connected.
- Page 8 Teradek User Manual RECORDING Serv Micro encoders support recording to an SD card, USB drive, or NFS drive. Each recording is saved with the same resolution and bitrate set in Serv Micro. Record to SD card 1. Insert a compatible SD card into the corresponding slot.
- Page 9 1. From the web UI, select Cloud Services then click the Link this Device tab. 2. Log in to Core: Enter your credentials to link Serv Micro to your Core account, then click Next. Link with Code: Copy the authorization code generated for your Serv Micro, then follow the instructions provided.
- Page 10 Teradek User Manual 3. Once a connection is established, you can configure Serv Micro from either the web UI or Core dashboard. MONITOR WITH VUER Teradek’s VUER is a free app that allows you to monitor and analyze up to four live video feeds simultaneously, each with its own set of tools to help you and your crew gain insights into your footage.
-
Page 11: Other Resources
1. Download VUER from the App Store (iOS devices), or from the Google Play Store (Android devices). 2. Connect your device to the same network as Serv Micro (Ethernet or WiFi), then launch VUER. 3. From the VUER app, tap CAMERA on the upper, left-hand corner, choose your device(s), then tap Done.
Need help?
Do you have a question about the Serv Micro and is the answer not in the manual?
Questions and answers