Table of Contents
Advertisement
Quick Links
Advertisement
Table of Contents

Related Manuals for Russell Hobbs AURA 20355-56


Summary of Contents for Russell Hobbs AURA 20355-56
- Page 1 INSTRUCTIONS AND WARRANTY MODEL NO. 20355-56 AURA 700W KITCHEN MACHINE...
-
Page 2: Important Safeguards
Congratulations on purchasing our Russell Hobbs Aura 700W Kitchen Machine. Each unit is manufactured to ensure safety and reliability. Before using this appliance for the first time, please read the instruction manual carefully and keep it for future reference. FEATURES OF THE RUSSELL HOBBS AURA 700W KITCHEN MACHINE ... - Page 3 4. This appliance is intended for household use only. Commercial use invalids the warranty and the supplier cannot be held responsible for injury or damage caused when using the appliance for any other purpose than that intended. 5. Avoid any contact with moving parts. This appliance is not intended for use by persons (including children) with reduced physical, sensory or mental capabilities, or lack of experience and knowledge, unless they have been given supervision or instruction concerning use of the appliance by a person responsible for...
- Page 4 21. This appliance is not suitable for outdoor use. Do not use this appliance for anything other than its intended use. 22. Do not operate this appliance by means of an external timer. 23. DO NOT carry any appliance by the power cord. 24.
-
Page 5: Parts Diagram
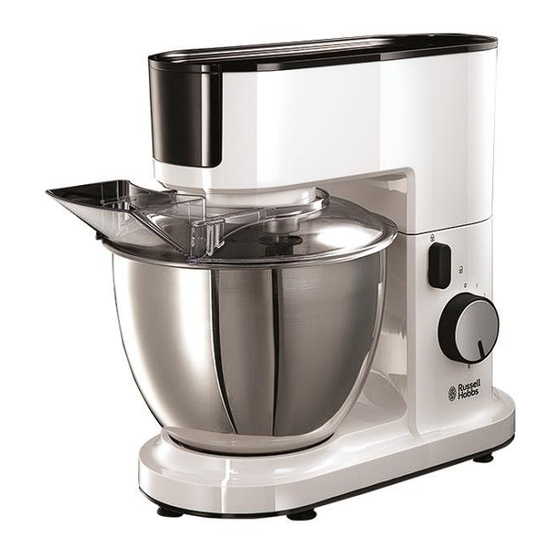
PARTS DIAGRAM... -
Page 6: Before First Use
BEFORE FIRST USE Before using your appliance for the first time, take it out of the box and remove any protective wrappings. REMEMBER: DO NOT LEAVE PROTECTIVE PACKAGING LYING AROUND, AS IT COULD BE DANGEROUS AROUND INFANTS AND CHILDREN. RAISING THE ARM 1. -
Page 7: Speed Control
3. Press the arm down. 4. Let the arm release go. 5. Let go. THE SPLASH GUARD 1. The splash guard fits on top of the bowl. 2. The funnel lets you add ingredients without removing the splash guard. With the bowl in position, and the arm down, slide the splash guard between the arm and the bowl. - Page 8 Hook Heavy mixtures, bread, pastry THE ATTACHMENTS 1. Fit and remove the attachments with the appliance switched off and unplugged, and the arm lowered. 2. Remove the front drive cover from the arm. 3. Align the rear of the body with the hole in the front drive, push the tool into the drive, and turn it clockwise to lock it into place.
-
Page 9: Meat Grinder
MEAT GRINDER 1. This tool can be used for grinding meat, making sausages, or making kebbe. Push the shaft into the body. 2. Fit the blade to the front of the shaft. 3. The flat side of the blade should be towards the screen. Fit the screen you want to use. 4. -
Page 10: Handy Hints And Tips
7. Put the front of the kebbe nozzle through the centre of the ring nut. Align the rear of the kebbe nozzle with the front of the backplate. Fit the ring nut to the front of the body and tighten it by hand. 8. -
Page 11: Cleaning And Maintenance
The speed can be adjusted at any time. Starting from “0” / “OFF” and then adjusting the speed to the food type being mixed. For thicker mixtures, a low speed is recommended. For fine consistency, use the high-speed settings. CLEANING AND MAINTENANCE ... -
Page 12: Servicing The Appliance
Egg whites should be at room temperature for maximum volume. Use a high setting. Beating time will vary according to the freshness of the eggs. Hints for whipping cream:- Use a heavy cream. Chill the cream before whipping. ... - Page 13 Green/Yellow = Earth Blue = Neutral Brown = Live...
- Page 14 PLEASE AFFIX YOUR PROOF OF PURCHASE/RECEIPT HERE IN THE EVENT OF A CLAIM UNDER WARRANTY THIS RECEIPT MUST BE PRODUCED. W A R R A N T Y Home of Living Brands (Pty) Limited warrants to the original purchaser of this product (“the customer”) that this product will be free of defects in quality and workmanship which under normal personal, family or household use and purpose may manifest within a period of 1 (one) year from the date of purchase (“warranty period”).
Need help?
Do you have a question about the AURA 20355-56 and is the answer not in the manual?
Questions and answers