urmet domus 2 VOICE ELEKTA Installation And Programming
Calling module
Hide thumbs
Also See for 2 VOICE ELEKTA:
- Installation, programming and use instruction manual (92 pages) ,
- User booklet (44 pages) ,
- Installation, programming and use instruction manual (38 pages)
Table of Contents
Advertisement
Available languages
Available languages
Quick Links
Mod.
1083
DS 1083-153
LBT 21084
MODULO DI CHIAMATA ELEKTA STEEL E ELEKTA STEEL SATINATA
ELEKTA AND ELEKTA STEEL MATT FINISH CALLING MODULE
Sch./Ref. 1083/28 - 1083/29
LIBRETTO DI INSTALLAZIONE E PROGRAMMAZIONE
INSTALLATION AND PROGRAMMING BOOKLET
(La documentation en Français, Espagnol, Allemand et Néerlandais est
disponible en scannant le QR-Code suivant).
(La documentación en Francés, Español, Alemán y Neerlandés está disponible
escaneando el código QR siguiente).
(Die Dokumentation ist in Französisch, Spanisch, Deutsch und Niederländisch
durch Scannen des folgenden QR-Codes verfügbar).
(Documentatie in het Frans, Spaans, Duits en Italiaans is beschikbaar door de
volgende QR-Code te scannen).
Advertisement
Chapters
Table of Contents

Related Manuals for urmet domus 2 VOICE ELEKTA


Summary of Contents for urmet domus 2 VOICE ELEKTA
- Page 1 Mod. 1083 DS 1083-153 LBT 21084 MODULO DI CHIAMATA ELEKTA STEEL E ELEKTA STEEL SATINATA ELEKTA AND ELEKTA STEEL MATT FINISH CALLING MODULE Sch./Ref. 1083/28 - 1083/29 LIBRETTO DI INSTALLAZIONE E PROGRAMMAZIONE INSTALLATION AND PROGRAMMING BOOKLET (La documentation en Français, Espagnol, Allemand et Néerlandais est disponible en scannant le QR-Code suivant).
-
Page 2: Table Of Contents
ITALIANO PRESTAZIONI ............................4 INSTALLAZIONE ............................ 5 COLLEGAMENTI ELETTRICI ......................... 6 3.1. Descrizione morsetti ........................6 REGOLAZIONE VOLUME ........................7 DESCRIZIONE DEL MODULO DI CHIAMATA ..................7 PROGRAMMAZIONE ..........................8 6.1. Struttura menu ..........................8 6.2. Configurazione parametri ......................9 6.2.1 Tabella parametri ...................... - Page 3 7.6.2. Cancella .......................... 29 7.6.3. Cancella tutto ......................... 30 7.7. Reset ............................30 PROGRAMMAZIONE VIA BLUETOOTH ....................31 MANUTENZIONE ..........................31 10. CARATTERISTICHE TECNICHE......................31 11. LEGENDA SIMBOLI ..........................31 12. DICHIARAZIONE DI CONFORMITÀ UE SEMPLIFICATA ..............31 APPENDICE ............................32 13.
-
Page 4: Prestazioni
PRESTAZIONI Il modulo di chiamata Elekta Steel è stato realizzato per installazioni ad incasso in ambienti esterni. Le prestazioni dei moduli di chiamata nel sistema a due fili 2Voice sono le seguenti: • Può chiamare tutti i potenziali utenti dell’impianto (128 appartamenti per 32 colonne, pari a 4096 appartamenti max) tramite digitazione del codice fisico o selezionando direttamente il nominativo (scorrimento dell’elenco o ricerca lettera iniziale). -
Page 5: Installazione
INSTALLAZIONE • Predisporre la canalizzazione in modo che termini in corrispondenza del foro inferiore della scatola incasso. • Rimuovere il tappo inferiore di occlusione del foro passaggio cavi (1). • Applicare i bollini adesivi sui fori per le viti della cornice (2). • Murare la scatola incasso Sch.1158/43 all’altezza indicata (3). -
Page 6: Collegamenti Elettrici
COLLEGAMENTI ELETTRICI Per la realizzazione dei cablaggi, per le distanze massime realizzabili e per gli schemi elettrici di riferimento fare riferimento alle informazioni contenute nel manuale di sistema. I cavi impiegati devono rispondere alla norma IEC 60332-1-2 se di sezione 0,5 mm² o superiore, oppure alla norma IEC 60332-2-2 se di sezione inferiore a 0,5 mm². -
Page 7: Regolazione Volume
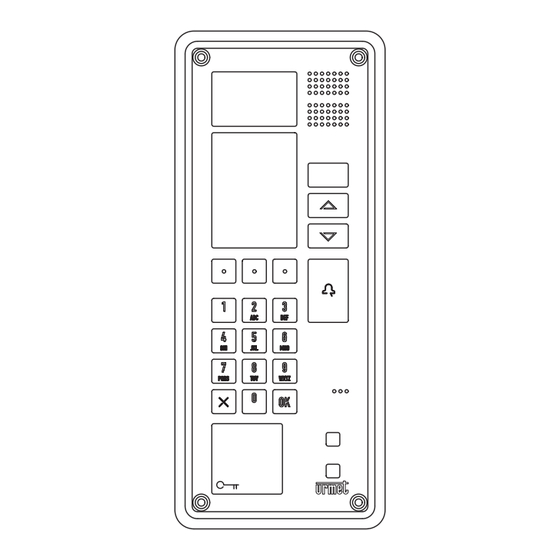
REGOLAZIONE VOLUME I livelli del microfono e dell’altoparlante sono tarati in fabbrica in modo da essere adeguati per la maggior parte delle installazioni. Qualora fosse necessario modificare uno o entrambi i livelli, usare un cacciavite per regolare il corrispondente potenziometro. DESCRIZIONE DEL MODULO DI CHIAMATA Lettore chiavi di prossimità Tastiera 3 - Tasti contestuali che si configurano dinamicamente. L’icona sopra il tasto identifica la funzione disponibile. Display a colori 320 x 240 pixel Telecamera con illuminazione a LED Altoparlante Sensore IR di presenza... -
Page 8: Programmazione
PROGRAMMAZIONE 6.1 STRUTTURA MENU LINGUA CONFIGURAZIONE NOMI GUI (*) SEMPLIFICATA APRIPORTA PRINCIPALE SECONDARIO CHIAVI TIPO MODULO RESET MULTICOLONNA NUMERO COLONNA ID MODULO PRINCIPALE ID MODULO SECONDARIO TIPO CODICE RIEMPIMENTO AUTOMATICO (**) TEMPO OCCUPATO INTERROMPIBILE TEMPO APERTURA APRIPORTA 1 APRIPORTA 1 TEMPO APERTURA APRIPORTA 2 APRIPORTA 2 PASSWORD... -
Page 9: Configurazione Parametri
6.2. CONFIGURAZIONE PARAMETRI Dopo aver installato il modulo di chiamata procedere con la sua programmazione, che consiste nel configurare i seguenti parametri. 6.2.1. TABELLA PARAMETRI Valori Valore di Parametro Descrizione consentiti fabbrica Čeština, Deutsch, English, English UK, Español, Français, Lingua Lingua utilizzata sul display Italiano, Magyar, ITALIANO Nederlands,... - Page 10 Determina se un’autoinserzione senza audio oppure conversazione intercomunicante possano essere interrotte da una chiamata proveniente dal posto esterno. Interrompibile SÌ, NO Deve essere programmato lo stesso parametro “Interrompibile” in tutti i moduli di chiamata dell’impianto. Tipo dell’apriporta e tempo di attivazione dell’uscita della postazione esterna.
-
Page 11: Procedura Di Programmazione
PROCEDURA DI PROGRAMMAZIONE La programmazione avviene attraverso uno specifico menu multilivello, accessibile solo tramite password. Si possono scorrere e selezionare le opzioni del menu, o il valore del parametro, coi tasti , confermando la scelta col tasto OK. Il tasto X annulla la scelta fatta e torna al livello di menu precedente Per uscire dalla configurazione occorre premere il tasto X finché non viene visualizzata la pagina principale del modulo di chiamata. - Page 12 Digitare la password (valore di fabbrica 1000) e confermare premendo OK. Se la password è errata appare la schermata mostrata a lato. Dopo circa 3 secondi sarà nuovamente possibile digitare una password. IMPORTANTE: Se si è modificata la password di fabbrica e ci si dimentica la nuova password impostata, è necessario richiedere al Servizio Clienti Urmet una password temporanea per accedere alla modalità...
-
Page 13: Lingua
Qui di seguito viene mostrata la procedura per la programmazione di tutti i parametri del modulo di chiamata. Non è necessario programmare sempre tutti i parametri. Se alcuni valori di fabbrica sono idonei, oppure se si devono modificare solo alcuni parametri di un modulo già configurato, si possono selezionare solo le voci di menu corrispondenti;... -
Page 14: Gui Semplificata
7.3.2. Di seguito selezionare coi tasti il tipo di modulo PRINCIPALE e confermare la scelta con il tasto OK. 7.3.3. Se si è selezionato PRINCIPALE per il modulo di chiamata appare la schermata mostrata a lato. Selezionare SI se il sistema è multicolonna, NO in caso contrario e confermare la scelta col tasto OK. -
Page 15: Id Modulo Secondario
7.3.6. Ogni colonna può avere fino a due moduli secondari. Impostare con la tastiera il codice identificativo (ID) del modulo secondario nella colonna e confermare la scelta col tasto OK. Valori ammissibili 0 o 1. L’eventuale segnalazione di errore dell’ID del modulo secondario è visibile solo quando si esce dalla modalità di configurazione e si riporta il dispositivo alla modalità di funzionamento normale. 7.3.7. -
Page 16: Tempo Occupato
7.3.9. Selezionare coi tasti il tempo di occupato desiderato e confermare la scelta con il tasto OK. Valori ammissibili: 1, 10, 20, 30, 40, 50, 60, 70 secondi. 7.3.10. Selezionare coi tasti se, durante il tempo di occupato, un’autoinserzione senza audio oppure una conversazione intercomunicante possano essere interrotte da una chiamata proveniente dal posto esterno. 7.3.11. -
Page 17: Tempo Apertura Apriporta 2
7.3.13. Impostare con la tastiera la durata dell’attivazione dell’apriporta 2 (azionamento relè morsetti SE2) e confermare la scelta con il tasto OK. Valori ammissibili: 0 ÷ 90 secondi, con incrementi di 1 secondo. Se il tempo è impostato a 0 secondi, l’apertura della porta è disabilitata. Non è possibile programmare entrambi i tempi di apertura dell’apriporta 1 e dell’apriporta 2 a 0 secondi. -
Page 18: Tono Tasti
7.3.17. Selezionare coi tasti se il modulo di chiamata deve emettere un tono di riscontro ogni volta che si preme un tasto e confermare la scelta con il tasto 7.3.18. Digitare il codice fisico dell’interno al quale indirizzare la chiamata generata premendo contemporaneamente almeno 3 tasti (CHIAMATA D’EMERGENZA) quando l’impianto non è... - Page 19 Questa schermata mostra come apparirà un valore di FUSO ORARIO diverso da quello di fabbrica dopo averlo memorizzato Selezionare coi tasti il CONTINENTE dove è installato l’impianto e confermare la scelta con il tasto OK. la nazione e confermare la scelta con il tasto OK. Selezionare coi tasti Se la nazione comprende più...
-
Page 20: Data E Ora
7.3.21. Impostare con la tastiera la data nel formato gg/mm/aaaa e successivamente l’ora nel formato hh:mm (valori ammessi 00:00 ÷ 23:59). Confermare la data e ora immesse con il tasto OK. Se durante la digitazione si commette un errore è possibile cancellare il numero immesso con il tasto C del menu contestuale. Nella schermata successiva il sistema mostrerà... - Page 21 Se si è attivata la funzione postino è possibile determinare le fasce orarie in cui essa è attiva. Vengono presentati in sequenza tutti i giorni della settimana, a partire da LUNEDÌ. Selezionare coi tasti se abilitare la funzione postino nel giorno indicato e confermare la scelta con il tasto OK.
-
Page 22: Sintesi Vocale
7.3.23. Selezionare coi tasti se attivare la funzione SINTESI VOCALE e confermare la scelta con il tasto OK. Se viene attivata la funzione Sintesi vocale, l’inoltro della chiamata e l’apertura della porta sono descritti da appositi messaggi vocali nella lingua impostata. 7.3.24. -
Page 23: Nuovo
7.4.1. Nuovo Inserire con la tastiera il nuovo nome (si possono inserire anche i caratteri speciali, come accade con i telefoni cellulari premendo i tasti 1 e 0) e confermare il nome immesso con il tasto OK. Il nome può essere lungo fino a 32 caratteri. Se durante la digitazione si commette un errore è possibile cancellare la cifra a sinistra del cursore con il tasto C del menu contestuale. - Page 24 Se il codice è sbagliato appare la schermata mostrata a lato e la tastiera viene disabilitata per circa 3 secondi. Se il modulo è stato configurato per usare anche i codici logici (vedere il paragrafo Configurazione), appare la schermata mostrata a lato. Abbinare al nome il CODICE LOGICO che identifica l’appartamento. Il codice è formato da un numero fino a 4 cifre (valori ammissibili 1 ÷ 9999). Lo stesso codice può essere assegnato a nomi diversi, purché questi condividano lo stesso codice fisico.
-
Page 25: Modifica
Se il codice è sbagliato appare la schermata mostrata a lato e la tastiera viene disabilitata per circa 3 secondi. Il nuovo utente viene aggiunto al database e si torna al menu NOMI. 7.4.2. Modifica Per modificare un nome, o i parametri ad esso abbinati, selezionare coi tasti il nome da modificare e confermare la scelta con il tasto OK. La procedura da seguire è la stessa dell’inserimento di un nuovo nome: per ogni parametro vengono proposti i valori già in memoria, che è possibile confermare direttamente premendo il tasto OK, oppure modificare secondo necessità. -
Page 26: Cancella Tutto
7.4.4. Cancella tutto Per cancellare l’intero database dei nomi e i parametri ad essi abbinati, confermare l’operazione di cancellazione premendo il tasto OK o annullarla premendo il tasto X. ATTENZIONE: L’operazione di cancellazione è irreversibile. 7.5. APRIPORTA Con il menu di secondo livello APRIPORTA è possibile configurare un massimo di 100 codici apriporta non legati ad alcun nome/codice fisico. Questi codici possono essere utilizzati, ad esempio, da chi cura la manutenzione per accedere allo stabile. Attraverso il menu è possibile accedere alle funzioni per inserire un nuovo codice, modificare un codice esistente, cancellare un codice dal database o cancellare tutti i codici dal database Selezionare APRIPORTA dal menu principale. -
Page 27: Modifica
Se si conferma un codice già presente appare la schermata mostrata a lato e la tastiera viene disabilitata per circa 3 secondi. Se il codice ha una lunghezza errata appare la schermata mostrata a lato e la tastiera viene disabilitata per circa 3 secondi. Il nuovo codice viene aggiunto al database e si torna al menu APRIPORTA. -
Page 28: Cancella Tutto
Confermare l’operazione di cancellazione premendo il tasto OK o annullarla premendo il tasto X. ATTENZIONE: L’operazione di cancellazione è irreversibile. 7.5.4. Cancella tutto Per cancellare tutti i codici apriporta confermare l’operazione di cancellazione premendo il tasto OK o annullarla premendo il tasto X. ATTENZIONE: L’operazione di cancellazione è... -
Page 29: Nuovo
7.6.1. Nuovo Posizionare la chiave di prossimità da acquisire vicino al lettore chiavi del modulo di chiamata. Se la chiave viene acquisita appare per 2 secondi un pop-up con il messaggio “CHIAVE SALVATA”. Ripetere l’operazione per tutte le chiavi da acquisire. Al termine premere il tasto OK per uscire dalla fase di acquisizione e tornare al menu precedente. -
Page 30: Cancella Tutto
Confermare l’operazione di cancellazione premendo il tasto OK o annullarla premendo il tasto X. ATTENZIONE: L’operazione di cancellazione è irreversibile. 7.6.3. Cancella tutto Per cancellare tutte le chiavi di prossimità confermare l’operazione di cancellazione premendo il tasto OK o annullarla premendo il tasto X. ATTENZIONE: L’operazione di cancellazione è... -
Page 31: Programmazione Via Bluetooth
PROGRAMMAZIONE VIA BLUETOOTH In alternativa alla programmazione effettuata direttamente sul modulo di chiamata, si può programmare il modulo tramite un personal computer (PC) oppure un dispositivo portatile (tablet o telefono cellulare) dotato di interfaccia Bluetooth e software dedicato. Il software può essere scaricato dalla sezione Download\Software del sito www.urmet.com. Le istruzioni sulla programmazione via Bluetooth e le procedure connesse sono contenute nel libretto di istruzioni che correda il software. -
Page 32: Appendice
APPENDICE 13. PROGRAMMAZIONE E UTILIZZO DELLA GUI SEMPLIFICATA La GUI SEMPLIFICATA consente di scegliere l’utilizzo di una interfaccia utente (GUI) particolarmente semplice, che richiede all’utente di selezionare una delle colonne presenti nell’impianto e digitare semplicemente il numero dell’appartamento da chiamare. Per entrare nella procedura di programmazione fare riferimento al paragrafo Accesso alla procedura di programmazione. -
Page 33: Configurazione Modulo Di Chiamata Secondario
Impostare con la tastiera il codice identificativo (ID) del modulo principale e confermare la scelta col tasto OK. Valori ammissibili: 0÷3. Se si imposta un ID già utilizzato, quando si esce dalla modalità di configurazione e si riporta il dispositivo alla modalità di funzionamento normale viene segnalato un errore. -
Page 34: Colonne
Ogni colonna può avere fino a due moduli secondari. Impostare con la tastiera il codice identificativo (ID) del modulo secondario nella colonna e confermare la scelta col tasto OK. Valori ammissibili 0 o 1. L’eventuale segnalazione di errore dell’ID del modulo secondario è visibile solo quando si esce dalla modalità di configurazione e si riporta il dispositivo alla modalità di funzionamento normale. Le voci di menù successive sono le stesse riportate dal punto 7.3.9 fino al punto 7.3.22. - Page 35 In questa schermata è possibile modificare il nome di una colonna utilizzando la tastiera alfanumerica ed i tasti C, del menu contestuale. Per confermare la modifica premere il tasto OK . Questa schermata viene visualizzata se si cerca di inserire un nome vuoto per una colonna. Dopo circa tre secondi si ritorna automaticamente alla schermata di modifica nome colonna. Questa schermata viene visualizzata quando si cerca di assegnare alla colonna in modifica un nome già utilizzato in precedenza per un’altra colonna.
- Page 36 In questa schermata si chiede conferma per il ripristino ai valori predefiniti di tutti i nomi delle colonne memorizzate nel modulo di chiamata. Le voci di menù di secondo livello successive sono descritte ai seguenti punti: - 7.5. Apriporta - 7.6. Chiavi - 7.7. Reset DS1083-153...
-
Page 37: English (Index)
ENGLISH 1. FUNCTIONS ............................39 2. INSTALLATION ............................40 3. ELECTRIC CONNECTIONS ........................41 3.1 Description of terminals ........................41 4. VOLUME ADJUSTMENT .......................... 42 5. CALLING MODULE DESCRIPTION ....................... 42 6. PROGRAMMING ............................. 43 6.1 Menu structure ..........................43 6.2 Parameter configuration ........................ - Page 38 7.6.2. Delete ..........................64 7.6.3. Delete all ..........................65 7.7. Reset ............................65 8. BLUETOOTH PROGRAMMING ......................66 9. MAINTENANCE ............................66 10. TECHNICAL SPECIFICATIONS ......................66 11. KEY TO SYMBOLS ..........................66 12. SIMPLIFIED EU DECLARATION OF CONFORMITY ................66 APPENDIX ............................
-
Page 39: Functions
FUNCTIONS The Elekta and Elekta Steel calling module was created for flush-mounting in outdoor environments. The features of this calling module in the 2Voice two-wire system are the following: • Possibility of calling all potential system users (128 apartments on 32 risers, equal to 4096 apartments in total) by keying in a physical code or selecting the name directly (the name list can be scrolled or searched by initial). -
Page 40: Installation
INSTALLATION • Arrange the duct so that it ends at the lower hole of the flush-mounting box. • Remove the lower cap from the wire hole (1). • Apply adhesive labels on the holes for the screws of the frame (2). • Install flush-mounting box Ref. 1158/43 at indicated height (3). • Fix the frame to the flush-mounting body (4). • Establish the electric connections. • Fix the calling module to the frame (4). A L T ALTO A L T... -
Page 41: Electric Connections
ELECTRIC CONNECTIONS Refer to the information contained in the system manual for more information on wiring, maximum distances and reference wiring diagrams. Wires with cross-section area of 0.5 mm or larger must comply with IEC 60332-1-2; wires with cross section area smaller than 0.5 mm must comply with IEC 60332-2-2. -
Page 42: Volume Adjustment
VOLUME ADJUSTMENT The microphone and speaker volumes are calibrated by default and may be suitable for most installations. Use a screwdriver to adjust the corresponding potentiometer to adjust one or both volumes. CALLING MODULE DESCRIPTION Proximity key reader Keypad Dynamically configured short-cut buttons. The icon over the button indicates the available function. -
Page 43: Programming
PROGRAMMING 6.1. MENU STRUCTURE LANGUAGE CONFIGURATION NAMES GUI (*) SEMPLIFICATA DOOR OPENER PRIMARY SECONDARY KEYS MODULE TYPE RESET MULTIRISE RISE NUMBER ID PRIMARY MODULE ID SECONDARY MODULE CODE TYPE AUTOMATIC FIT (**) BUSY TIME STOPPABLE DOOR LOCK RELEASE TIME 1 OPEN DOOR 1 DOOR LOCK RELEASE TIME 2 OPEN DOOR 2... -
Page 44: Parameter Configuration
6.2. PARAMETER CONFIGURATION Program the calling module after having installed it by configuring the following parameters. 6.2.1. PARAMETERS TABLE Default Parameter Description Possible values settings Čeština, Deutsch, English, English UK, Español, Français, Language Language used on the display Italiano, Magyar, ITALIANO Nederlands, Polski, Português, Slovenš č ina. Select primary or secondary module. All system users may be called from the primary module. - Page 45 The door unit lock release type and lock output activation time. The type may be: SECRET: pressing the door opener button on Type: an apartment station will activate the door unit Type: SECRET, SECRET Door lock output only after having received a call or during FREE Door Lock 1 release type...
-
Page 46: Programming Procedure
PROGRAMMING PROCEDURE The device is programmed using a specific password-protected multiple level menu. The menu options can be scrolled and selected, together with the parameter values, by using the buttons. Press OK to confirm the selection. Press X to cancel the selection and go back to the previous menu level. To exit the configuration, press X until the home page of the calling module appears. 7.1. - Page 47 Enter the password (default password: 1000) and press OK to confirm. The page by the side will appear if the password is not correct. Wait for approximately 3 seconds before attempting to enter the password again. IMPORTANT: If you set a new password instead of the default one and loose it, ask Urmet Customer Care for a temporary password to access programming mode, read the lost password and set a new one.
-
Page 48: Language
The procedure for programming all calling module parameters is described below. Some parameters do not need to be programmed. Select only the relevant menu items if some default values are already correct or to modify only some parameters of a previously configured module;... -
Page 49: Module Type
7.3.2. buttons and press OK Then select the type of PRIMARY module with the to confirm. 7.3.3. The page shown here by the side will appear if PRIMARY calling module type is selected. Select YES for multiriser systems or NO otherwise and press OK to confirm the selection. -
Page 50: Id Secondary Module
7.3.6. Each column may have up to two secondary modules. Set the identification code (ID) of the secondary module in the riser on the keypad and press OK to confirm the selection. Permitted values: 0 or 1. Secondary module ID errors will only be shown when exiting configuration mode and returning the device to normal operating mode. -
Page 51: Stopable
7.3.10. Use the buttons to select whether auto-on without audio or an intercom conversation may be interrupted by a call from the door unit. 7.3.11. Set the release time of door lock 1 (voltage to the SE+/SE- terminals and actuation of the C-NO relay) on the keypad and press OK to confirm the selection. -
Page 52: Door Lock 2
7.3.14. buttons and press OK Select the behaviour of DOOR LOCK 2 with the to confirm. See the Parameter table for more information on FREE and SECRET mode. 7.3.15. Modify the default calling module PASSWORD by entering a new four-digit code using the keypad and pressing the OK button to confirm. Press X to cancel an incorrect digit. -
Page 53: Multitouch Call
7.3.18. Enter the physical code of the extension where to route the call generated by pressing at least three buttons at the same time (multitouch or emergency call) if the system is not provided with concierge switchboard or if this is present but configured in NIGHT mode. -
Page 54: Date And Time
Select the CONTINENT where the system is installed with the buttons and press OK to confirm. buttons and press OK to confirm. Select the COUNTRY with the The page shown by the side will appear if there are multiple time zones in the selected country. buttons and press OK Select the required REGION (time zone) with the to confirm. -
Page 55: Postman
The DAY of the week corresponding to the set day will appear on the following page. Press OK to proceed with the configuration. The day corresponding to the set date will be restored in all cases after confirming if the day of the week is changed. 7.3.22. -
Page 56: Vocal Synthesis
The start and end time of the service will appear if the postman function was enabled for the day. Set the start time and then the end time in hh:mm format using the keypad (permitted values: 00:00 ÷ 23:59). Press OK to confirm. Press C on the short-cut menu to delete the entered number if you make a mistake. -
Page 57: Switchboard
7.3.24. The function is available only if the calling module was configured as PRIMARY. Select YES with the buttons if a SWITCHBOARD is present in the system and press OK to confirm. 7.4. NAMES The second level NAMES menu is used to add new names, edit existing names, and to delete one or all names from the database. - Page 58 The page by the side will appear if name already exists and the keypad will be deactivated. The previous page with the field empty will appear after approximately three seconds. Combine the PHYSICAL CODE which identifies the apartment to the newly entered name. The physical code is five digit long (XXYYY), where: •...
- Page 59 The page shown here by the side will appear if the module is configured to use logical codes (see Configuration paragraph). Combine the LOGICAL CODE which identifies the apartment. The code is formed by a number up to four digits long (permitted values: 1 ÷ 9999). The same code may be allocated to different names, providing they share the same physical code. Two different logical codes may be allocated to different names which share the same physical code. Set the logical code using the keypad and press OK to confirm. Press C on the short-cut menu to enter the digit to the left of the cursor if you make a mistake.
-
Page 60: Modify
7.4.2. Modify To edit a name or the parameters paired to it, select the name to be edited buttons and press OK to confirm. using the The procedure is the same as that described for adding new names: the stored values will be shown for each parameter. Press OK to confirm directly or edit as needed. 7.4.3. Delete To delete a name and the parameters paired to it (physical code, logical codes and door codes), select the name to be edited using the buttons and press OK to confirm. -
Page 61: Door Opener
7.5. DOOR OPENER The second level DOOR OPENER code can be used to configure up to 100 door codes which are not linked to any name or physical code. These codes may be used by maintenance personnel, for instance. The menu can be used to add new codes, edit exiting codes and delete one or all codes from the database. -
Page 62: Modify
The page shown here by the side will appear and the keypad will be deactivated for approximately three seconds if the code length is incorrect. The new code will be added to the database and the system will go back to the DOOR OPENER menu. 7.5.2. -
Page 63: Delete All
7.5.4. Delete all Press OK to delete all door codes or press X to cancel the operation. IMPORTANT: The deletion operation cannot be undone. 7.6. PROXIMITY KEYS The second level KEYS menu can be used to acquire new proximity keys and delete one or all keys acquired by the calling module. -
Page 64: Delete
At the end, press OK to exit the acquisition step and go back to the previous menu. The page shown here by the side will appear and the keypad will be deactivated for approximately three seconds if the key has already been acquired. 7.6.2. -
Page 65: Delete All
7.6.3. Delete all Press OK to delete all proximity keys or press X to cancel the operation. IMPORTANT: The deletion operation cannot be undone. 7.7. RESET The second level RESET menu can be used to restore the default settings (configuration parameters only, i.e. -
Page 66: Bluetooth Programming
BLUETOOTH PROGRAMMING The calling module can be programmed directly or alternatively using a personal computer (PC) or a portable device (tablet or mobile phone) with Bluetooth interface and dedicated software. The software may be downloaded from Download\Software section of the www.urmet.com website. Instructions on how to program via Bluetooth and the respective procedures are illustrated in the instruction booklet provided with the software. -
Page 67: Appendix
APPENDIX 13. PROGRAMMING AND USE OF THE SIMPLIFIED GUI Simplified GUI is used to select to use a very simple user interface (GUI) allowing the user to select one or more columns (or blocks) in the system and enter the number of the apartment to be called. To enter the programming procedure, see paragraph Access to programming procedure. To change the language of the calling module, see paragraph Language. 13.1 CONFIGURATION OF PRIMARY CALLING MODULE Select CONFIGURATION on the main menu. -
Page 68: Configuration Of Secondary Calling Module
Set the identification code (ID) of the primary module on the keypad and press OK. to confirm the selection. Admissible values: 0÷3 An error will appear when exiting configuration mode and returning the device to normal operating mode if a previously used ID is set. The next items on the menu are the same ones found in points 8.3.9 to 8.3.22. 13.2. -
Page 69: Blocks
Each column may have up to two secondary modules. Set the identification code (ID) of the secondary module in the riser on the keypad and press OK to confirm the selection. Permitted values: 0 or 1. Secondary module ID errors will only be shown when exiting configuration mode and returning the device to normal operating mode. - Page 70 This page can be used to edit the name of a block by using the alphanumeric keyboard and the C, buttons in the shortcut menu. Press the OK button to confirm the change. This page appears if an attempt is made to enter an empty name for a block. The system will automatically go back to the block modify page after approximately three seconds This page appears if an attempt to assign a name which was previously used...
- Page 71 This screen prompts to confirm to reset all the default names of blocks stored in the calling module. The items on the next second level menu are described in the following points: - 7.5. Door opener - 7.6. Keys - 7.7. Reset DS1083-153...
- Page 72 ITALIANO DIRETTIVA 2012/19/UE DEL PARLAMENTO EUROPEO E DEL CONSIGLIO del 4 luglio 2012 sui rifiuti di apparecchiature elettriche ed elettroniche (RAEE) Il simbolo del cassonetto barrato riportato sull’apparecchiatura o sulla sua confezione indica che il prodotto alla fine della propria vita utile deve essere raccolto separatamente dagli altri rifiuti. L’utente dovrà, pertanto, conferire l’apparecchiatura giunta a fine vita agli idonei centri comunali di raccolta differenziata dei rifiuti elettrotecnici ed elettronici. In alternativa alla gestione autonoma è possibile consegnare l’apparecchiatura che si desidera smaltire al rivenditore, al momento dell’acquisto di una nuova apparecchiatura di tipo equivalente.
Need help?
Do you have a question about the 2 VOICE ELEKTA and is the answer not in the manual?
Questions and answers