
Related Manuals for Rollei LUX 60 RGB


Summary of Contents for Rollei LUX 60 RGB
- Page 1 LUX 60 RGB Ultra-kompaktes COB-Dauerlicht Ultra-Compact COB Continuous Light Anleitung auf Deutsch Manual in English www.rollei.de...
-
Page 2: Table Of Contents
Inhalt Vor dem ersten Gebrauch . . . . . . . . . . . . . . . . . . . . . . . . 4 Bestimmungsgemäßer Gebrauch . - Page 3 Content Before the First Use . . . . . . . . . . . . . . . . . . . . . . . . . . . . 24 Intended Use .
-
Page 4: Vor Dem Ersten Gebrauch
Vor dem ersten Gebrauch Lesen Sie vor dem ersten Gebrauch die Bedienungsanleitung und die Sicherheitshinweise aufmerksam durch . Bewahren Sie die Bedienungsanleitung zusammen mit dem Gerät für den späteren Gebrauch auf . Sollten andere Personen dieses Gerät nutzen, so stellen Sie ihnen diese Anleitung zur Verfügung . Wenn Sie das Gerät an Dritte weitergeben, gehört diese Anleitung zum Gerät und muss mitgeliefert werden . -
Page 5: Zeichenerklärung
Zeichenerklärung Die folgenden Symbole werden in dieser Bedienungsanleitung, auf dem COB-Dauerlicht, seinem Zubehör oder auf der Verpackung verwendet . Mit diesem Symbol gekennzeichnete Produkte erfüllen alle maßgeblichen Gemeinschaftsvorschriften des Europäi- schen Wirtschaftsraums . Mit diesem Zeichen gekennzeichnete Produkte werden mit Gleichstrom betrieben . -
Page 6: Sicherheitshinweise
Sicherheitshinweise Gefahr durch elektrischen Strom! Fehlerhafte elektrische Installationen oder eine übermäßige Netz- spannung können Stromschlag verursachen . – Schließen Sie das Produkt nur dann an, wenn die Netzspannung der Steckdose mit den Angaben auf dem Typenschild überein- stimmt . – Das Produkt an eine leicht zugängliche Steckdose anschließen, damit Sie es bei Problemen schnell vom Netz trennen können . - Page 7 Sicherheitshinweise – Bevor Sie die Strom- oder Akkuverbindung trennen, schalten Sie das Gerät am Hauptschalter aus . – Sorgen Sie für ausreichende Belüftung während des Betriebs . Das Geräts niemals abdecken . – Verwenden Sie das Gerät nur mit geeigneten, hochwertigen Li-Ion-Akkus vom Typ NP-F sowie V-Mount-Akkus mit max .
- Page 8 Sicherheitshinweise Achtung! Gefahr für Kinder und Personen mit eingeschränkten physi- schen, sensorischen oder geistigen Fähigkeiten (z. B. teilweise Behinderte, ältere Personen mit eingeschränkten körperlichen und geistigen Fähigkeiten) oder mangelnder Erfahrung und Know-how (z. B. ältere Kinder). – Dieses Produkt kann von Personen mit eingeschränkten physi- schen, sensorischen oder geistigen Fähigkeiten oder mangelnder Erfahrung und Know-how benutzt werden, sofern diese beauf- sichtigt werden oder eine Anleitung zur sicheren Verwendung...
-
Page 9: Lieferumfang
Lieferumfang – LUX 60 RGB – Reflektor – Netzteil – Kabel (1,80 m) – Schutzkappe – Diffusor-Ball – Bedienungsanleitung... -
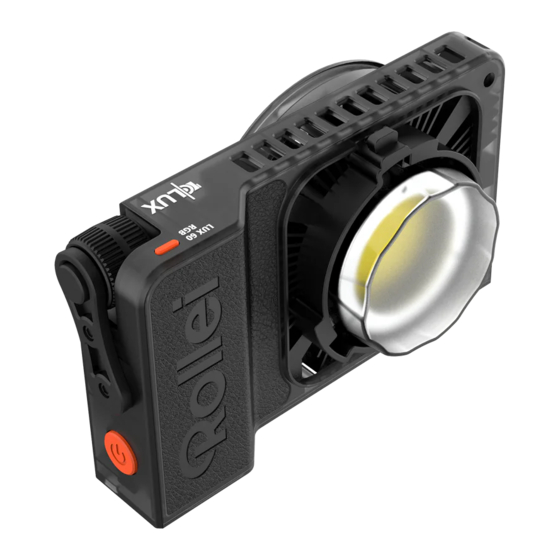
Page 10: Übersicht
Übersicht Ein-/Ausschalter 1/4“-Anschluss Einstelltaste für Drahtlos- Einstellrad Verbindung OLED-Bildschirm LUX-Mount-Entriegelungs- Lufteinlass taste Einstellrad COB-LED Batterie-Anschluss* LUX-Mount USB-C-Anschluss NFC-Erkennungsbereich DC-Anschluss *Aktuell ohne Funktion . DEUTSCH... -
Page 11: Aufbau Und Kombinationsmöglichkeiten
Aufbau und Kombinationsmöglichkeiten zusätzliches Equipment Entfernen der Schutzkappe – Drücken Sie die LUX-Mount-Entriegelungstaste [3] und drehen Sie die Schutzkappe gegen den Uhrzeigersinn, um sie zu entfernen . Hinweis: Achten Sie darauf, die Schutzabdeckung und die Schutzfolie vor der Verwendung zu entfernen . Montage und Demontage des Reflektors –... - Page 12 Aufbau und Kombinationsmöglichkeiten zusätzliches Equipment Anschluss Netzteil oder USB-C-Kabel – Schließen Sie den Netzadapter an den DC-Anschluss [14] . Achten Sie darauf, den Netzadapter nicht in der Luft hängen zu lassen . Verwenden Sie den Drahtring, um den Netz adapter am Lampenstativ zu befestigen .
-
Page 13: Bedienung
Bedienung Schutzfolien entfernen: Vor der ersten Inbetriebnah- me des COB-Dauerlichts entfernen Sie die Schutzfolien, die sich auf dem Gerät und dem Display befinden . Schutzkappe abnehmen: Entfernen Sie die Schutz- kappe des COB-Dauerlichts vor jedem Gebrauch, bevor Sie das Gerät einschalten . Beachten Sie diese Schritte, um eine ordnungsgemäße und sichere Nutzung des COB-Dauerlichts zu gewährleisten . - Page 14 Bedienung 4. Einstellen der Helligkeit – Drehen Sie das Einstellrad [8], um die Helligkeit zwischen 0 und 100 % einzu stellen . – Drücken Sie kurz auf das Einstellrad [8, um eine voreingestellte Helligkeit auszuwählen (0 %, 25 %, 50 %, 75 %, 100 %) . 5.
- Page 15 Bedienung App-Verbindungsstatus-Symbol 2,4-GHz-Steuermodus: Verfügbar für die Steuerung über die Fernbedienung für Candela/Lux . App-Steuermodus: Verfügbar für die Steuerung über die Candela/Lux LED App . Lüfter-Symbol Intelligenter Modus (SMART): Das COB-Dauerlicht passt die Geschwindigkeit des Lüfters entsprechend der im Inneren des COB-Dauerlichts gemessenen Tempera tur einer optimalen Arbeitstemperatur an .
-
Page 16: Verbinden Mit Der App
Verbinden mit der App 1 . Laden Sie die Candela/Lux LED-App direkt aus dem App Store herunter (iOS 9 .0 oder höher) . Aus technischen Gründen ist die App zur Zeit nur für iOS verfügbar . 2 . Aktivieren Sie Bluetooth * auf Ihrem Smartphone . - Page 17 Verbinden mit der App 6 . Klicken Sie auf „Gerät hinzufügen“, danach auf „Neues Gerät“ .
- Page 18 Verbinden mit der App 7 . Wählen Sie das gewünschte Licht aus und klicken Sie auf „Zur Szene hinzufügen“ . 8 . Sollte eine Verbindung nicht sofort zu Stande kommen, wählen Sie erneut das Gerät wie in Schritten 6 und 7 beschrieben aus und drücken Sie parallel die Einstelltaste für Drahtlos-Verbindung [2] am Gerät .
- Page 19 Verbinden mit der App Hier können Sie die App downloaden: Erhältlich im Eine ausführliche Anleitung zur Verbindung mit der App finden Sie in unserem Download-Center .
-
Page 20: Technische Daten
Technische Daten Anzahl LEDs 1 (COB-LED) Leistung LED 60,0 W Energieeffizienzklasse (EU 2017/1369) EU-Energieeffizienz- A – G klasse-Spektrum (EU 2017/1369) Farbtemperatur 2 .700 – 6 .500 K Farbwiedergabeindex (CRI) Television Lighting Consistency Index (TLCI) TN-30-18 Rf 95 / Rg 104 Leistungsregelung 0 –... - Page 21 Änderungen von technischen Daten bleiben vorbehalten und bedürfen keiner Ankündigung . *Die Bluetooth -Wortmarke und Logos sind eingetragene Warenzeichen der ® Bluetooth SIG, Inc . und die Verwendung dieser Marken durch Rollei erfolgt unter Lizenz . Andere Warenzeichen und Handelsnamen sind Eigentum ihrer jeweiligen Inhaber .
-
Page 22: Entsorgung
Entsorgung Entsorgen Sie die Verpackung sortenrein. Nutzen Sie dafür die örtlichen Möglichkeiten zum Sammeln von Papier, Pappe und leichten Verpackungen (anwendbar in der Europäischen Union und anderen europäischen Staaten mit Systemen zur getrennten Sammlung von Wertstoffen) . Geräte, die mit diesem Symbol gekennzeichnet sind, dürfen nicht mit dem Hausmüll entsorgt werden! Sie sind gesetzlich dazu verpflichtet, Altgeräte getrennt vom Hausmüll zu entsorgen . -
Page 23: Konformität
Konformität Hiermit erklärt die Rollei GmbH & Co . KG, dass der Funkanlagentyp „Rollei LUX 60 RGB“ der Richtlinie 2014/53/EU entspricht . Der vollständige Text der EU-Konformitätserklärung ist unter der folgenden Internetadresse verfügbar: www .rollei .de/egk/lux60rgb Rollei GmbH & Co . KG... -
Page 24: Before The First Use
Before the First Use Read the operating instructions and the safety instructions carefully before using the device for the first time . Keep the operating instructions together with the device for future use . If you pass on the device to a third party, this manual is part of the device and must be supplied with the device . -
Page 25: Explanation Of Symbols
Explanation of Symbols The following symbols are used in these operating instructions, on the COB continuous light, its accessories or on the packaging . Products marked with this symbol comply with all relevant community regulations of the European Economic Area . Products marked with this symbol are operated with direct current . -
Page 26: Safety Instructions
Safety Instructions Danger due to electric current! Faulty electrical installations or excessive mains voltage can cause electric shock . – Only connect the product if the mains voltage of the socket corresponds to the information on the rating plate . –... - Page 27 Safety Instructions – Do not use or store the unit at high temperatures or in closed rooms with direct sunlight and do not charge the batteries during this time . The product should not be used at ambient temperatu- res above 40° C . –...
- Page 28 Safety Instructions – This product can be used by persons with reduced physical, sensory or mental capabilities or lack of experience and know- how if they have been given supervision or instruction concerning use of the product in a safe way and understand the potential hazards arising from its use .
-
Page 29: Box Content
Box Content – LUX 60 RGB – Reflector – Power supply unit – Cable – Protective cap – Diffusor ball – User manual... -
Page 30: Overview
Overview On/off switch 1/4“ connection Setting button for wireless Adjustment wheel connection OLED screen LUX mount release button Air inlet COB LED Adjustment wheel LUX-Mount Battery connection* NFC detection area USB-C port DC connector *Currently without function . ENGLISH... -
Page 31: Structure And Possible Combinations
Structure and Possible Combinations Additional Equipment Removing the protective cap – Press the LUX mount release button [3] and turn the protective cap anti-clockwise to remove it . Note: Make sure to remove the protective cover and the protecti- ve film before use . Fitting and removing the reflector –... - Page 32 Structure and Possible Combinations Additional Equipment Connecting the mains adapter or USB-C cable – Connect the mains adapter to the DC connection [14] . Take care not to leave the mains adapter hanging in the air . Use the wire ring to attach the mains adapter to the lamp tripod .
-
Page 33: Operation
Operation Remove the protective film: Before using the COB permanent light for the first time, remove the protective film from the device and the display . Remove the protective cap: Remove the protective cap from the COB permanent light before each use, before switching on the device . - Page 34 Operation 4. Adjusting the brightness – Turn the adjustment dial [8] to set the brightness between 0 and 100 % . – Briefly press the adjustment dial [8] to select a preset brightness (0 %, 25 %, 50 %, 75 %, 100 %) . 5.
- Page 35 Operation App connection status symbol 2.4 GHz control mode: Available for control via the remote control for Candela/Lux . App control mode: Available for control via the Candela/Lux LED app . Fan symbol Intelligent mode (SMART): The COB continuous light adjusts the speed of the fan to an optimum working temperature according to the temperature mea- sured inside the COB continuous light .
-
Page 36: Connect With The App
Connect with the App 1 . Download the Candela/Lux LED app directly from the App Store (iOS 9 .0 or higher) . For technical reasons, the app is currently only available for iOS . 2 . Activate Bluetooth * on your smartphone . ®... - Page 37 Connect with the App 6 . Click ”Add Device“, then click ”New Device“ .
- Page 38 Connect with the App 7 . Select the desired light and click on ”Add to scene“ . 8 . If a connection is not established immediately, select the device again as described in steps 6 and 7 and press the wireless connec- tion setting button [2] on the device at the same time .
- Page 39 Connect with the App You can download the app here: Download on the You can find detailed instructions on how to connect to the app in our download centre .
-
Page 40: Technical Data
Technical Data Number of LEDs 1 (COB LED) LED output 60,0 W Energy efficiency class (EU 2017/1369) EU energy efficiency class A – G spectrum (EU 2017/1369) Colour temperature 2,700 – 6,500 K Colour rendering index (CRI) Television Lighting Consistency Index (TLCI) TN-30-18 Rf 95 / Rg 104 Power control... - Page 41 *The Bluetooth word mark and logos are registered trademarks of the Bluetooth ® SIG, Inc . and any use of such marks by Rollei is under licence . Other trademarks and trade names are the property of their respective owners .
-
Page 42: Disposal
Disposal Dispose of the packaging according to its type. Use the local possibilities for collecting paper, cardboard and other materials (applicable in the European Union and other European countries with systems for the separate collection of recyclable materials) . Devices that are marked with this symbol must not be disposed of with household waste! You are legally obliged to dispose of old devices separately from to dispose of household waste . -
Page 43: Conformity
Conformity Rollei GmbH & Co . KG hereby declares that the radio equipment type ”Rollei LUX 60 RGB“ is in compliance with Directive 2014/53/EU . The full text of the EU declaration of conformity is available at the following internet address: www .rollei .com/egk/lux60rgb... - Page 44 Rollei GmbH & Co. KG In de Tarpen 42 D-22848 Norderstedt Service Hotline: +49 40 270750277 /rollei.foto.de @rollei_de Item No.: 20184 www.rollei.de...
Need help?
Do you have a question about the LUX 60 RGB and is the answer not in the manual?
Questions and answers