Table of Contents
Advertisement
Quick Links
Advertisement
Table of Contents

Related Manuals for Drucker Diagnostics Horizon 6 DC


Summary of Contents for Drucker Diagnostics Horizon 6 DC
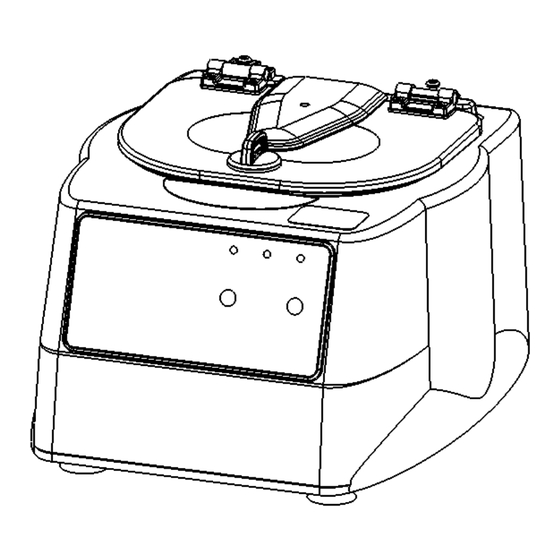
- Page 1 200 Shadylane Drive Philipsburg, PA 16866 Phone: +1 (814) 692-7661 or +1 (866) 265-1486 Fax: +1 (814) 692-7662 www.druckerdiagnostics.com Service Manual Model Horizon 6 (DC) Centrifuge DRUCKER DIAGNOSTICS SM032 MODEL Horizon 6 (DC) SERVICE MANUAL REV: A...
-
Page 2: Table Of Contents
GENERAL DESCRIPTION OF MAJOR COMPONENTS ................. 3 WARRANTY INFORMATION ......................3 SPECIFICATIONS ..........................3 TROUBLESHOOTING ......................... 4 SERVICE INSTRUCTIONS ........................5 ASSEMBLY DRAWINGS ........................9 REVISION HISTORY .......................... 13 DRUCKER DIAGNOSTICS SM032 MODEL Horizon 6 (DC) SERVICE MANUAL REV: A... -
Page 3: Preface
Failure to follow the procedures in this document may result in personal injury or instrument damage. Drucker Diagnostics will not be held liable for any injury or damage as a result of improper servicing. -
Page 4: Troubleshooting
Tighten rotor screw. PROBLEM POSSIBLE CAUSE SOLUTION Debris in air intake / exhaust ports Remove power before clearing debris. Whistling noise while running Gasket failure Requires service. Gasket failure Requires service. DRUCKER DIAGNOSTICS SM032 MODEL Horizon 6 (DC) SERVICE MANUAL REV: A... -
Page 5: Service Instructions
Use a #2 Phillips screwdriver to remove the cabinet screws (three on the back, six on the underside). d) The centrifuge control panel is attached to the base internally with cable harnesses. Be careful not to stress the cables when removing the cabinet. DRUCKER DIAGNOSTICS SM032 MODEL Horizon 6 (DC) SERVICE MANUAL REV: A... - Page 6 The rotor is held in place with the rotor screw and washer. c) Use a 1/8” hex driver to remove the center rotor screw and washer (turn counter- clockwise). DRUCKER DIAGNOSTICS SM032 MODEL Horizon 6 (DC) SERVICE MANUAL REV: A...
- Page 7 Fasten the guard bowl to the base with six #8 thread cutting screws. l) Install the exhaust air cover with three #8 screws and washers. m) Secure the wire harnesses to the base assembly with zip ties. DRUCKER DIAGNOSTICS SM032 MODEL Horizon 6 (DC) SERVICE MANUAL...
- Page 8 Carefully place the cabinet onto the base taking care not to pinch any wires between the two. f) Complete the assembly by replacing the nine screws using a #2 Phillips screwdriver. DRUCKER DIAGNOSTICS SM032 MODEL Horizon 6 (DC) SERVICE MANUAL...
-
Page 9: Assembly Drawings
7 ASSEMBLY DRAWINGS 7.1 FINAL CENTRIFUGE ASSEMBLY 7.1.1 Reference drawing 01-176-109-000 DRUCKER DIAGNOSTICS SM032 MODEL Horizon 6 (DC) SERVICE MANUAL REV: A... - Page 10 7.2 CABINET ASSEMBLY 7.2.1 Reference drawing 02-002-0-0151 DRUCKER DIAGNOSTICS SM032 MODEL Horizon 6 (DC) SERVICE MANUAL REV: A...
- Page 11 7.3 LOWER ASSEMBLY 7.3.1 Reference drawing 02-003-0-0138 DRUCKER DIAGNOSTICS SM032 MODEL Horizon 6 (DC) SERVICE MANUAL REV: A...
- Page 12 7.4 MOTOR ASSEMBLY 7.4.1 Reference drawing 02-005-1-0010 DRUCKER DIAGNOSTICS SM032 MODEL Horizon 6 (DC) SERVICE MANUAL REV: A...
-
Page 13: Revision History
8 REVISION HISTORY Revision # Date Details of Change Original Issue - DR-xxxx DRUCKER DIAGNOSTICS SM032 MODEL Horizon 6 (DC) SERVICE MANUAL REV: A...
Need help?
Do you have a question about the Horizon 6 DC and is the answer not in the manual?
Questions and answers