Table of Contents
Advertisement
Quick Links
Advertisement
Table of Contents

Subscribe to Our Youtube Channel
Related Manuals for Drucker Diagnostics 642M


Summary of Contents for Drucker Diagnostics 642M
- Page 1 642M Operator’s Manual P/N 03-0-0002-0104 Rev. I...
- Page 2 [This page intentionally left blank]...
-
Page 3: Table Of Contents
TABLE OF CONTENTS Model Description ..................1 Intended Use: ....................1 Supplied Equipment ..................2 Features ....................... 2 General Specifications ................. 3 Initial Setup Procedure ................3 Control Panel ....................5 Verifying The Preset Time ................6 Changing The Preset Time ................6 Operation ..................... - Page 4 [This page intentionally left blank]...
-
Page 5: Model Description
(10) minutes, for precise spin times and ease of use. Samples can be safely viewed through the transparent lid. Entry into the machine is restricted during operation by the safety interlock system. The Model 642M features a lighted control panel that displays the status of the machine, easily viewable from a distance. -
Page 6: Supplied Equipment
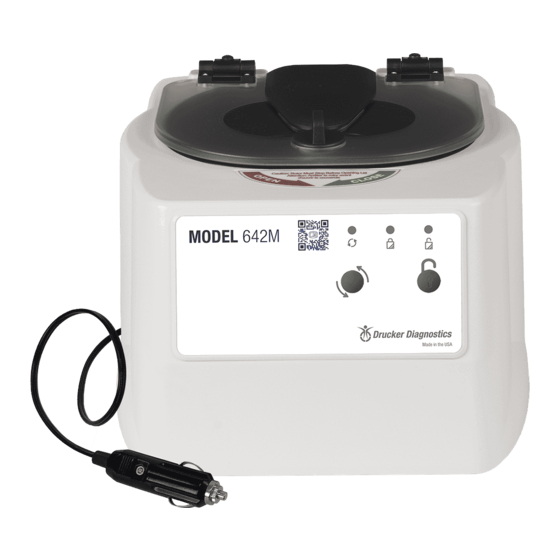
Electronically controlled timed operation (see pg. 8) • Push-button operation • Indicator lights: Color Status ‘RUNNING’ Green Power is applied to the motor ‘LATCHED’ Yellow Lid is closed and latched ‘UNLOCKED’ Lock system is deactivated Drucker Diagnostics +1-814-692-7761 - CustomerService@DruckerDiagnostics.com Page | 2... -
Page 7: General Specifications
5. Place the six test tube holders inside the rotor (as shown to the right), and verify that they are seated properly. 6. Close the lid. Rotate the lid knob clockwise to its complete stop position. The ’LATCHED’ indicator light should be illuminated. If it is Drucker Diagnostics +1-814-692-7761 - CustomerService@DruckerDiagnostics.com Page | 3... - Page 8 Power may be cut to the motor but you should be unable to fully turn the latch. If it is possible to turn the latch and open the lid while the unit is running, contact Drucker Diagnostics for assistance. Close and latch the lid.
-
Page 9: Control Panel
Circuit Breaker: The Model 642M is protected with a 4 Amp circuit breaker located at the rear of the machine mounted to the base. Any electrical short circuit will cause the breaker to cut power to the machine. -
Page 10: Verifying The Preset Time
10. The green START indicator light will flash each time you press the start button. When you are finished, press the ‘OPEN’ button to exit. Use the above procedure to verify the run time and brake setting change. Drucker Diagnostics +1-814-692-7761 - CustomerService@DruckerDiagnostics.com Page | 6... -
Page 11: Operation
13. To gain entry into the centrifuge after this period has ended, simply press the OPEN/STOP button. The lid will unlock for fifteen (15) additional seconds. Drucker Diagnostics +1-814-692-7761 - CustomerService@DruckerDiagnostics.com Page | 7... -
Page 12: Spinning Balanced Loads
See page 5 for this procedure. Drucker Diagnostics +1-814-692-7761 - CustomerService@DruckerDiagnostics.com Page | 8... -
Page 13: Care And Preventative Maintenance
2. Always Spin Balanced Loads: Make certain that you are always spinning a balanced load. The Model 642M has a unique counter balanced motor mounting design which, along with its rubber suction feet, produces excellent vibration dampening. -
Page 14: Cleaning And Disinfection
Before transporting the centrifuge in a vehicle; make certain that the centrifuge is secured sufficiently to prevent shifting sliding or rolling, and that there are no tube holders or accessories in the rotor or rotor chamber. Drucker Diagnostics +1-814-692-7761 - CustomerService@DruckerDiagnostics.com Page | 10... -
Page 15: Troubleshooting
The latch makes contact with a switch underneath the front top of the cabinet. If this switch is not activated, the light will not turn on and the machine will not run. Drucker Diagnostics +1-814-692-7761 - CustomerService@DruckerDiagnostics.com Page | 11... - Page 16 Rotor speed is lower than Rotor speed is calibrated at specified range 13.8VDC. Confirm source voltage meets or exceed this value. Motor speed will vary according to source voltage. Drucker Diagnostics +1-814-692-7761 - CustomerService@DruckerDiagnostics.com Page | 12...
-
Page 17: Emergency Rotor Chamber Entry
• Do not operate the centrifuge in a moving automobile. Lid Safety Switch: The Model 642M lid is secured to the top of the cabinet by a latching knob and pawl system. When the knob is rotated clockwise, the pawl grips the underside of the cabinet opening and prevents the lid from opening. - Page 18 Lid Safety Interlock System: In addition to the Lid Safety Switch, the Model 642M has a true “0 RPM” lid locking system. The lid safety locking system keeps the lid locked at all times, (even during power failure), and requires that the rotor be at rest in order to unlock the lid.
-
Page 19: Replacement Parts
1.5 to 2 mL Tube SmartView™ Adapter Adapter Platform p/n 7713068 p/n 7713065 p/n 00-079-009-001 ARRANTY Drucker Diagnostics warranties that this centrifuge is free from defects in workmanship and parts for 2 years. Drucker Diagnostics +1-814-692-7761 - CustomerService@DruckerDiagnostics.com Page | 15... - Page 20 FDA LISTED RoHS Compliant INSTRUCTIONS FOR DISPOSAL OF WEEE BY USERS IN THE EUROPEAN UNION This product must not be disposed of with other waste. Instead, it is the user’s responsibility to dispose of their waste equipment by handing it over to a designated collection point for the recycling of waste electrical and electronic equipment.
Need help?
Do you have a question about the 642M and is the answer not in the manual?
Questions and answers