Advertisement
Quick Links
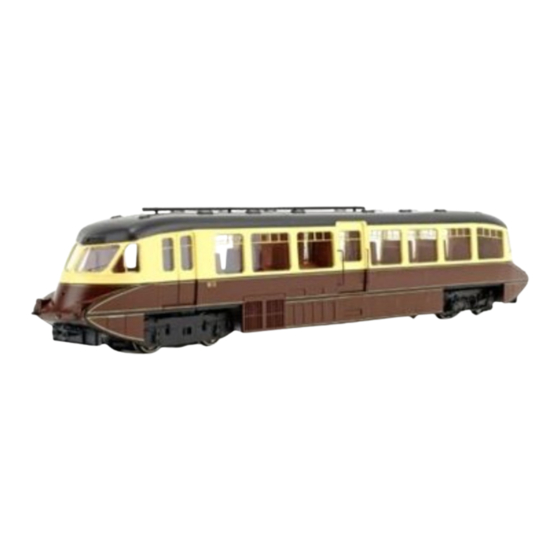
Dapol OO gauge GWR Railcar
We'd like to thank you for purchasing this Dapol product. This owners guide is
applicable to all versions of this locomotive.
In addition to this sheet please check that you have the following items within the packaging.
a) Dapol 'No Quibble' warranty sheet
b) Accessory pack containing three lamps and lamp brackets (2 x spare)
Quick start:
by DC operation (Ref: Section 4a. the model configured for DC operation). For factory fitted DCC
operation please refer to section 4b. N.B. Factory fitted DCC models will operate on DC or DCC.
Running in / First use:
1.
been designed with care and appropriate materials to offer many years of service with minimal maintenance. However,
we suggest that before you operate your model for an extended time, you first run it in both directions at a low speed
whilst checking for correct operation. This operation can be performed using either DC or DCC (after fitment of a
decoder – Ref: Section 5)
Dummy lamp and lamp brackets:
2.
for use with later era models (those fitted with front steps). By fitting these either end can
be chosen as the leading cab. Fit the dummy lamp bracket to the rear. Spare lamps and
lamp brackets have been included in case of loss.
Removing the body:
3.
the central doors.
a. Holding over a flat surface gently pull the body apart at the indentations in the chassis.
b. The chassis will drop away from the body.
c. There is no need to be concerned about wires, as no electrical parts are attached to the bodyshell.
Lighting operation:
4.
a.
DC/Analogue: Front and rear lights will operate directionally (single red at rear and dual white lamps at front).
Additionally, four (numbered) switches are located on the lighting bar at the guard's end) are provided to operate
the following features and are accessible after removal of the bodyshell (Ref: Section 3):
• Switch 1: White front running lamps (On/Off)
• Switch 2: Express mode (Lower buffer beam lamps and top centre lamp on, when off, only top centre map is on)
• Switch 3: Rear Cab light (On when leading or Off)
• Switch 4: Interior lights (On/OFF)
To adjust the switches, use a fine bladed cross head screwdriver or similar tool to move the switch. Do not use a
pencil as the 'lead' is conductive and may break leading to short circuits.
b. DCC: After fitting a DCC decoder (unless factory fitted) lighting features can be controlled remotely via your DCC
handset (If not factory fitted DCC, functions listed will be dependent upon the configuration of your chosen decoder)
•
F0 Front/Rear directional running lamps (On/Off)
•
F1 Leading cab light (On when leading or Off)
•
F2 Interior lights (On/Off)
This model can be controlled with either a 21 pin DCC decoder (fitting Ref: Section 5) or
No special running in or initial lubrication is required, our new generation models have
Push fit dummy lamps and brackets are provided
The body is held to the chassis by 2 clips located in the centre of
Depending on DC or DCC operation lighting features are controllable by switch or decoder.
Owners guide
GWR Railcar OO information sheet. V 1.0 17-12-2015
Advertisement

Related Manuals for DAPOL OO gauge GWR Railcar


Summary of Contents for DAPOL OO gauge GWR Railcar
- Page 1 Owners guide Dapol OO gauge GWR Railcar We’d like to thank you for purchasing this Dapol product. This owners guide is applicable to all versions of this locomotive. In addition to this sheet please check that you have the following items within the packaging.
- Page 2 Owners guide Dapol OO gauge GWR Railcar Fitting a DCC decoder: This model accepts a standard 21 pin NMRA DCC Decoder with a minimum of 3 functions. Regardless of the decoder type, the basic fitting remains the same, however, if you are fitting a sound decoder, instructions on installing a speaker are shown as optional steps below.
Need help?
Do you have a question about the OO gauge GWR Railcar and is the answer not in the manual?
Questions and answers