
Subscribe to Our Youtube Channel
Related Manuals for Leviton EV Series


Summary of Contents for Leviton EV Series
- Page 1 EV Series Plug-In Charger - 40 AMP Cat. Nos. EV40P Installation Manual PK-A3503-10-00-5A...
-
Page 3: Table Of Contents
TABLE OF CONTENTS 1 Warnings ............................4 Safety and Specifications ......................5 3 Tools Needed ..........................6 Basic Interface ..........................7 Dimensions ............................8 Status Light Key ..........................9 Installation ............................ 10 Operating Instructions ........................ 11 Error and Warning Messages ...................... 14 10 Maintenance and Repair ......................15 11 STANDARD STATEMENTS AND WARRANTY ................ -
Page 4: Warnings
1 WARNINGS Safety Instructions WARNINGS: • TO AVOID FIRE, SHOCK, DEATH, OR DAMAGE TO THE CHARGER, carefully read the charging instructions in your vehicle’s manual before charging and heed the following warnings: • TO AVOID INJURY OR DEATH: • DO NOT put fingers into the electric vehicle connector. •... -
Page 5: Safety And Specifications
2 SAFETY AND SPECIFICATIONS Design Safety Standards UL2594: Electric Vehicle Supply Equipment UL 2231-1: Personnel Protection Systems for Electric Vehicle (EV) Supply Circuits: General Requirements UL 2231-2: Personnel Protection Systems for Electric Vehicle (EV) Supply Circuits: Particular Requirements for Protection Devices for Use in Charging Systems UL 2251: Plugs, Receptacles and Couplers for Electric Vehicles UL 62: Flexible Cords and Cables UL 991: Tests for Safety-Related Controls Employing Solid-State Devices... -
Page 6: Tools Needed
3 TOOLS NEEDED Tools required: • Wire stripper • Adjustable Wrench M6 • Voltmeter or digital multimeter (for measuring AC voltage at the installation site) • Level • Pencil or marker • Drill Contents Included: Product Name Quantity Description AC Charger With attached input power cable and output charging cable. -
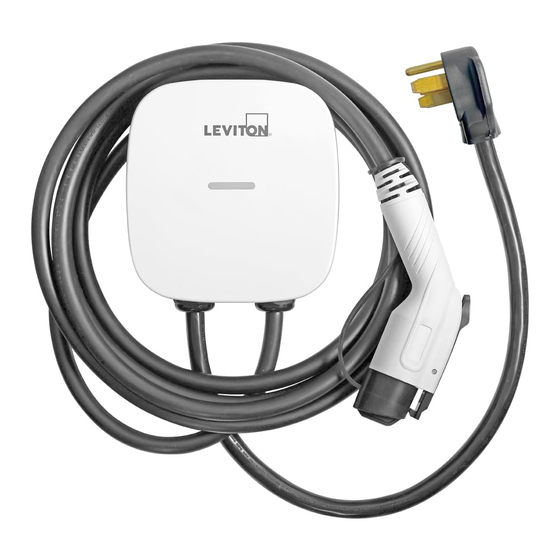
Page 7: Basic Interface
4 BASIC INTERFACE EV40P Rear Notch LED Light Indication RFID Card Reader NEMA 14-50Plug SAE J1772 AC Charging Charging Cable Connector... -
Page 8: Dimensions
5 DIMENSIONS Enclosure 3.65 in. 8.23 in. 8.63 in. 8.63 in. 3.65 in. 8.23 in. Wall-Mounted Bracket 3.15 in. 4-Φ0.35 in. 2.36 in. -
Page 9: Status Light Key
6 STATUS LIGHT KEY 6.1 Status Description of the Charger Indication Light Status of Charger Indication Light Standby - Blue Light The READY light stays steady in standby mode. Blue Light Waiting for Charge - Green Light After the vehicle connector is connected to the vehicle inlet, the CHARGE light is Green Light constantly lit. -
Page 10: Installation
7 INSTALLATION 7.1 Wall-Mounted Bracket and Charger Installation NOTE: Ensure a NEMA 14-50 receptacle is installed within reach of the EV40P charger. Input cable length from device is 3 ft. 1. Select the appropriate mounting location with electrical capacity: • Ensure the owner has chosen a mounting location that allows the charging cable to reach the car’s charging port while still providing slack. -
Page 11: Operating Instructions
8 OPERATING INSTRUCTIONS 8.1 Operating Procedures • User authorization • Connect to Vehicle Charging Inlet • Charging Message • Charging completed NOTE: Device may need to be activated or de-activated with RFID cards. WARNING: This device should be supervised when used around children. CAUTIONS: •... - Page 12 8 OPERATING INSTRUCTIONS 8.2 To Restrict User Activation via RFID Card Activation and Usage NOTE: Activation of RFID access control is ONLY required when access to charging will be restricted only for RFID card holders. If no restriction is required (open charging) this step is NOT required. 1.
- Page 13 8 OPERATING INSTRUCTIONS 3. To enable charging with RFID card(s) • Charging can be enabled with your standard RFID cards Enable charging. TAP your RFID card to the front of the charger over the image of the RFID. The POWER light will turn solid green when the RFID card has enabled the unit to charge.
-
Page 14: Error And Warning Messages
9 ERROR AND WARNING MESSAGES Status Blue Green Remark 1 flash followed by Input OVP Auto Recover 3 sec pause 2 flashes followed Input UVP Auto Recover by 3 sec pause 3 flashes followed Output OCP Auto Recover by 3 sec pause 4 flashes followed Auto Recover by 3 sec pause... -
Page 15: Maintenance And Repair
10 MAINTENANCE AND REPAIR 10.1 Daily Maintenance WARNING • Avoid moisture or water in the charger. If there is water or moisture, it is necessary to immediately power off to avoid immediate danger, and notify professional personnel to carry out maintenance before next use. -
Page 16: Standard Statements And Warranty
LIMITED 2 YEAR WARRANTY AND EXCLUSIONS Leviton warrants to the original consumer purchaser and not for the benefit of anyone else that this product at the time of its sale by Leviton is free of defects in materials and workmanship under normal and proper use for two years from the purchase date. Leviton’s only obligation is to correct such defects by repair or replacement, at its option.
Need help?
Do you have a question about the EV Series and is the answer not in the manual?
Questions and answers