Advertisement
Quick Links
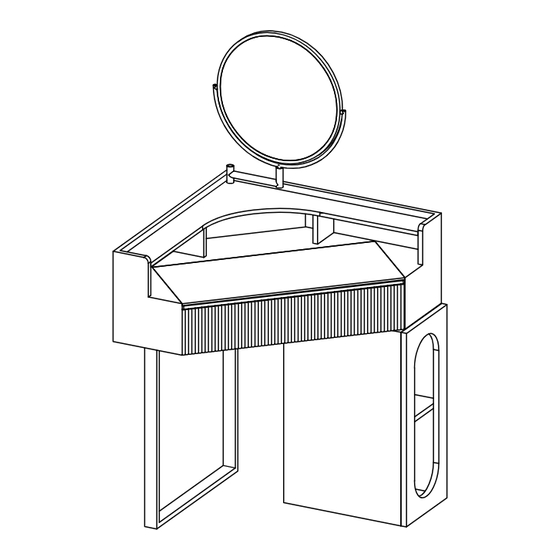
1.Place the hardware feet on the corresponding position at the bottom of the dressing table, align the hole positions,
place the hexagonal mechanical screws, and tighten them with a wrench.
2.Place the auxiliary cabinet at the corresponding position at the bottom of the dressing table, align the hole positions,
place cross mechanical screws, and tighten them with a screwdriver.
Installation instruction
VB8048W70 Installation
The number of people needed for installation:2
①
Please read the manual carefully before
installing this product. And strictly
follow the installation process
②
Please take good care of this manual
for your next installation
Hexagon socket
③
Note: Before installation, screw all
mechanical screw
the screws to 1/2 of the length of
the installation. After all screws
are half screwed in, tighten them all
together.
On a red ribbon are furniture
Parts list
Serial
Shape
number
A
screw(M6*25mm)
Cross mechanical
B
C
D
Cross mechanical
E
screw+gasket
F
G
installation accessories
Quantity
Spare
required for
Name
quantity
installation
Hexagon socket
4
1
mechanical
2
1
screw(M8*30mm)
4
1
Gasket
1
0
Wrench
TotaL 2 page; page 1
Advertisement

Related Manuals for POVISON VB8048W70


Summary of Contents for POVISON VB8048W70
- Page 1 1.Place the hardware feet on the corresponding position at the bottom of the dressing table, align the hole positions, place the hexagonal mechanical screws, and tighten them with a wrench. Installation instruction VB8048W70 Installation The number of people needed for installation:2 ①...
- Page 2 3.Simply insert the mirror into the table hole 4.Installation completed Installation instruction VB8048W70 Installation The number of people needed for installation:2 ① Please read the manual carefully before installing this product. And strictly follow the installation process ② Please take good care of this manual for your next installation ③...
Need help?
Do you have a question about the VB8048W70 and is the answer not in the manual?
Questions and answers