jotron Tron SA20 PLB Operation Manual
Hide thumbs
Also See for Tron SA20 PLB:
- Quick reference manual (8 pages) ,
- Operation manual (38 pages)
Table of Contents
Advertisement
Quick Links
Advertisement
Table of Contents

Related Manuals for jotron Tron SA20 PLB


Summary of Contents for jotron Tron SA20 PLB
- Page 1 Tron SA20 PLB Operation manual...
-
Page 2: Plb Activation
PLB activation 1. Slide the red cover downwards. 2. Unfold and tilt the antenna to vertical position. 3. Press and hold the red button for 2 seconds. Warning! For emergency use only! See chapter 3 for more details on deactivation and how to optimize performance. -
Page 3: Table Of Contents
Table of Contents PLB activation ................2 General ..................5 Introduction ................5 Operating instructions ..............6 Activation .................. 6 Deactivation of the PLB ............. 8 Operating scenarios ..............9 Indicators when activated ............11 Signal mirror ................13 Emergency whistle ..............14 Self-test ................... - Page 4 RLS system ................37 121.5 MHz homing signal ............38 7.10 Position receiver (GPS) ............38 7.11 NFC ..................39 Spare parts, warranty and disposal ..........40 Accessories and spare parts ............ 40 Counterfeit spare parts ............40 Warranty ................. 40 Service ..................
-
Page 5: General
General Congratulation as a user of a trusted Jotron product, Tron SA20 PLB. We sincerely appreciate your decision to choose this safety product. This user manual is designed to guide you through the seamless operation of your SA20 PLB, ensuring that you maximize its potential and enjoy a smooth experience. -
Page 6: Operating Instructions
Operating instructions Activation To activate the PLB follow these steps: 1. Slide the red cover downwards. 2. Unfold and tilt the antenna to vertical position. 3. Press and hold the red button for 2 seconds. Warning! For emergency use only! Misuse of the PLB may be subjected to a fine. - Page 7 The following measures can be made to enhance the distress signal strength. • Lay the PLB down on a flat surface with the antenna pointing towards the sky. • Keep the angle between the antenna and the PLB 90°. • Provide a clear view to the sky.
-
Page 8: Deactivation Of The Plb
Deactivation of the PLB If the PLB has been accidentally activated or if you want to deactivate it after use, press and hold the PLB Off button for 4 seconds. All three indicators will light up when the button is pressed. Keep pressing until all lights are turned off. -
Page 9: Operating Scenarios
Operating scenarios The Tron SA20 PLB is most effective when placed in an open and elevated area. Make sure to unfold the antenna and keep the angle between the PLB and the antenna 90°. Place the unit on a flat surface. - Page 10 The PLB is not designed to float and transmit a • distress signal at the same time. • The PLB may not be substituted for a required EPIRB on a vessel. The Tron SA20 PLB is a category 1 PLB in Australia and New Zealand. Page 10 of 44...
-
Page 11: Indicators When Activated
Indicators when activated 3.4.1 Strobe light When the Tron SA20 PLB is activated the strobe light will start flashing steadily with approximately 20 flashes per minute. The first emergency satellite signal (406 MHz) will be transmitted approximately 50 seconds after activation. These transmissions are indicated with triple flashes. - Page 12 3.4.2 Position (GPS) indicator Position indicator Waiting for position Triple flashes Position achieved Steady flashes 3.4.3 RLS indicator (if enabled) Confirmation that the distress signal has been detected and received. RLS indicator Waiting for RLS Triple flashes RLS acknowledged Steady flashes RLS disabled (PLB is not equipped with RLS No light...
-
Page 13: Signal Mirror
Signal mirror Your signal mirror with a sight hole is located in the PLB soft carrying case pocket. It can be used to signal for help several kilometers away. Instructions for use: • Reflect the sunlight on the surface of your hand. -
Page 14: Emergency Whistle
• Repeat after a short delay. Self-test Self-tests shall be performed regularly to verify that the Tron SA20 PLB is working correctly. Jotron recommends performing one self-test every month, and one extended self-test instead of the normal self-test every third month. Performing self-tests more often will affect battery life. - Page 15 To start the self-test, press and hold the black test button for approximately 2 seconds until the test indicator lights up. During the normal self-test, the main functionality of the Tron SA20 PLB is tested. A test signal is transmitted on both frequencies (121.5 MHz and 406 MHz).
- Page 16 Test sequence Position indicator RLS indicator Test indicator Self-test started Signals Two short off transmitted periods RLS enabled * On for 0.5 seconds Extended self- test successful On for 3 seconds If one of the above tests are unsuccessful, the remaining test sequences will not be performed, and the test indicator will indicate self-test failure.
- Page 17 3.7.2 Extended self-test The extended self-test includes a GPS test in addition to the normal self- test. To start the extended self-test press and hold the black test button for a minimum of 7 seconds. Keep holding until both the yellow test indicator and the green position indicator light up.
- Page 18 Test sequence Position indicator RLS indicator Test indicator Extended self- test started Waiting for position Triple flashes Position achieved On for 2 seconds Self-test started Signals Two short off transmitted periods RLS enabled * On for 0.5 seconds Extended self- test successful On for 3 seconds If one of the above tests are unsuccessful, the remaining test...
- Page 19 3.7.3 Test failure indications If a sequence in the self-test fails, the test indicator will flash a specific number of times, signalling the type of failure. Refer to the table below for a detailed description of these failure codes. Failure indication Number of flashes Battery failure...
- Page 20 Contact your service partner if this does not help. 3.7.4.3 No position The GPS receiver in the Tron SA20 PLB needs a free view of the sky to get a position within the time limit. Windows and canopies will also reduce the signals from the satellites.
-
Page 21: False Alerts
False alerts If your PLB is activated in a non-distress situation, or a distress situation which has been resolved and you no longer require assistance, deactivate your PLB and call the number printed on the back side of your PLB, or your nearest SAR authority . - Page 22 The PLB shall only be used in emergency situations. Misuse may be subjected to a fine. To prevent accidental activation, you must never remove the red protective cover other than in emergency situations. Important! False alerts are a serious problem for the rescue service.
-
Page 23: Product Description
Product description The main purpose of the Tron SA20 PLB is to alarm the SAR authorities in a distress situation. When activated the PLB will transmit a signal, which includes the ID and the position of the PLB. The strobe light will start flashing in both visible and infrared light. -
Page 24: Controls
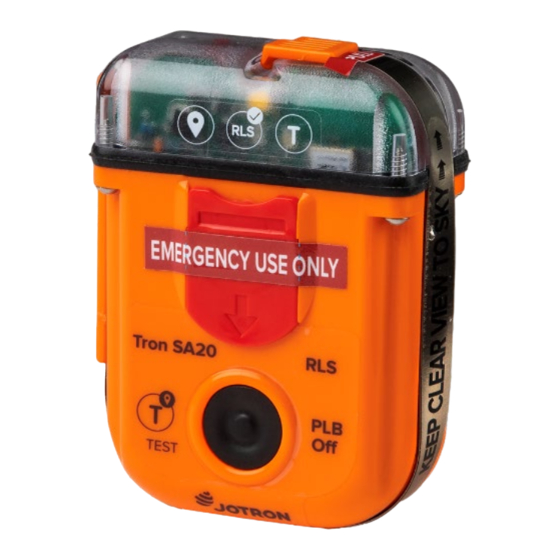
The Tron SA20 PLB is equipped with two buttons. A red activation button that is hidden behind a tamper proof cover, and a black button that is used to start self-tests and to turn the Tron SA20 PLB off after activation. Page 24 of 44... -
Page 25: Indicator Lights
Indicator lights The Tron SA20 PLB is equipped with a white strobe light and 3 colored LED indicator lights with associated icons. See the tables below for descriptions and possible statuses. Indicator lights icons Icons Position (GPS) Test Description (Green) -
Page 26: Infrared (Ir) Light
Infrared (IR) light To enhance visibility for SAR teams using night vision goggles and systems, the PLB is equipped with an infrared (IR) light in addition to the visible strobe light. The IR light is located at the top of the PLB, next to the strobe light, and will start flashing automatically when the PLB is activated. -
Page 27: Return Link Service (Rls)
Return Link Service (RLS) This PLB has the capability to use the RLS feature, which is provided by the Galileo navigation satellite system. The RLS feature is an indication that confirms to the user that the distress signal has been received and is being sent to the responsible search-and- rescue (SAR) authorities. -
Page 28: Registration
Registration Registration of the PLB Your PLB must be registered before use. This allows the SAR authorities to retrieve information about you and your emergency contacts in an emergency. Which again enables them to contact you to determine if the distress signal from the PLB is a false alarm, and an expensive rescue operation can be avoided. -
Page 29: Change Of Ownership
For information about your country’s registration requirements please consult the list of Beacon Registration Contacts on www.406registration.com 5.1.1 Registration in USA For registration of the PLB in USA, use this link: http://www.beaconregistration.noaa.gov The preferred and easiest way to register is to use the web page. However, if this is not possible, a filled in registration form can be emailed beacon.registration@noaa.gov The registration form is available at the US beacon registration website. -
Page 30: Testing And Maintenance
Testing and maintenance To ensure reliability and to minimize the risk of false distress alerting it is important that your PLB is tested and maintained as described in this chapter. Keep your PLB clean and dirt-free and use a clean cloth for cleaning if necessary. -
Page 31: Battery Expiry Date
The battery expiry date can be found on a label located on the transparent top of the PLB. The Tron SA20 PLB is fitted with special lithium batteries that cannot be replaced. The PLB must be replaced when the battery has reached its expiry date. -
Page 32: Technical Information
Technical information General Tron SA20 PLB: PLB Class: Class 2 - Operating temperature: -20° C to 55° C (-4° F to 131° F) - Stowage temperature: -30° C to 70° C (-22° F to 158° F) PLB Category: Category 2 (see footnote 4 ) -
Page 33: Satellite Signal Transmitter
Satellite signal transmitter Satellite signal transmitter Frequency: 406.031 MHz Output power: Standard Location, National Protocols: Location, RLS Location Modulation Phase modulation Data encoding Bi Phase L Short term stability Less than 2x10 Medium term stability Less than 10 Residual noise: Less than 3x10 Bit rate: 400 b/s... -
Page 34: Battery Information
The safety information is available for download at: http://jotron.com/product/tron-SA20-PLB The product described in this manual is subject to follow special packing instructions and/or transportation regulations. See chapter 8.3.1 for details. - Page 35 7.6.2 Handling and storage Store in a cool, well-ventilated area. Warning! If this PLB is kept above room temperature for prolonged periods of time the battery capacity will be degraded. The PLB should then be replaced earlier than the date stated on the battery expiry label. If not the stated 24-hour operating life of the PLB may be reduced.
-
Page 36: Cospas-Sarsat System
When the Tron SA20 PLB is activated (1), the satellites (2) will detect the transmitted signal and relay it to an antenna at a LUT (3). The signal will be routed from the LUT to an MCC (4). -
Page 37: Rls System
• Mission control centers (MCC) that distributes the signals to the appropriate search and rescue authorities. Each PLB must be programmed with its own unique code in the system for identification. It is important that the PLB is registered in the database for the applicable country. -
Page 38: 121.5 Mhz Homing Signal
SAR vessels. 7.10 Position receiver (GPS) Jotron PLBs have a built in Global Navigation Satellite Systems (GNSS) receiver capable of receiving position signals from GPS, GLONASS and Galileo satellite systems. The position is encoded by the message generator of the PLB and transmitted to the Cospas-Sarsat satellites. -
Page 39: 7.11 Nfc
7.11 NFC An NFC antenna is located at the bottom right corner of the PLB. The user can scan it with a smartphone or a similar device; no app is needed. The NFC tag can be used to read the HEX ID, serial number and battery expiry date that has been programmed onto the PLB. -
Page 40: Spare Parts, Warranty And Disposal
Counterfeit spare parts Jotron is aware of extended counterfeit spare parts being marketed and sold to fit GMDSS safety products. It is of extreme importance that any spare parts being fitted to this product are original spare parts, manufactured or approved by Jotron. -
Page 41: Service
Jotron does not accept any responsibility for the dismantling or reassembling of any Jotron product that occurs externally from a Jotron authorized facility and/or is handled by someone other than an authorized, training, and certified person. This can void the user's authority to operate the equipment. -
Page 42: Abbrevations And Definitions
Abbrevations and definitions Agreement concerning the International Carriage of Dangerous Goods by Road COSPAS COsmichskaya Sistyema Poiska Avariynich Sudov (Space System for the Search of Vessels in Distress) GEOSAR Geostationary Search and Rescue GMDSS Global Maritime Distress and Safety System GNSS Global Navigation Satellite Systems Global Positioning System... -
Page 43: Ammendment Records
Ammendment records Date Reason for Issue Author 05.03.2024 First release Page 43 of 44... - Page 44 3270 Larvik, Norway NE23 1LA, UK Tel: +47 33 13 97 00 Tel: +44 1670 712000 SINGAPORE Jotron Asia Pte. Ltd. Jotron USA, Inc 10 Ubi Crescent, Ubi Techpark 6300 Rothway Street, Suite C Lobby B, #05-11/12, Singapore 408564 Houston, TX 77040, USA...
Need help?
Do you have a question about the Tron SA20 PLB and is the answer not in the manual?
Questions and answers