Table of Contents
Advertisement
Quick Links
www.nitedevil.com
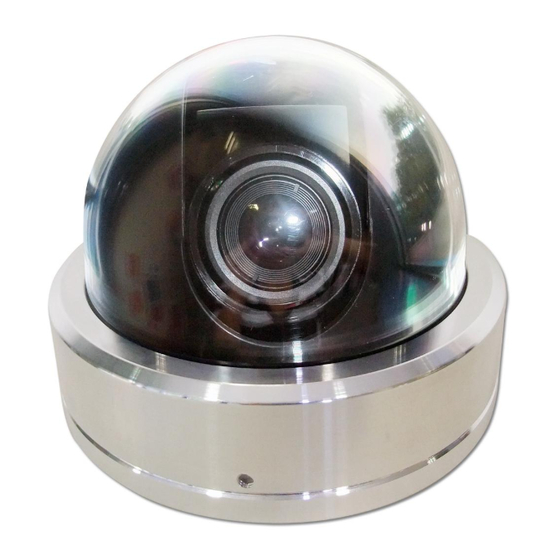
NiteDevil WDR Hi-Res Dome
The NiteDevil Dome Camera produces high
quality images and works in very low light
conditions down to 0.00019 Lux. It has many
features including a solid aluminium waterproof
base, 3D axis mounting inner bracket for wall
mounting, a SONY SuperHad CCD and a 2.8mm
~ 12mm varifocal lens. An OSD facility provides
options for wide dynamic, High Sensitivity BLC,
motion detection, privacy masking and other
camera functions.
Models Available
CAM751 540TVL, 12VDC
CAM752 540TVL, 12VDC/24VAC
Electronic Features
x
1/3" SONY SUPER HAD CCD II
Low illumination down to 0.0008 Lux
Menu for Motion Detection & camera setup
Wide Dynamic Range Function.
High Sensitivity Backlight Compensation
Mounting the Camera
The camera is for mounting on a wall, ceiling or outdoor facia board. Note that this camera has a 3D gimble allowing
wall mounting or ceiling mounting. Note that fitting the screws into a ceiling will require support for the screws. N.B
Please be aware that when refitting camera, the dome cowling does not obscure the lens.
Powering the Camera
CAM751
The dome requires a 12V DC regulated power supply. Connections are polarity sensitive so therefore ensure that the
positive and negative cables are connected correctly. The camera is provided with a fly lead with a 2.1 jack connector
for power. This camera draws a maximum of 140mA at 12v DC. Ensure that a regulated power supply is used if using
12vDC and allow adequate headroom i.e only use a power supply with a minimum rating of 200mA.
CAM752
This dome is dual voltage. It will work on 12vDC or 24vAC. Connections are not polarity sensitive so therefore power
connections can be either way round. The camera is provided with a fly lead with a 2.1 jack connector for power. This
camera draws a maximum of 230mA at 12v DC or 110mA at 24vAC. Ensure that a regulated power supply is used if
using 12vDC and allow adequate headroom i.e only use a power supply with a minimum rating of 300mA.
Connecting the camera to control equipment.
The dome camera comes with a fly lead for video out. To reduce installation time the video out lead is terminated into
a male BNC connector. This allows the installer to effortlessly connect the camera to control equipment via a female
BNC-BNC lead. A special setup joystick controller is located on the side of the PCB board and this allows access to
the OSD menu. A special socket is located to the right of the joystick controller to connect an optional test video
monitor lead.
RS485 Connection
The RS485 connection allows access to the menu using a keyboard or DVR PTZ operation using a 95 call to open
menu and select options using near, far, open and closed. Red needs to be connected to Transmit + and Black to
Transmit -.
Email:
support@nitedevil.com
NiteDevil Hi-Res External Colour Dome Camera
MMechanical Features
Vandalproof & Weatherproof
3 Axis 3D built-in bracket
Vari-focal 2.8 ~ 12mm Auto DC Iris Lens
Aluminium housing with Polycarbonate
Smoked Cover
Two Allen screws to stop tampering
Last Revised: 12/09/2011
Doc XCAM752
Advertisement
Table of Contents

Subscribe to Our Youtube Channel
Related Manuals for System Q NiteDevil CAM751


Summary of Contents for System Q NiteDevil CAM751
- Page 1 www.nitedevil.com Doc XCAM752 NiteDevil Hi-Res External Colour Dome Camera NiteDevil WDR Hi-Res Dome The NiteDevil Dome Camera produces high quality images and works in very low light conditions down to 0.00019 Lux. It has many features including a solid aluminium waterproof base, 3D axis mounting inner bracket for wall mounting, a SONY SuperHad CCD and a 2.8mm ~ 12mm varifocal lens.
- Page 2 www.nitedevil.com Doc XCAM752 NiteDevil Hi-Res External Colour Dome Camera Cable Diagram Setup Instructions 1. First adjust the camera position using the 3 way gimble. The complete camera can be moved in the metal housing. Hold the camera at either side of the camera bracket where the locking screws are located.
-
Page 3: Ceiling Mount
www.nitedevil.com Doc XCAM752 NiteDevil Hi-Res External Colour Dome Camera Ceiling Mount Email: support@nitedevil.com Last Revised: 12/09/2011... -
Page 4: Wall Fitting
www.nitedevil.com Doc XCAM752 NiteDevil Hi-Res External Colour Dome Camera 1. Place drilling template sheet onto a ceiling surface and drill holes through the marked positions. 2. Put a sponge plate onto the bottom surface of the Dome. This prevents the camera from water or dust ingress. - Page 5 www.nitedevil.com Doc XCAM752 NiteDevil Hi-Res External Colour Dome Camera OSD (On Screen Display) Function. Remove the dome cover using the Allen key supplied to access the PCB board for entering the menu. Test 1. If you want to use the test monitor lead supplied, plug it Monitor into the Test Monitor Connection shown in diagram.
- Page 6 www.nitedevil.com Doc XCAM752 NiteDevil Hi-Res External Colour Dome Camera LENS This option allows the screen brightness to be adjusted. Range of brightness setting is 0 ~ 100. EXPOSURE SHUTTER The shutter speed is set at 1/50, x2, X4, x8, x16, x32, x64, x128, x256, 1/100000, 1/10000, 1/5000, 1/200, 1/500, 1/250, FLK.
-
Page 7: Hsblc Menu
www.nitedevil.com Doc XCAM752 NiteDevil Hi-Res External Colour Dome Camera HSBLC OFF HSBLC ON HSBLC MENU NOTE: HSBLC can be activated for both day and night conditions. When headlights for example reduce the overall light level making car number plate recognition more difficult, using the HSBLC option can help to provide more light to see the number plate. - Page 8 www.nitedevil.com Doc XCAM752 NiteDevil Hi-Res External Colour Dome Camera DAY / NIGHT You can display pictures in colour or black & white. The following options are available: COLOR, B/W, EXT and AUTO. COLOR The picture is always displayed in colour. EXT This deactivates the EXT function.
- Page 9 www.nitedevil.com Doc XCAM752 NiteDevil Hi-Res External Colour Dome Camera SPECIAL CAM-TITLE OFF / ON This is the camera title option. Set this to ON by pressing the left or right direction keys and then pressing SET button. Use the four direction buttons to move to the desired letter and select the letter by pressing the SET button.
-
Page 10: Area Display
www.nitedevil.com Doc XCAM752 NiteDevil Hi-Res External Colour Dome Camera MOTION OFF / ON The motion detection facility if set to ON will display the words MOTION DETECTION whenever the camera detects movement. The motion can be selected in each of the 4 areas defined in the camera picture. -
Page 11: Troubleshooting
www.nitedevil.com Doc XCAM752 NiteDevil Hi-Res External Colour Dome Camera ADJUST This option allows picture sharpness adjustment plus changes to BLUE and RED colour. RESET This is the factory RESET option. RETURN Select RET to return to main menu or END to close menu. EXIT Press the SET button to save the current settings and exit the MAIN menu setup. -
Page 12: Technical Specifications
www.nitedevil.com Doc XCAM752 NiteDevil Hi-Res External Colour Dome Camera Technical Specifications Function Specification Model CAM751 CAM752 Power Source 12vDC / 24vAC Dual Power 12vDC 140mA 12vDC 230mA / 24vAC 110mA Imaging Sensor 1/3” SONY Super HAD CCD II Total Pixels PAL: 795(H) x 595(V) Effective Pixels PAL: 752(H) x 582(V)
Need help?
Do you have a question about the NiteDevil CAM751 and is the answer not in the manual?
Questions and answers