
Related Manuals for Backyard Pro 554BPHP17


Summary of Contents for Backyard Pro 554BPHP17
- Page 1 Item No. 554BPHP17, 554BPRD13, 554BPRD21, 554BREWKIT3 OUTDOOR RANGES WITH WIND GUARD User Manual Retain this manual for future reference. Unit must be kept clear of combustibles at all times.
-
Page 2: Table Of Contents
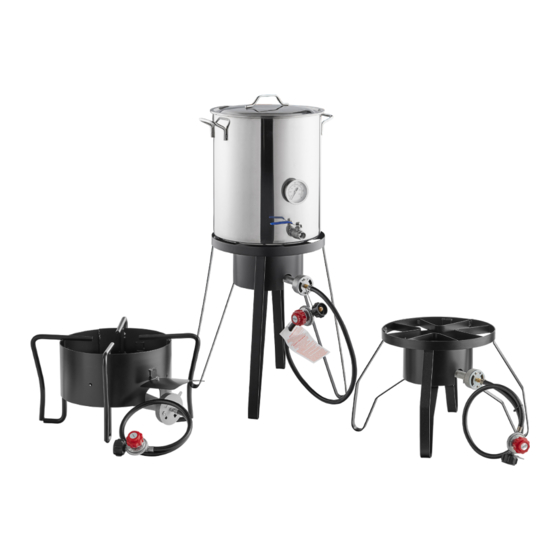
INTRODUCTION Upgrade your outdoor cooking lineup with Backyard Pro outdoor ranges or brewing kit with built-in wind guard! These durable ranges are great for use on a patio, with a catering setup, or with an outdoor concession stand. The welded frame allows these units to accomodate larger, heavier stock pots. The built-in wind guard provides protection for the burner and helps keep even heat distribution. -
Page 3: Safety Warnings
SAFETY WARNINGS Backyard Pro LP Outdoor Ranges are designed, built, and sold for commercial use and should be operated by trained personnel only. Clearly post all DANGERS, CAUTIONS, WARNINGS, and OPERATING INSTRUCTIONS near each unit to ensure proper operation and to reduce the chance of personal injury and/or equipment damage. - Page 4 CAUTION: 1. This range is for use with propane gas only (propane gas cylinder not included). 2. Never attempt to attach this range to the self-contained propane system of a camper trailer, motor home, or house. 3. DO NOT attempt to move the range while it is lit. 4.
-
Page 5: Assembly Instructions
ASSEMBLY INSTRUCTIONS #554BPHP17 Parts Tools Needed Burner Body - x1 Gas Hose Shield - x1 Bolt - x1 Nut - x1 Phillips Head Adjustable Wrench Screwdriver (Not Included) (Not Included) Gas Hose Assembly - x1 Step 1 Attach the gas hose shield (B) to the burner body (A) using the bolt (C) and nut (D). -
Page 6: 554Bprd13
ASSEMBLY INSTRUCTIONS #554BPRD13 Parts Tools Needed Burner Body - x1 Gas Hose Assembly - x1 Adjustable Wrench (Not Included) Step 1 Connect the gas hose assembly (B) to the burner (A). WARNING: Test the gas connection with soapy water. Gas leaks can lead to injury and property damage. -
Page 7: 554Bprd21
ASSEMBLY INSTRUCTIONS #554BPRD21 Parts Tools Needed Burner Body - x1 Gas Hose Assembly - x1 Adjustable Wrench (Not Included) Step 1 Connect the gas hose assembly (B) to the burner (A). WARNING: Test the gas connection with soapy water. Gas leaks can lead to injury and property damage. -
Page 8: 554Brewkit3
Tools Needed ASSEMBLY INSTRUCTIONS #554BREWKIT3 Adjustable Wrench (Not Included) Parts Burner Body - x1 Gas Hose Assembly - x1 Brewing Stock Pot - x1 Valve Stem - x1 Drain Valve - x1 Step 1 Connect the gas hose assembly (B) to the burner (A). WARNING: Test the gas connection with soapy water. -
Page 9: Before Each Use
10 FT. the hose, the hose/regulator assembly must be replaced prior to using the appliance. Visit WebstaurantStore.com for information regarding a replacement hose assembly. Only the LP hose/ regulator assembly specified by Backyard Pro should be used with the appliance. -
Page 10: Lighting Instructions
LIGHTING INSTRUCTIONS FIG. 1 WARNING: NEVER put hands or face directly over the burner while lighting or while the unit is in operation. Connect the gas hose to LP cylinder and check all connections for leaks. Note: Keep the LP cylinder at least 24" away from the unit. 2. -
Page 11: Cooking Oil
COOKING OIL • Suggested cooking oil: For deep frying, we suggest using peanut oil, but any good liquid vegetable oil may be used. • To keep used cooking oil: Let the oil cool. While slightly warm, filter out particles (using filter paper or a clean cloth) before storing in original container or similar sturdy plastic or glass container.
Need help?
Do you have a question about the 554BPHP17 and is the answer not in the manual?
Questions and answers