
Related Manuals for Backyard Pro 554PL2040


Summary of Contents for Backyard Pro 554PL2040
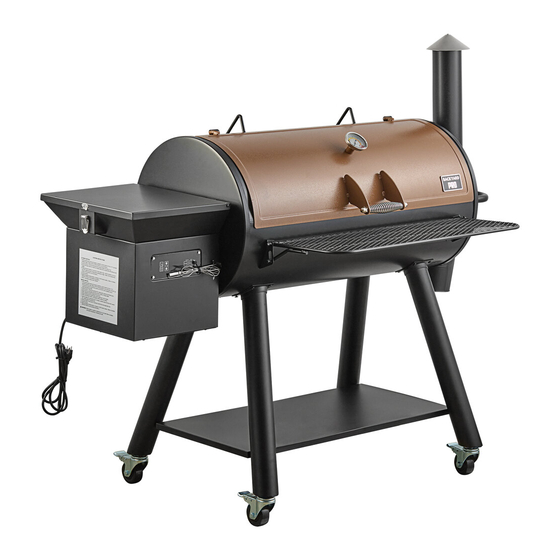
- Page 1 Item No. 554PL2040 40" WOOD-FIRE PELLET GRILL & SMOKER User Manual + Retain this manual for future reference. + Unit must be kept clear of combustibles at all times.
-
Page 2: Table Of Contents
2 |Introduction TABLE OF CONTENTS Introduction Safety Warnings ................................3-5 Assembly Instructions ..............................6-15 Parts..................................6 Operation Instructions ..............................16-22 Controller Instructions & Functions ........................... 16 Preparation for Use & Lighting Instructions ....................... 17 Preheating the Grill ..............................19 Cooking Instructions ..............................19 Cook Mode ................................ -
Page 3: Safety Warnings
PAGE Pellet Grill Safety Warnings | 3 READ FIRST! RULES FOR PELLET GRILL SAFE OPERATION. • DISPOSAL OF ASHES - ANY ASHES THAT ARE REMOVED FUEL FROM THE GRILL SHOULD BE PLACED IN A METAL CON- TAINER WITH A TIGHT FITTING LID. THE CLOSED CONTAIN- •... - Page 4 4 |Safety Warnings WARNING! USE PROPER FUEL AT ALL TIMES • USE ONLY FOOD GRADE HARDWOOD PELLETS MADE FOR PELLET GRILLS. • DO NOT USE HEATING PELLETS WHICH MAY CONTAIN HAZARDOUS CONTAMINANTS. • IT IS RECOMMENDED THAT EXCESS PELLETS ARE NOT STORED IN THE HOPPER FOR EXTENDED PERIODS AS THEY CAN ABSORB MOISTURE CAUSING THE AUGER TO SEIZE.
- Page 5 Safety Warnings | 5 WARNING! • • Keep the lid closed during use. This pellet grill is intended DO NOT alter the grill in any way. to be used with a closed lid. • DO NOT modify or hardwire the auger to run continuously. •...
- Page 6 6 |Assembly shopbackyardpro.com...
- Page 7 Assembly | 7 M6 x 12 M5 x 10 M6 x 14 M4 x 8 Adjustable Phillips Washer Cap Nut Bolt Bolt Step Bolt Bolt Lock Nut Wrench Head shopbackyardpro.com...
-
Page 8: Parts
8 |Assembly ITEM DESCRIPTION ITEM DESCRIPTION Warming Rack Bracket Flame Tamer Hopper Top Cooking Chamber Protection Guard Grease Tray Power Cord Bracket Chamber Lid Hopper Gasket Temp Gauge Hopper Bottom Assembly Hopper Inner Front Shelf Bracket (L) Hopper Top Gasket Front Left Leg Hopper Bottom Wagon Wheel... - Page 9 Assembly | 9 STEP 1 Remove the lid from the Cooking Chamber (27) by removing bolt and washer and sliding the hinge pins on the lid out of the hinge holes on the cooking chamber. Set bolt and washer aside for step 18.
- Page 10 10 |Assembly STEP 3 Insert the Bottom Shelf (12) into the mounted legs. Attach remaining 2 legs (Back Right (17) & Back Left (11) by inserting the hooks of the bottom shelf (12) into the holes in the legs before bolting to the Cooking Chamber (27) using M6 x 12 Bolts (B x 8) and M6 Nuts (F x 8).
- Page 11 Assembly | 11 STEP 5 With assistance, position the assembly upright as shown. STEP 6 Attach Chamber Right Bracket (19) onto Cooking Chamber (27) right endcap inside using M6 x 12 Bolts (B x 2) and M6 Nuts (F x 2) as shown. Attach Side Handle (22) on Cooking Chamber (27) right end cap using M6 x 12 Bolts (B x 4) and M6 Nuts (F x 4).
- Page 12 12 |Assembly STEP 7 Attach Chimney Pipe (20) and Chimney Gasket (18) to the Cooking Chamber (27) right endcap using M6 x 12 (B x 4). Be certain the gasket fits between the Chimney Pipe (20) and outside face of the chamber endcap as shown.
- Page 13 Assembly | 13 STEP 9 Connect the Hopper Top (2) to the Hopper Bottom Assembly (6) with M5 x 10 Bolts (C x 4). Install Protection Guard (3) into the Hopper Assembly with M5 x 10 Bolts (C x 2). NOTE: Insert all 6 Bolts before tightening completely.
- Page 14 14 |Assembly STEP 11 Slide Hopper Gasket over Auger Housing. Then, place the Pellet Hopper Assembly onto the Cooking Chamber (27) by inserting the Auger Housing through the left endcap. While holding the Hopper Assembly away from the endcap, insert the Grill Probe (46) through the endcap wall.
- Page 15 Assembly | 15 STEP 13 Place the Flame Tamer (26) over the Fire Pot inside the Cooking Chamber. It should rest in place as shown. POSITION SLOT STEP 14 Place the Grease Tray (28) on LEFT the chamber right side bracket and chamber left side bracket as shown.
- Page 16 16 |Assembly STEP 15 Place Cooking Grates (23) onto cooking chamber grid brackets/ rails as shown. STEP 16 Insert Warming Rack Brackets (1) into mounting tabs found on cooking chamber endcaps. shopbackyardpro.com...
- Page 17 Assembly | 17 STEP 17 Place Warming Rack (25) onto Warming Rack Brackets (1) so that it securely rests in brackets. STEP 18 Reconnect the Cooking Chamber Lid (29) by sliding the hinge pins into the hinges. Secure it with the washer and bolt removed in Step 1. Screw the Temperature Gauge (230) fully into the lid.
- Page 18 18 |Assembly STEP 19 Pellet grill is now assembled. shopbackyardpro.com...
-
Page 19: Controller Instructions & Functions
Operation | 19 CONTROLLER INSTRUCTIONS • The maximum temperature that the pellet grill can achieve is influenced by the ambient temperature. In colder weather, the grill may not be able to achieve the highest set temperature and it will continually feed pellets into the fire pot attempting to reach the set temperature. -
Page 20: Preparation For Use & Lighting Instructions
20 |Operation PREPARATION FOR USE & LIGHTING INSTRUCTIONS CAUTION! • PLACE THE GRILL OUTDOORS ON A HARD, LEVEL, NON-COMBUSTIBLE SURFACE AWAY FROM ROOF, OVERHANG, OR ANY COMBUSTIBLE MATERIAL. • NEVER USE ON WOODEN OR OTHER SURFACES THAT COULD BURN. • PLACE THE GRILL AWAY FROM OPEN WINDOWS OR DOORS TO PREVENT SMOKE FROM ENTERING ENCLOSED SPACES. - Page 21 Operation | 21 PREPARATION FOR USE & LIGHTING INSTRUCTIONS CAUTION! • The pellet hopper must be properly setup with pellets in the auger tube PRIOR to lighting the grill. • NEVER add or use wood chips or particles in the hopper. ONLY use barbecue grade pellets. •...
-
Page 22: Preheating The Grill
22 |Operation CURING INSTRUCTIONS BEFORE INITIAL USE Before initial use, it is recommended to cure the grill to remove manufacturing oils or residue and minimise smoke odors or unnatural flavors from being added to food. 1. Follow SETUP PROCEDURE to ensure the grill is safe for operation. 2. -
Page 23: Smoke Mode
Operation | 23 SMOKE MODE To enter SMOKE MODE, press the MODE button once. In SMOKE MODE, the grill regulates the time that the auger feeds fuel to the fire pot. For the pellet system to produce more smoke, the temperature fluctuation from the SET POINT will be larger than in cook mode. NOTE: Experiment with various temperatures to fully understand the grill operation cooking temperatures and times before preparing food for the first time. -
Page 24: Shut Down Instructions
24 |Operation WIRELESS CONNECTION You can connect your phone to the grill's controller using Bluetooth® wireless technology. 1. Download and install the PTC app from the App Store or Google Play on your smartphone. 2. Create an account in the PTC app using an email or phone number. A verification code will be sent to activate the app for use, and is only required for the initial setup. -
Page 25: Cooking Tips
Operation | 25 COOKING TIPS WOOD PELLETS • ONLY USE wood pellets made for barbecue, not heat grade pellets. Barbecue wood pellets should be 100% all natural wood and come in a variety of types of wood that will add flavor to whatever food you are grilling or smoking. •... -
Page 26: Cleaning
26 |Operation CLEANING THE GRILL BODY • Use warm, soapy water to clean the outside of grill body with a cloth and then wipe it dry. • To prevent rusting, periodically treat interior surface of grill body with a light coat of vegetable oil and then wipe it dry. •... - Page 27 Troubleshooting | 27 PROBLEM CAUSE SOLUTION Verify there is power at the outlet. If connected to a GFCI The grill won't ignite. Power issue outlet, check and reset if necessary. if there is power, but the grill fails to ignite, contact customer service. Verify there are pellets in the pellet hopper and they are not stuck on the side walls.
- Page 28 28 |Troubleshooting PROBLEM CAUSE SOLUTION Operating the grill in very cold conditions may affect the Temperature or digital Outdoor temperature. performance. display does not match set Lid open. Close the grill lid and allow up to 15 minutes for the temperature.
- Page 29 Troubleshooting | 29 PROBLEM CAUSE SOLUTION Remove cooking grate, grease drain pan, and flame tamer. Turn unit on and visually inspect the auger feed. Auger Motor Remove control board and inspect the wires and Grill will not start. connections. If not working, call customer service. (continued) Remove control board.
-
Page 30: 30 |Control Board
30 |Control Board CONTROL BOARD WIRING DIAGRAM AUGER IGNITOR 120VAC MOTOR MOTOR GRILL MEAT PROBE CONTROLLER (BACK VIEW) COLOR CODE: B ..BLACK O ..ORANGE P ..PURPLE R ..W .
Need help?
Do you have a question about the 554PL2040 and is the answer not in the manual?
Questions and answers