Advertisement
Quick Links
Item No. 554SMOKR60KD
+ Save these instructions for future
reference. If you are assembling this unit
for someone else, give this manual to
him or her to save for future reference.
+ Assembly of this unit requires 2 adults.
60"
CHARCOAL / WOOD
SMOKER GRILL
Assembly Instructions
Advertisement

Related Manuals for Backyard Pro 554SMOKR60KD


Summary of Contents for Backyard Pro 554SMOKR60KD
- Page 1 Item No. 554SMOKR60KD 60" CHARCOAL / WOOD SMOKER GRILL Assembly Instructions + Save these instructions for future reference. If you are assembling this unit for someone else, give this manual to him or her to save for future reference. + Assembly of this unit requires 2 adults.
-
Page 2: California Proposition
2 |Warning WARNING CALIFORNIA PROPOSITION 65 Combustible by-products, such as carbon monoxide, produced when using this product contain chemcials known in the State of California to cause cancer, birth defects, or other reproductive harm. 2. This product contains chemicals, including lead and lead compounds, known to the State of California to cause cancer, birth defects, or other reproductive harm. - Page 3 Parts List and Hardware | 3 shopbackyardpro.com...
- Page 4 4 |Assembly Instructions STEP 1 Install casters (1) to the leg (2) by turning the nut on the top of the caster (1) inserting into leg (2) and then tightening leg to stem. STEP 2 Fully remove set screw in connecting piece (3) and insert into leg.
- Page 5 Operating Instructions | Assembly Instructions | 5 STEP 4 Install the bottom panel (6) to the legs using included hardware. STEP 5 Assemble the four support parts (7) with raised side facing inwards on the bottom panel using BOLT A -- 8 pcs. STEP 6 Attach front panel (8) using BOLT A -- 5 pcs.
- Page 6 6 |Assembly Instructions STEP 7 Attach back panel (9) using BOLT A -- 5 pcs. STEP 8 Attach left side panel (10) to the grill body using BOLT A -- 8pcs. Make sure tray hooks are pointed towards the back panel. STEP 9 Attach right side panel (10) to the grill body using BOLT A -- 8pcs.
- Page 7 Operating Instructions | Assembly Instructions | 7 STEP 10 Connect air vent handles (13,15) to both side doors (12,14) using BOLT A - 2 pcs and Nut C-4 pcs. STEP 11 Insert left side door to hinges on the left side of the grill body.
- Page 8 8 |Assembly Instructions STEP 13 Attach the left side lid lock handle to the side panel closer towards the back panel. Install the air vent to the side door using BOLT A-- 3 pcs NUT C -- 3 pcs. STEP 14 Attach the right side lid lock handle to the side panel closer towards the back panel.
- Page 9 Operating Instructions | Assembly Instructions | 9 STEP 16 Attached the charcoal pan support bar (19) to both front and side panel using BOLT A - 10 pcs. STEP 17 Attach lid hinges (20) to the grill back panel using BOLT B - 6 pcs. STEP 18 Put the charcoal pans (21) on charcoal pan support bar.
- Page 10 10 |Assembly Instructions STEP 19 Connect the grate holder handle (23) to the grate holder (a22) using Bolt D - 16pcs and LOCK PIN E - 8 pcs. TIP: Insert Lock Pin E into the handle before attaching in place with the hardware. STEP 20 Position the grate holder into the grill body with the lip facing upwards.
- Page 11 Operating Instructions | Assembly Instructions | 11 STEP 22 Fully remove the screw from the handle so that the lid handle (27) can be connected to the lid (26) using BOLT A -- 2pcs. STEP 23 Connect hinges (28) to the lid using BOLT B - 6 pcs.
- Page 12 12 |Assembly Instructions STEP 25 Install the two thermometers (29) onto the lid. STEP 26 Attach the grill stacks (30) to the lid using BOLT A -- 8 pcs and NUT C -- 8 pcs. shopbackyardpro.com...
- Page 13 Operating Instructions | Assembly Instructions | 13 STEP 27 Install BOLT G to the lid using BOLT G - 2 pcs and NUT C - 2 pcs. After the grill is fully assembled, you can open lock the lid in place by using the handles on the side.
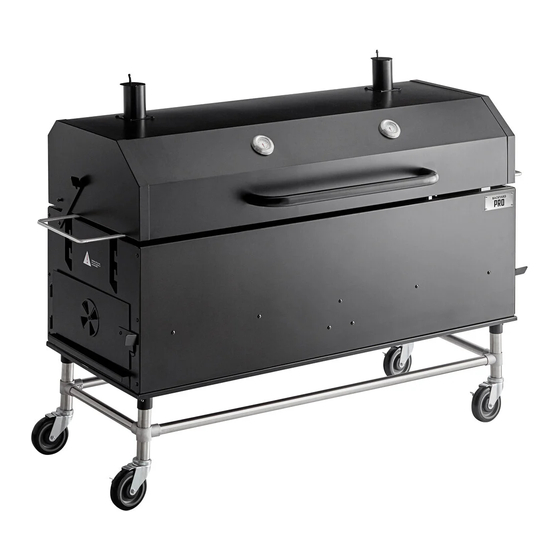
- Page 14 14 |Assembly Instructions FULLY ASSEMBLED shopbackyardpro.com...
Need help?
Do you have a question about the 554SMOKR60KD and is the answer not in the manual?
Questions and answers