JVA SV2 Installation And User Manual
Electric fence energizer
Hide thumbs
Also See for SV2:
- Quick start user manual (8 pages) ,
- Installation and user manual (40 pages) ,
- Installation and user manual (22 pages)

Related Manuals for JVA SV2


Summary of Contents for JVA SV2
- Page 1 JVA Electric Fence Energizer Installation and User Manual (SV2, SV5, SV10, SV15, SV20) J VA T E CH N O LO G I E S www.jva-fence.com...
-
Page 2: Table Of Contents
Other ..... . .7 3 JVA Models and Features . . . . . . . . . . . . . . . . 8 Features . - Page 3 Flat Batteries ....23 Battery Replacement ....24 Errors and Error Codes ... . . 26 8 Common Fence Problems .
-
Page 4: Introduction
INTRODUCTION Congratulations on your choice of a JVA Energizer. In choosing to purchase a JVA product you have opted for the highest quality in electric fencing. Please read this manual entirely before installing or operating your new energizer. All JVA products offer a three-year warranty against faulty components and workmanship but excludes environmental extremes (i.e. -
Page 5: Important Notes
IMPORTANT NOTES ELECTRIC FENCES 1. Electric fences are not toys; do not let children play with them. 2. Electric fences should only be installed with regard to the relevant standards and work place health and safety requirements. 3. Electric fences should be signed. Warning signs that comply to IEC stan- dards should be prominently displayed on electric fences at distances specified by the country in which they are installed. -
Page 6: Power Supply Options
POWER SUPPLY OPTIONS The JVA SV series of electric fence energizers are fully self contained solar powered energizers. Each energizer in the SV series comes with an internal battery, integrated battery charger, solar panel bracket and solar panel. IMPORTANT NOTES •... -
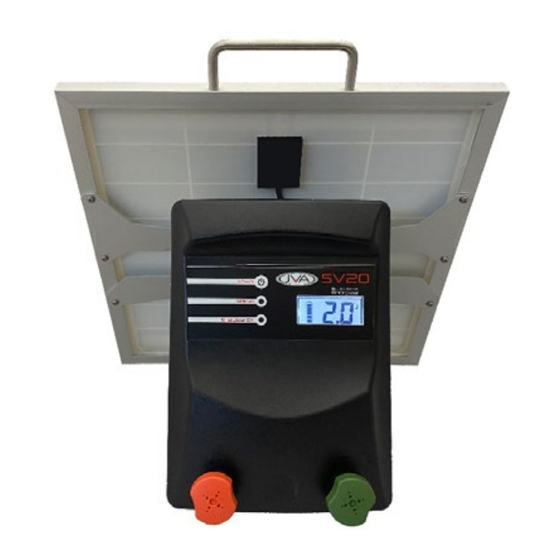
Page 7: Solar Panels
2. Solar panels need as much direct sunlight as possible, preferably full sun all day. Unlike small solar powered items such as calculators, all JVA solar-powered energizers need direct sunlight to generate enough electricity to charge the battery. 3. The solar panel also needs to be clean to operate properly. Clean off any dust or dirt using a damp cloth. -
Page 8: Jva Models And Features
JVA MODELS AND FEATURES FEATURES SV10 SV15 SV20 Mains powered Battery powered Digital control “Smooth” wave shape Power on demand LCD showing kV and Stored Energy Ant & moisture protec- tion UV stable enclosure Overload indication (Vis- ible) Lightning protection... - Page 9 SV10 SV15 SV20 Energy Output 0.2 J 0.5 J 1.0 J 1.5 J 2.0 J Power consumption at 67mA 84mA 105mA 126mA 12.5Vdc Warranty 3 Years 3 Years 3 Years 3 Years 3 Years Power Adaptor recharge (24Vdc) ST0146 User Manual Page 9...
- Page 10 The Auto Recover feature will attempt to recover the energizer from severe errors which causes the energizer to stop working. This auto- matic recovery process will occur at 7 minute intervals. • Power on demand automatically increases the power to heavy fence loads. Page 10 © JVA Technologies. www.jva-fence.com...
-
Page 11: Specifications
SPECIFICATIONS Specifications Model Energizer output Stored Power Peak voltage # Energy Output 6.8KV 0.14J solar 0.2J 7.5kV 0.7J solar 0.5J SV10 7.5kV 1.3J solar 1.0J SV15 7.5kV 2.1J solar 1.5J SV20 7.5kV 2.7J solar 2.0J Symbols • # - No load, actual voltage on a short fence can be as high as 10kV •... -
Page 12: Jva Models And Features
JVA MODELS AND FEATURES 1. Status indicates fence overload or internal energizer fault (red LED) 2. Energizer On and OK indicator (green LED) 3. High Power fence connection terminal 4. Ground/Earth return connection terminal 5. Rubber O-ring seal between front and back case pieces 6. -
Page 13: Fence Connectors
FENCE CONNECTORS High Power Earth Terminal Terminal Full Voltage Operation 1. The Green Earth Terminal (Right) should be connected to suitable elec- tric fence earth spikes. 2. The Red Fence Terminal (Left) should be connected to the live wires of the fence. -
Page 14: Power Button
More than two flashes shows an error code (this is rare). Some errors can cause the energizer to shut down. See Troubleshooting Energizer Problems below. Energizer OK green LED (RED LED function for SV2): • Flashes with each pulse to show the unit is on and operating correctly. - Page 15 Status Symbols (model dependant): • Wi-Fi Strength • Bluetooth (Not used) • Solar input active • Plug Pack on/Connected LCD Screen Examples 1. Charging from sunlight 2. Battery Fully Charged 3. Battery Voltage 13.6V 4. Low Battery 5. Battery Voltage 10.8V The following screens are shown when the unit is on (armed), scrolling from one to the other every 1.3 seconds.
-
Page 16: Installation
The mains power pack MUST be kept indoors! Solar Power Source: Included, simply place into direct sunlight and mount off of the ground. 2. Turn the energizer ON by pushing the Power button once. Page 16 © JVA Technologies. www.jva-fence.com... -
Page 17: Operation
OPERATION ELECTRIC FENCES Electric fence energizers work by discharging a short, safe, high voltage pulse onto the fence wires. The animal will not be harmed by a pulse, but it will remember to avoid contact with the energised fence in future. The high voltage is discharged from the red positive fence terminal of the energizer and this is connected to the live wires, or fence tape, of the fence to make them “live”... -
Page 18: Benefits Of Electric Fences
The fence and the earth voltages can be measured using an electric fence digital voltmeter or digital electric fence directional fault finder (the JVA Electric Fence Fault Finder). BENEFITS OF ELECTRIC FENCES •... -
Page 19: Electric Fences
ELECTRIC FENCES The Earth Return (also called Ground Return) configuration is the most common method for electric fences, particularly smaller fence applica- tions like “strip grazing”, due to its lower cost and ease of setting up. The fence live wire(s) are electrified and rely on the dirt to complete the circuit back to the energizer Earth terminal when an animal touches the fence. -
Page 20: Fence Return System
Page 20 © JVA Technologies. www.jva-fence.com... -
Page 21: Earthing Your Energizer
EARTHING YOUR ENERGIZER The best way to earth your energizer is using a 1 meter galvanized earth stakes. If the earth stake is too rusty it may not work properly. The best place to locate the earth stake is somewhere close to where the fence starts and that is kept damp like a garden bed, a water course, or the overflow from a rain water tank. - Page 22 1. Check the fence voltage using an electric fence volt meter. The JVA fault finder will also detect faults and direct you towards them. 2. Keep vegetation away from the fence. If it touches the fence it will reduce its performance.
-
Page 23: Troubleshooting Energizer Problems
(See Errors and Error Codes) on the LED and LCD displays. MOISTURE AND ANTS Moisture and Ants should not be a significant problem for the JVA range of energizers as they come in a weatherproof case. Still, where possible, keep the energizer protected from the weather. -
Page 24: Battery Replacement
BATTERY REPLACEMENT The JVA SV series of energizers contain a sealed lead-acid (SLA) or LiFePo4 battery that is charged by the solar panel. If the unit indicates a depleted battery it will flash the red error LED twice. The unit should be turned off and placed in full sun for 2 to 3 days to allow the battery to fully charge. - Page 25 (see image below) 5. Remove the battery and replace it with an equivalent 12V SLA battery of the same dimensions (JVA COB004 or AUS. Jaycar SB2486). Remove J1 shunt Alternative battery LiFePO4 (JVA COB010 or AUS. Jaycar SB2210).
-
Page 26: Errors And Error Codes
ERRORS AND ERROR CODES The JVA energizer may stop and display error codes. The error codes are displayed in two places. The first of these is on the Status (red) LED, where it will flash rapidly a number of times. The number of these flashes cor- responds to the Error Code. - Page 27 Error Red LED LCD Display Meaning Code # Flashes “Er 08” Self-calibration failure - insuffi- cient output “Er 09” Self-calibration failure – insuffi- cient capacitor charge “Er 10” Capacitor failure, charged too quickly “Er 11” Calibration error, voltage reading too low for fence conditions “Er 21”...
-
Page 28: Common Fence Problems
Using an electric fence volt meter or a JVA Electric Fence Fault Finder (do not use a standard multi- meter) check what the voltage is at the earth terminal of the energizer. In general you should see a reading less than 300 volts (0.3kV). -
Page 29: Australian Standards Requirements
Instructions for installation and connection of electric fences in Australia, as required under AS60335.2.76 AUSTRALIAN STANDARDS REQUIRE- MENTS - AS60335.2.76 This material is copyright of the International Electrical Commission (IEC). DEFINITIONS Connecting lead an electric conductor, used to con- nect the energizer to the electric fence or the earth electrode Electric animal fence an electric fence used to contain... - Page 30 Care must be taken to avoid damage to the connecting leads due to the effects of animal hooves or tractor wheels sinking into the ground. 9. Connecting leads shall not be installed in the same conduit as the Page 30 © JVA Technologies. www.jva-fence.com...
- Page 31 mains supply wiring, communicating cables or data cables. 10. Connecting leads and electric animal fence wires shall not cross above overhead power or communication lines. 11. Crossings with overhead power lines shall be avoided wherever pos- sible. If such a crossing cannot be avoided, it shall be made underneath the power line and as nearly as possible at right angles to it.
-
Page 32: Particular Requirements For Electric Animal Fences In Australia
At any such crossing, the adjacent electrified wires shall carry warning signs. PROHIBITED MOUNTING Electric fence conductors should not be mounted on a support used for any overhead power line. Page 32 © JVA Technologies. www.jva-fence.com... -
Page 33: Warranty
Whilst every effort has been made to check that the information contained in this manual is accurate, JVA Technologies will not be liable to loss or damage resulting from construction, operation or failure of any installation or system. -
Page 34: 10.3 Contacts
Kimberley Potchefstroom West Rand (Roodepoort) 29A Schmidtsdrift Road 35 Dr James Moroko Avenue 599 Ontdekkers Road Rhodesdene Tel : 018 297 1488 Delarey, Roodepoort Tel : 053 861 5631 Tel : 011 472 8823 Page 34 © JVA Technologies. www.jva-fence.com... - Page 35 Notes ST0146 User Manual Page 35...
- Page 36 DEALER Manufactured for JVA by Pakton Group The JVA logo is trademark of JVA Technologies Pty Ltd ST146 Cruiser Energizer Manual 1v0 fEncE...
Need help?
Do you have a question about the SV2 and is the answer not in the manual?
Questions and answers