
Related Manuals for VTech RM5764HDV2


Summary of Contents for VTech RM5764HDV2
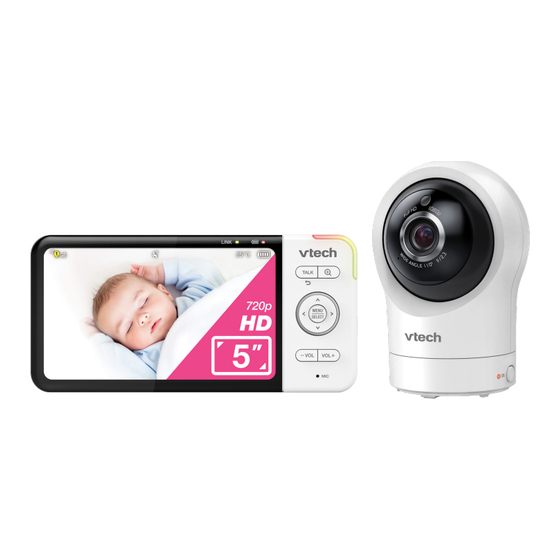
- Page 1 RM5764HDV2 RM5764HDV2-2 5” Smart HD Pan & Tilt Video Monitor with Remote Access User Guide This guide contains important information. Please keep it for future reference.
-
Page 2: Table Of Contents
Download App for Mobile Access ..................26 Test the Best Location for the Baby Unit ................27 Protect Your Privacy and Online Security ................28 Monitoring Modes (RM5764HDV2-2 only) ................29 Melodies and Soothing Sounds ....................30 Sound, Motion, Temperature Alerts ..................31 Low Battery and No Link Alerts .....................34 Night Vision ...........................35... -
Page 3: Important Safety Instructions
20. You should test the sound reception every time you Baby Unit Output: 5V DC 1.5A turn on the units or move one of the components. VTech Telecommunications Ltd. 21. Periodically examine all components for damage. Model: VT07EAU05150 Parent Unit Output: 5V DC 2A 22. - Page 4 Electromagnetic fields (EMF) children (more than 3 ft (0.9m) away). Do not remove warning label on the adaptor cord. This VTech product complies with all standards regarding electromagnetic fields (EMF). If handled properly and • Never place the camera unit(s) inside the baby’s crib according to the instructions in this user’s manual, the...
-
Page 5: Setup
Parent Unit Wall Mount Bracket Baby Unit Parent Unit Adaptor Baby Unit Adaptor Quick Start Guide 1 set for RM5764HDV2 Learn to set up your units and have all detailed instructions on using your audio 2 sets for RM5764HDV2-2 baby monitor. -
Page 6: Overview
Overview Baby Unit... - Page 7 Light Sensor Camera Lens Microphone Infrared LEDs • Allow you to see clearly in a dark environment. LED Indicator It is set to off by default. You can turn it on using the app (Setting > Camera Setting > LED status). In Direct Connect Mode: •...
- Page 8 Parent Unit...
- Page 9 LINK LED Light • On when the parent unit is linked to the baby unit. • Flashes when the link to the baby unit is lost. LED light • On when the parent unit is connected to AC power, and the battery is charging. •...
-
Page 10: Parent Unit Icons
Parent Unit Icons Main Sub- Options Menu menu Monitoring mode (For RM5764HDV2-2 only) • View baby units in Single mode. • View baby units in Patrol mode (switch view every 10 seconds). • View baby units in Split screen. General settings Connect to Mobile App •... - Page 11 Main Sub- Options Menu menu Melodies and soothing sounds Play/Stop • Toggle between play and stop. Library • Select to play all melodies, or play one of the five melodies or five soothing sounds. Camera Volume • Adjusts baby unit speaker volume. Timer •...
- Page 12 The signal icon(s) on the left indicate the baby unit is connected to a home Wi-Fi network. The red icon(s) indicates no connection. Baby unit 1 and 2 are being viewed in Patrol mode (For RM5764HDV2-2 only). Baby unit 1 and 2 are being viewed in Split mode (For RM5764HDV2-2 only).
- Page 13 Parent unit is muted. Temperature measured at baby unit. Battery level indicator Low battery indicator Alert Icons Displays when parent unit’s battery is low and needs charging. Displays when motion that exceed the set sensitivity level is detected at a baby unit. Displays when baby unit detects temperature reaches or exceeds the set maximum.
-
Page 14: Connect The Baby Monitor
Connect the Baby Monitor Notes: • The rechargeable battery in the parent unit is built-in. • Use only the power adaptors supplied with this product. • Make sure the parent unit and the baby unit are not connected to an electronically/timer controlled electric power outlet. -
Page 15: Charge The Parent Unit Battery
Charge the Parent Unit Battery The parent unit operates on an internal rechargeable battery or AC power. To continuously monitor your baby, keep the parent unit connected to AC power. When the parent unit is used on the internal batteries, the operating time will vary according to the initial state of charge and the settings. -
Page 16: Basic Operation
Basic Operation After powering up your video monitor, the parent unit streams live video in Direct mode. We recommend you follow the instructions on screen to set up a home Wi-Fi network connection with your monitor for mobile/tablet remote access and receiving firmware updates. - Page 17 2� The parent unit turns on automatically after connecting to the power socket, POWER and the welcome screen appears. You can press and hold to turn the parent unit on or off. 3� Once your baby unit and parent unit are powered on, the parent unit and baby unit will link to each other automatically.
-
Page 18: Test The Sound Level And Position The Baby Monitor
Test the Sound Level and Position the Baby Monitor Testing the Sound Level of the Baby Monitor You may test your baby monitor before initial use, and at regular times thereafter. Note: This baby monitor is intended as an aid. It is not a substitute for proper adult supervision, and should not be used as such. - Page 19 Positioning the Baby Monitor Caution: • Keep the baby unit out of the reach of your baby. Never place or mount the baby unit inside the baby’s crib or playpen. • Excessive downward camera tilt may impair night vision and sound reception. If so, please adjust the tilt slightly upward.
-
Page 20: Use The Menu
Use the Menu Press MENU on the parent unit to enter the main menu, choose a menu item, or save a setting. You can use the parent unit menu for advanced settings or operations, such as to play or stop the baby unit lullaby, or adjust the baby unit sound sensitivity. -
Page 21: Zoom, Pan And Tilt The Camera
Zoom, Pan and Tilt the Camera How to pan and tilt the camera: • Press on the parent unit to move the camera leftward; or press and hold to move the camera leftward continuously. • Press on the parent unit to move the camera rightward;... -
Page 22: Talk To Your Baby Via The Baby Unit
Talk to Your Baby via the Baby Unit 1� Press and hold the TALK key. 2� When the icon displays on screen, speak to your parent unit. Your voice is transmitted to the baby unit. 3� When finished talking, release the TALK key to hear your baby again. Press and hold Turn on/off the Parent Unit Screen You can turn on or off the parent unit screen without powering off the unit. -
Page 23: Adjust Parent Unit Screen Brightness
Adjust Parent Unit Screen Brightness 1� Press MENU/SELECT to enter the main menu. 2� Press repeatedly to choose General Settings menu, press MENU/ SELECT to enter. 3� Press repeatedly to select Screen Brightness. ress 4� P to adjust (Level 1 - Lowest to Level 5 - Highest). -
Page 24: Advanced Operation
Advanced Operation How the System Works? To receive product firmware updates, this baby monitor requires connecting to a 2.4GHz home Wi-Fi network. Direct Connect Mode Your baby monitor parent unit and baby unit connect to each other in Direct connect mode by default, which allows you to immediately stream video out of the box. - Page 25 App Connect Mode To enhance your experience and enjoy seamless live video streaming via your mobile app, and to receive product software updates (when available), we highly recommend setting up your monitor’s Wi-Fi connection. It uses your 2.4GHz home Wi-Fi network to connect your video monitor. It supports live video streaming through the mobile app.
-
Page 26: Download App For Mobile Access
Download App for Mobile Access Use the MyVTech Baby Plus on your mobile device to monitor your baby remotely. Follow the instructions below to set up and pair your baby monitor with the app. 1. Scan the QR code to download the free MyVTech Baby Plus mobile app, or search “MyVTech Baby Plus”... -
Page 27: Test The Best Location For The Baby Unit
Tips: Use Camera Sharing to instantly share access to the camera. Follow these steps: 1. Go to Menu and select Camera Sharing. 2. Choose “Invite People” and enter the name and email address of the family member’s app account. 3. The family member will receive a pop-up notification in the app and can accept the invitation to access the camera(s). -
Page 28: Protect Your Privacy And Online Security
Protect Your Privacy and Online Security Protect Your Privacy and Online Security VTech cares about your privacy and peace of mind. That’s why we’ve put together a list of industry-recommended best practices to help keep your wireless connection private and your devices protected when online. -
Page 29: Monitoring Modes (Rm5764Hdv2-2 Only)
Monitoring Modes (RM5764HDV2-2 only) When more than one baby unit is paired to the parent unit, you can choose to view different baby units in three monitoring modes. Learn more about each below: Single Mode The screen displays images only from the selected baby unit in full screen. -
Page 30: Melodies And Soothing Sounds
Melodies and Soothing Sounds There are 5 melodies and 5 soothing sounds in the baby monitor for you to comfort your baby with. Play the Melodies and Soothing Sounds 1� Press MENU/SELECT to enter the main menu. 2� Press to navigate, then press MENU/SELECT to enter Melodies &... -
Page 31: Sound, Motion, Temperature Alerts
Sound, Motion, Temperature Alerts Set Screen Off Timer You can set a specific time interval, if no keys have been pressed on the parent unit, the screen will turn off (goes to sleep) to save power. You can still hear sounds from the baby unit when the screen turns off. - Page 32 Motion Detect You can turn on Motion Detect and adjust the baby unit’s Motion Sensitivity Level to only detect your set level of motion. If you have turned on Motion Detect, when the baby unit detects motions that exceed the set level, the parent unit screen turns on if it has been switched off or dimmed, the parent unit beeps, and an alert will display on the screen.
- Page 33 Temperature To ensure your baby remains comfort at all time, the baby monitor allows you to monitor the room temperature detected by the baby unit. The parent unit's status bar will continuously display the current room temperature. If the detected temperature falls outside the preset range and the temperature alert is activated, the parent unit will emit a beep and display an alert message.
-
Page 34: Low Battery And No Link Alerts
Low Battery and No Link Alerts Adjust the Alert Volume 1� Press MENU | SELECT to enter the main menu. 2� Press to go to Alerts Settings menu. 3� Press repeatedly to select 4� Press to adjust the alert volume level. Turn on/off Low Battery and No Link Alerts Alerts Settings menu, press MENU | SELECT to enter. -
Page 35: Night Vision
Night Vision The baby unit has infrared LEDs that allow you to see your baby clearly at night or in a dark room. When the baby unit detects low light levels, the infrared LEDs are switched on automatically. The images from the baby unit are in black and white, appears on the parent unit screen. -
Page 36: Reset
Reset On Parent Unit To restore the parent unit to its default settings, you can reset it by inserting a pin or paper clip into the RESET hole on the back of the parent unit and gently press the button inside. Alternatively, you can reset your parent unit by accessing the menu, selecting >... -
Page 37: Software And Firmware Update
Software and Firmware Update To ensure that your baby monitor is always at its best performance, the parent unit will prompt you to update its software and the baby unit firmware when there are new versions available. You can check if your device is running on the latest software or to update your device software manually: 1�... -
Page 38: Additional Information
Additional Information Wall Mount (Optional) Notes: • Check the reception strength and baby unit camera angle before drilling any holes. • The types of screws and wall plugs you need depend on the composition of the wall. You may need to purchase the screws and wall plugs separately to mount your baby units. 1�... - Page 39 3� Align the wall mount bracket and screws with the holes in the wall as shown. Tighten the screw in the middle hole first, so that the wall mount bracket position is fixed. You can tighten the other screw in the top hole. Insert the screws into the holes and tighten the screws until only 6.5mm of the screws are exposed.
- Page 40 Place the baby unit on the wall mount bracket, and then slide it forward until it locks into place. Align the holes on the wall mount bracket with the screws on the wall, and slide the wall mount bracket down until it locks into place. 5.
-
Page 41: Frequently Asked Questions
Frequently Asked Questions Below are the questions most frequently asked about the baby monitor. Yes, press POWER | LCD ON/OFF on the parent Can I turn the parent unit display screen off but unit to turn off the screen. The parent unit display will keep hearing sounds from also dim automatically after being inactive for some the baby unit? -
Page 42: Maintenance
Maintenance To keep this product working well and looking good, follow these guidelines: • When you are not going to use the video monitor for some time, store the parent unit, the baby unit and the adaptors in a cool and dry place. •... -
Page 43: Customer Service And Product Warranty
24 months from date of purchase. VTech does not warrant that the product will be free from defects if defects are caused by an accident, misuse, abuse, improper installation or operation, vermin infestations, lack of reasonable care, unauthorised modification, loss of parts, tampering or attempted repair by a person not authorised by VTech;... -
Page 44: Disposal Of Batteries And Product
IMPORTANT NOTE: THIS IS NOT A PRODUCT RETURN OR SERVICE ADDRESS – PLEASE CONTACT TECHELP BY PHONE OR EMAIL FOR PRODUCT AND WARRANTY SUPPORT. NO LIABILITY WILL BE ACCEPTED BY VTECH FOR PRODUCTS RETURNED TO THIS ADDRESS UNDER THIS VOLUNTARY PRODUCT WARRANTY.
Need help?
Do you have a question about the RM5764HDV2 and is the answer not in the manual?
Questions and answers