Table of Contents
Advertisement
Quick Links
Advertisement
Table of Contents

Subscribe to Our Youtube Channel
Related Manuals for Snow Peak FES-433


Summary of Contents for Snow Peak FES-433
- Page 1 Product Manual Ver 1.00 FES-433 Tarp Extension Tent 4...
- Page 2 Thank you for purchasing this Snow Peak Product. This product is a tent to connect to a tarp for camping. To ensure your safety when using this product, please read these instructions carefully before use. Please be sure to keep this manual in a safe place for future reference. If you find anything in the instruction manual that is difficult to understand, or if you find a defect with the product, stop using it immediately and contact the dealer where you purchased the product, or Snow Peak Customer Service.
- Page 3 ●Before using the product, check each part for abnormalities. If there are abnormalities, take the product to the dealer or Snow Peak Customer Service for inspection or repairs. ●Pay close attention to the weather. If extreme weather is forecast, pack up camp and evacuate to a safe place.
-
Page 4: Part Names
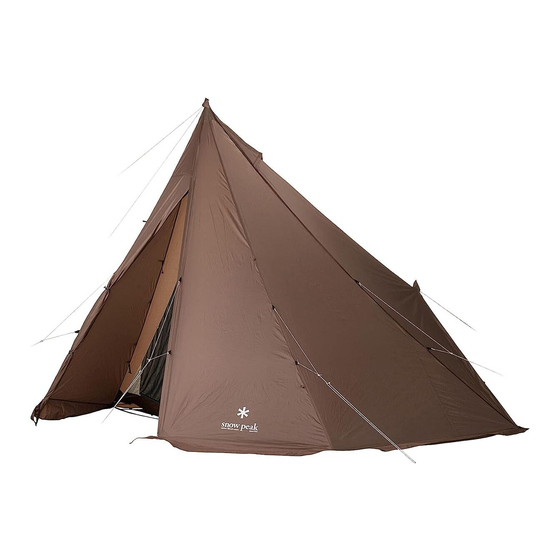
Part names *These illustrations show this product being connected to TP-250R HD Tarp Hexa Evo Pro. Please check the supported product list on page 17 and Building tape connect it to a tarp that can be used with this product. 280 cm (9.2') wing pole Tape... - Page 5 Rope with rope tensioner, peg down position 10 m (32.8') forked end rope 2.5 m (8.2') rope 2.5 m (8.2') rope 2.5 m (8.2') rope 5 m (16.4') forked end rope Fix each rope and determine the peg down positions as shown below. 2.5m (8.2') Rope...
- Page 6 Setup procedure: Please be sure to have two or more people available to set up the tent. Please practice tent setup and disassembly repeatedly according to the following explanation to prepare for use when camping. Make sure that you have all the accessories in advance. Inappropriate setup or disassembly may damage this product or wing poles, or lead to an accident.
- Page 7 Attaching the rope to the tip of the wing pole on the opposite side of the tarp Insert the tip of the wing pole into the triangular metal fitting at the main corner, and hook the center loop of the 10 m (32.8') forked end rope from above. Next, extend the rope approximately 45° around the wing pole until the tip of the rope and the lower end of the wing pole are in a straight line, and peg down the looped end of the rope.
- Page 8 Attaching the rope to each corner and pegging down Attach the rope to the tarp and peg down according to "Rope with rope tensioner, peg down position" on page 20. Pull the rope from the center of the tarp on the extension line connecting to the corners of both wings (on the extension line in the mounting direction of the grommet tape at each corner).
- Page 9 Attaching the pole cover After hooking the rope, secure it with Velcro tape so that the pole cover covers the tip of the pole. Pegging down the 5 m (16.4') forked end rope While paying attention to the position of the sub pole on the extension of the ridgeline of the tarp, pull the ends of the 5 m Approx.
- Page 10 ⑶ ⑴ Pegging down the peg down loops Insert a peg into each of the four peg down loops on the corners of the black building tape. * As shown in the figure on the right, peg down while pulling the sheet in the direction of the arrow, being aware of the diagonal lines.
- Page 11 Attaching the rope to the tip of the wing pole Bring down the pole as shown in the figure describing how to attach the rope. Then, extend the rope approximately 45° around the wing pole Approx. until the tip of the rope and the lower end of the 45°...
- Page 12 9 Pegging down the front panel Close the zipper on the front panel and peg down the peg down loops in two places in the front and one place at the back. Attaching the inner tent Spreading the ground sheet Spread the ground sheet so that the PU coated surface (shiny surface) is facing up and the woven name tag is on the front side.
-
Page 13: Back Side
Connecting the inner tent (1) Attach the hook at the top of the back side of the inner tent to the O-ring on the back of the fly sheet. (2) Wrap the Velcro tape on the top of the front of the inner tent around the wing pole as shown below. ( 1 ) ( 2 ) O-ring... - Page 14 Disassembly procedure: This product should always be assembled/disassembled by two or more people. Make sure there is nothing in your tent or under the tarp before you start disassembling the tent. Be sure to remove items used in the tent or under the tarp to outside the tarp, and keep a sufficient distance from the tarp. Remove the 2.5 m (8.2') rope pegs.
-
Page 15: Maintenance And Storage
Condensation Moisture suspended in the air rapidly cools down and turns into mist, which appears as condensation. In smaller spaces such as inside a narrow tent, the concentration of water vapor is higher than in an ordinary room and frequently results in more condensation. The water that comprises about 60% of the human body is released by breathing and sweating, which becomes water vapor and causes condensation to form inside the tent. -
Page 16: Specifications
The decision to repair or replace the product will be at our discretion. Snow Peak will not be able to repair the product or any damage that occurred due to any of the following: 1.
Need help?
Do you have a question about the FES-433 and is the answer not in the manual?
Questions and answers