Yamaha MU15 Owner's Manual
Yamaha mu15 synthesizer: owners manual
Hide thumbs
Also See for MU15:
- Owner's manual (112 pages) ,
- Owner's manual (112 pages) ,
- Service manual (55 pages)
Table of Contents
Advertisement
Advertisement
Table of Contents

Related Manuals for Yamaha MU15


Summary of Contents for Yamaha MU15
- Page 1 Owner’s Manual Bedienungsanleitung Mode d’emploi...
-
Page 2: Special Message Section
This product should be used only with the compo- nents supplied or; a cart, rack, or stand that is recommended by Yamaha. If a cart, etc., is used, please observe all safety markings and instructions that accompany the accessory product. - Page 3 SAVING USER DATA • Save all data to an external device such as the Yamaha MIDI Data Filer MDF3, in order to help prevent the loss of important data due to a malfunction or user operating error.
- Page 4 — all in a highly compact and portable package. With the built-in host computer interface and MIDI terminals, the MU15 is ideal for any computer music system — from connection to a simple laptop to integration in a complete MIDI studio.
- Page 5 XG logo, you will enjoy a full musical experience that includes unlimited expansion voices and effect func- tions. Your MU15 package should include the items listed below. Make sure that you have them all. • MU15 • Owner’s Manual...
-
Page 6: Table Of Contents
How to Use This Manual ... 8 The MU15 — What It Is and What It Can Do ... 10 What It Is..10 What It Can Do..10 About General MIDI (GM) ... 12 About XG ... 12 Panel Controls and Terminals ... - Page 7 • Filter Parameters — Cutoff Frequency and Resonance ... 50 Cutoff Frequency ... 50 Resonance ... 51 • EG (Envelope Generator) Parameters — Attack Time and Release Time ... 52 Attack Time ... 53 Release Time ... 53 • Vibrato Parameters — Rate, Depth, and Delay ... 54 Vibrato Rate ...
-
Page 8: How To Use This Manual
Since the MU15 is so easy to use, you could play it right “out of the box” without even having to glance at the manual. - Page 9 H o w t o U s e T h i s M a n u a l 5) Reference Once you’re familiar with everything above, lightly go over this comprehensive guide to all editing functions. You won’t need (or want) to read everything at once, but it is there for you to refer to when you need information about a certain feature or function.
-
Page 10: The Mu15 - What It Is And What It Can Do
XG set. What It Can Do... Here are a few ideas on how you can use the MU15. The list below is not comprehensive, but is meant to be a general guide to the possibilities and provide a starting point or springboard for your own creative ideas and explorations. - Page 11 MU15. Using With Other MIDI Controllers Even if you’re not a keyboard player, you can still play the MU15 with other types of MIDI controllers. For example, use a MIDI percussion controller to play the drum and percussion sounds of the MU15.
-
Page 12: About General Midi (Gm)
MIDI control and built-in effects of the MU15 (as well as other MU-series instruments). To get the most out of XG and your MU15, we recommend using XG-compatible instruments and software. For example, the Yamaha CBX-K2 keyboard lets you dynamically control a variety of param- eters in real time while you play. -
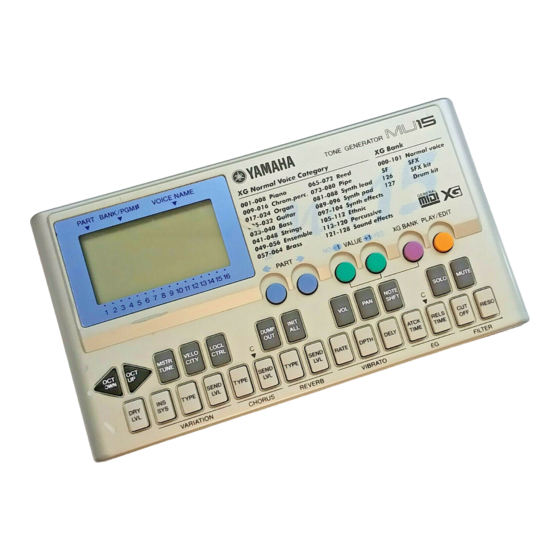
Page 13: Panel Controls And Terminals
P a n e l C o n t r o l s a n d T e r m i n a l s Panel Controls and Terminals Front Panel GrandPno q Display In the Play mode, this shows the Part number, the currently selected program number and Voice name for the Part. - Page 14 For changing the octave transposition of the MU15’s keyboard. (Page 29.) u Keyboard This two-octave keyboard is used to play the Voices of the MU15. It can also be used to enter notes to a connected sequencer or computer. (Page 22.) The keys are also used to select Edit mode parameters (the names of which are printed on the buttons).
- Page 15 P a n e l C o n t r o l s a n d T e r m i n a l s Rear Panel q MIDI OUT and MIDI IN terminals For connection to other MIDI devices, such as a MIDI keyboard, tone generator, sequencer, or to a computer that has a MIDI interface.
-
Page 16: Volume Control
P a n e l C o n t r o l s a n d T e r m i n a l s Side Panel q VOLUME control For adjusting the overall level of the MU15. w LINE OUT/PHONES jack For connection to an amplifier/speaker system or a set of stereo... -
Page 17: Guided Tour
MU15. Setting Up Your MU15 Since the MU15 has a built-in keyboard, you could use it with nothing more than a set of batteries and a proper set of stereo headphones. It can also be used effectively with a computer in a “desktop music”... -
Page 18: Power Supply
When connecting the AC power adaptor, first make sure that the MU15 is turned off (set to STANDBY). Next, connect one end of the power adaptor to the DC IN jack on the MU15, and connect the other end to an appropriate AC outlet. -
Page 19: Using Batteries
S e t t i n g U p Y o u r M U 1 5 Using Batteries To use the MU15 on battery power, insert six 1.5V AA size (SUM-3, R-6 or equivalent) manganese or alkaline batteries in the battery compartment. -
Page 20: Making The Connections
X Connect the audio cables. If you are using an external sound system, connect the LINE OUT/ PHONES jack on the side of the MU15 to the appropriate inputs of the sound system (as shown). Use a stereo mini-plug to dual RCA pin “Y”... -
Page 21: Powering Up
Even when the switch is in the “STANDBY” position, electricity is still flowing to the instrument at the minimum level. When you are not using the MU15, make sure you unplug the AC power adaptor from the wall AC outlet and remove the batteries from the MU15. -
Page 22: Playing The Mu15
Voices on the MU15 will sound. (For more information on MIDI, see page 91.) Playing the Demo Song To get a taste of what is possible with the MU15, try playing the built-in Demo Song. This showcases the high-quality Voices and the AWM tone generation system of the MU15. - Page 23 CAUTION • Once you play the demo song, any edits that you’ve made to the MU15 will be cleared (with the exception of the Velocity, Local Control and Octave settings). To save your important data, use the Dump Out function (page 65).
-
Page 24: Selecting Voices
The MU15 has a total of 676 different instrument Voices. Here, we’ll select a different Voice for playing. Each Voice is numbered, and there are 128 Voices from which you can immedi- ately select. (We’ll see how to select Voices outside of these 128 later.) Operation Use the VALUE buttons. - Page 25 P l a y i n g t h e M U 1 5 Voices As mentioned in the section “The MU15 — What It Is and What It Can Do,” the MU15 is capable of playing sixteen different instru- ment sounds at the same time.
-
Page 26: Selecting Parts
As you learned in “Selecting Voices” above, each Voice is numbered, and there are 128 of them from which you can select. These 128 Voices make up a Voice “Bank.” The MU15 has many Banks, each of which contain 128 Voices. By selecting a different Bank, you can select different Voices —... -
Page 27: Selecting Banks
Selecting Banks As you learned in “About Parts, Voices, and Banks” above, the MU15’s 676 Voices are organized into Banks of 128 Voices each. Here, we’ll see how to select Voices of different Banks. Operation Z Select the desired Part. -
Page 28: Playing Drum Voices
In this way, the MU15 skips over Banks that have the same Voices as the basic Bank (Bank 000), and lets you automatically jump to Banks that have unique Voices for the selected Voice number. In the above example, Banks 002 - 017 all have the same Voice for number 005: “E.Piano1.”... -
Page 29: Changing The Octave Setting
Play the sounds from the MU15’s keyboard or from a connected MIDI keyboard. Since the various drum/percussion sounds are spread out over several octaves, in order to play them from the MU15, you’ll need to change the octave setting (see next section). Changing the Octave Setting Although the MU15’s built-in keyboard has a two-octave range, you can... -
Page 30: Editing A Part
• The Velocity and Local Control settings cannot be saved. Editing on the MU15 is basically divided into three types of controls: Part, Effect, and Utility. In this section, you’ll learn how to change the Note Shift setting and the Volume setting (both Part controls). However, the instructions given here are fundamentally the same for all editing operations. -
Page 31: Soloing And Muting Parts
Soloing and Muting Parts The MU15 has convenient Solo and Mute functions for selectively soloing or muting any of the sixteen Parts. These functions are especially useful when playing back song data from a connected computer or sequencer, since they let you isolate specific Parts in the mix and hear how they sound by them- selves or how the rest of the song sounds without them. -
Page 32: Using The Effects
The compact MU15 is packed with an enormous amount of sonic power and flexibility. In addition to the huge amount of instrument Voices, the MU15 features a built-in multi-effect processor with three independent digital effects: Reverb, Chorus, and Variation. In this section, you’ll learn how to apply the effects, change the effect type, and set how much effect is applied for each Part. -
Page 33: Using The Variation Effects
P l a y i n g t h e M U 1 5 To do this, simultaneously hold down the PLAY/EDIT button and press the REVERB SEND LVL button (for Reverb), or the CHORUS SEND LVL button (for Chorus), and then set the value to “60” or higher, by using the VALUE buttons. - Page 34 P l a y i n g t h e M U 1 5 Operation Z Select the desired Part. Do this in the normal way, by using the PART buttons. X Set Variation Connection to “SYS” (System). Setting the Variation Connection parameter to “SYS” allows you to use the Variation effect for all Parts.
- Page 35 P l a y i n g t h e M U 1 5 B Select the desired Variation Type. Use the VALUE buttons. For a list of the available Variation Types, see page 60. N Set the Send Level control to the desired value. Once you’ve selected a Variation Type to your satisfaction, you can re-adjust the effect level for the selected Part (and other Parts, too).
-
Page 36: Using The Mu15 With A Computer/Sequencer
Voices of the MU15. First, you’ll have to make sure that the MU15 is properly connected to the computer or sequencer, and that your music software is ready to run. (Refer to page 37 for connection examples and instructions.) If you are using the TO... - Page 37 The MU15 can be used with the following comput- ers: Apple Macintosh and compatibles, or IBM PC/AT and compatibles. If your computer already has a MIDI interface, you can connect the MU15 to it by using MIDI cables instead.
- Page 38 C Turn on the power of the computer first, and then the MU15. V Start up your music software, and (if necessary) set the appropriate options on the software for operation with the MU15. (See note on page 39.) • Connecting via the TO HOST terminal MIDI keyboard controller GrandPno...
- Page 39 1 MHz. • If you are using the MU15 to enter notes to the computer and wish to hear what you are playing, you should set the music software to “echo” the MIDI IN data to the MIDI OUT (on the computer). This is usually done with a “MIDI Thru”...
-
Page 40: Playing Song Data
Once you set up your computer or sequencer with the MU15, you’re ready to play back song data using the Voices of the MU15. Although any GM-compat- ible song data can be played, the MU15 will sound best when used with XG- compatible song data. -
Page 41: Midi/Computer Connecting Cables
MINI DIN 8-PIN This concludes your basic tour of the important functions of the MU15. To find out more about how to best use your MU15, look through the Reference section that follows and try out some of the functions and operations that interest you. -
Page 42: Reference
R e f e r e n c e R e f e r e n c e The Reference section of this manual covers in detail all of the functions of the MU15. Refer to it when you need information about a specific function, feature, or operation. -
Page 43: Play Mode
The Play mode is the default mode of the MU15 and is automatically set when the power is turned on. The Play mode allows you to play the Voices, either from the MU15’s keyboard or from a MIDI device. Depending on data received via MIDI, the MU15 operates in one of two Sound Module modes: XG or TG300B. -
Page 44: Edit Mode
MU15. The Edit mode allows you to change various settings and parameters of the MU15. These controls are divided into three basic types: Part (page 45), Effect (page 56), and Utility (page 63). The basic method of editing is fundamentally the same for all of the param- eters. -
Page 45: Part Controls
E d i t M o d e NOTE • Selecting a Part does not apply to the Utility controls or Effect controls, except for the Send Level parameters (pages 57, 59, 61) and Dry Level (when Variation Connection is set to “SYS”; page 62). Once you’ve selected a certain parameter, you can instantly return to that parameter from the Play mode by simply pressing the PLAY/ EDIT button. -
Page 46: Volume
NOTE • Keep in mind that when playing the MU15’s keyboard, the actual sound level of a selected Part also depends on the Velocity parameter in the Utility controls (page 64). If the Velocity setting is at or near the minimum, the Part may be very low in level, no matter what the Volume setting made here. -
Page 47: Pan
E d i t M o d e Pan setting Selected Part Range: Rnd, L 63 - C 00 - R 63 Default: C 00 This determines the stereo position of the selected Part. The Pan position is graphically represented by bars in the display. The “Rnd” (Random) setting randomly assigns the Voice to a pan position. -
Page 48: Solo
Part While a song is playing back on your computer or sequencer, you can selectively solo any of the 16 Parts of the MU15. Solo lets you isolate a single Part, to hear how that Part sounds by itself. Along with Mute (page 49), Solo is an effective tool that helps you as... -
Page 49: Mute
While a song is playing back on your computer or sequencer, you can selectively mute any of the 16 Parts of the MU15. Mute lets you silence one Part to hear how all of the other Parts sound without it. -
Page 50: Filter Parameters - Cutoff Frequency And Resonance
Filter Parameters — Cutoff Frequency The MU15 features digital filters for each Part that allow you to change the timbre or tone of the Voices. The filters are affected (together with the level) by the EG (Envelope Generator) parameters, which allow you to change the timbre over time as well. -
Page 51: Resonance
E d i t M o d e Resonance Resonance setting Selected Part Range: -64 - +63 Default: 0 This determines the amount of filter resonance or emphasis of the Cutoff Frequency parameter above. Higher values make the filter effect more pronounced and stronger, creating a resonant peak around the cutoff frequency. -
Page 52: Eg (Envelope Generator) Parameters - Attack Time And Release Time
EG (Envelope Generator) Parameters — Attack Time and Release Time The EG parameters allow you to shape the sound of a Part’s Voice — or, in other words, set how the level and timbre of the Voice changes over time. The relationship of the two EG parameters —... -
Page 53: Attack Time
E d i t M o d e Attack Time Attack Time setting Selected Part Range: -64 - +63 Default: 0 This determines the Attack Time of the EG, or how long it takes for the sound to reach full volume when a note is played. Higher positive values result in a longer, slower attack. -
Page 54: Vibrato Parameters - Rate, Depth, And Delay
Vibrato Parameters — Rate, Depth, and Delay Vibrato produces a quavering, vibrating sound in the Part’s Voice, by regularly modulating the pitch. You can control the speed and depth of the Vibrato, as well as the time it takes before the Vibrato effect is applied. Vibrato Rate setting Selected... -
Page 55: Vibrato Delay
E d i t M o d e Vibrato Delay Vibrato Delay setting Selected Part Range: -64 - +63 Default: 0 This determines the delay in the start of the Vibrato effect. Delay is effective especially for producing a natural sound on stringed instrument Voices. -
Page 56: Effect Controls
Reverb Chorus Variation The MU15 features a built-in multi-effect processor with three independent digital effects: Reverb, Chorus, and Variation. Reverb recreates the sounds of various performance environments by adding an ambient wash of delays or reflections. Several different types of Reverb effects are available to simulate the ambience of different sized rooms. -
Page 57: Reverb Send Level
E d i t M o d e Reverb Type Settings: NoEffect, Hall1 - 2, Room1 - 3, Stage1 - 2, Plate, W-Room (White Room), Tunnel, Basement Default: Hall1 This determines the Type of Reverb effect, or the performance environment that is simulated. When “NoEffect” is selected, the Reverb effect is turned off. -
Page 58: Chorus Parameters
Chorus uses pitch modulation to create a variety of rich, spacious-sounding effects, including Chorus, Celeste, and Flanger. For general information on using the Chorus effect, see page 32. Settings: NoEffect, Chorus1 - 4, Celeste1 - 4, Flanger1 - 3 Default: Chorus1 This determines the Type of Chorus effect. -
Page 59: Chorus Send Level
The Variation effects provide a wealth of additional tools for processing the Voices of the MU15. It features most of the same effects found in the Reverb and Chorus effects. This is not mere redundancy; it allows you to use two types of Reverb or Chorus simultaneously on different Voices. -
Page 60: Variation Connection
Default: INS This determines how the Variation effect is connected in the effect chain of the MU15. When set to “SYS” (System), Variation is applied to all Parts, according to the amount of Variation Send Level (page 61) set for each Part. When set to “INS” (Insertion), Variation is applied to only the selected Part, also set in the Variation Send Level parameter. -
Page 61: Variation Send Level
E d i t M o d e RotarySp (Rotary Speaker), Tremolo, AutoPan, Phaser1 - 2, Dist (Distortion), OverDrv (Overdrive), AmpSim (Amp Simulator), 3BandEQ, 2BandEQ, AutoWah, PitchCng (Pitch Change), Thru Default: DelayLCR This determines the Type of the Variation effect. About “NoEffect”... -
Page 62: Dry Level
When the Variation Connection parameter (page 60) is set to “SYS,” this determines the level of the selected Part’s Voice that is sent to the Variation effect. In this case, each Part can be set independently for different amounts of Variation on each Voice. A value of “0” results in a completely “dry”... -
Page 63: Utility Controls
Range: +/- 999 (in 0.1 cent steps) Default: 0 This determines the overall fine tuning of the MU15’s Voices. It does not affect the pitch of the individual drum/percussion sounds of the Drum Voices. Master Tune is especially useful for adjusting the pitch of the MU15 when playing with other instruments. -
Page 64: Velocity
88 (default). • Keep in mind that when playing the MU15’s keyboard, the actual sound level of a selected Part also depends on the Volume parameter in the Part controls (page 46). If the Volume setting is at or near the mini- mum, the Part may be very low in level, no matter what the Velocity setting made here. -
Page 65: Dump Out
If the sequencer is also set up to play back data using the Voices of the MU15, when you play the MU15, it will be sounding its own Voices twice — once from the keyboard, and after a very brief delay, again from the MIDI data coming from the sequencer. - Page 66 HOST SELECT switch is properly set. When using the MIDI terminals, connect the MIDI OUT of the MU15 to the MIDI IN of the data recorder. (See the “Saving and Restoring Data via MIDI” illustration above.) Also, set the HOST SELECT switch to MIDI.
- Page 67 Make sure that the devices are properly connected (see the illustra- tions on page 66), and execute the appropriate data transfer opera- tion from the data recorder. (Refer to the owner’s manual of that device or software for instructions.) The MU15 automatically receives incoming bulk data. NOTE •...
-
Page 68: Initialize All
CAUTION • Using Initialize All will erase whatever settings you’ve made on the MU15. If you have important settings you wish to keep, store them to a MIDI data recorder with the Dump Out function. (See page 65.) Operation Z Simultaneously hold down the PLAY/EDIT button and press the INIT ALL button. -
Page 69: Appendix
A p p e n d i x Troubleshooting Even though the MU15 is exceptionally easy to use, it may occasionally not function as you expect it to. If that happens, check the possible problems and solutions below before assuming that the instrument is faulty. - Page 70 • Check all MIDI connections, making sure that the MIDI OUT of the external device is connected to the MIDI IN of the MU15, and that the MIDI IN of the external device is connected to the MIDI OUT of the MU15.
-
Page 71: Error Messages
Error Messages Errors may occur from time to time, and when they do the MU15 will display a message to indicate the type of problem so that you can rectify it and return to normal operation. “Battery” The battery voltage is too low for proper operation. Replace the old batteries with a set of new ones. -
Page 72: Specifications
Specifications and descriptions in this owner’s manual are for information purposes only. Yamaha Corp. reserves the right to change or modify products or specifications at any time without prior notice. Since specifications, equipment or options may not be the same in every locale, please check with your Yamaha dealer. -
Page 73: Index
Attack Time ... 52, 53 Banks ... 26, 27 Banks, selecting ... 27 batteries, replacing ... 19 batteries, using ... 19 Chorus ... 32, 58 Chorus Send Level ... 59 Chorus Type ... 58 computer, connections ... 38, 39 computer, IBM ... 38, 39 computer, Macintosh ... - Page 74 I n d e x Release Time ... 52, 53 Resonance ... 51 Reverb ... 32, 56 Reverb Send Level ... 57 Reverb Type ... 57 Solo ... 48 Sound Module mode... 43 SYS (System) ... 34, 60 TG300B mode ... 43 Utility controls ...
-
Page 75: Sound List & Midi Data
S o u n d L i s t & S o u n d L i s t & M I D I D a t a M I D I D a t a XG Normal Voice List ... 76 TG300B Normal Voice List ... -
Page 76: Xg Normal Voice List
Bank Select MSB=000, LSB=Bank Number Instrument Program Bank Ele- Voice Name Group ment Piano GrandPno GrndPnoK MelloGrP PianoStr Dream BritePno BritPnoK El.Grand ElGrPnoK Det.CP80 LayerCP1 LayerCP2 HnkyTonk HnkyTnkK E.Piano1 El.Pno1K MelloEP1 Chor.EP1 HardEl.P VX El.P1 60sEl.P1 E.Piano2 El.Pno2K Chor.EP2 DX Hard DXLegend DX Phase DX+Analg... - Page 77 Instrument Bank Ele- Instrument Program Program Voice Name Group ment Group Reed SprnoSax Synth Pad Alto Sax Sax Sect HyprAlto TenorSax BrthTnSx SoftTenr TnrSax 2 Bari.Sax Oboe Eng.Horn Bassoon Clarinet Pipe Piccolo Flute Recorder PanFlute Synth Bottle Effects Shakhchi Whistle Ocarina Synth Lead 81 SquareLd...
-
Page 78: Tg300B Normal Voice List
TG300B Normal Voice List Bank Select MSB=Bank Number, LSB=000 Instrument Program Bank Ele- Voice Name Group ment Piano GrandPno GrndPnoK MelloGrP A-Piano1 a.piano1 BritePno BritPnoK A-Piano2 a.piano2 El.Grand LayerCP1 LayerCP2 ElGrPnoK A-Piano3 a.piano3 HnkyTonk HnkyTnkK A-Piano4 e.piano1 E.Piano1 Chor.EP1 VX El.P1 60sEl.P1 HardEl.P MelloEP1... - Page 79 T G 3 0 0 B N o r m a l V o i c e L i s t Instrument Bank Instrument Program Ele- Program Voice Name Group Group ment Synth Lead Brass Trumpet Trumpet2 BriteTrp Warm Trp Sax-3 contrabs Trombone...
-
Page 80: Xg Drum Voice List (Drum Map)
XG Drum Voice List (Drum Map) - Page 81 X G D r u m V o i c e L i s t ( D r u m M a p )
-
Page 82: Tg300B Drum Voice List (Drum Map)
TG300B Drum Voice List (Drum Map) - Page 83 T G 3 0 0 B D r u m V o i c e L i s t ( D r u m M a p )
-
Page 84: Effect Type List
REVERB Exclusive Effect Type NoEffect Hall1 Hall2 Room1 Room2 Room3 Stage1 Stage2 Plate W-Room Tunnel Basement CHORUS Exclusive Effect Type NoEffect Chorus1 Chorus2 Chorus3 Chorus4 Celeste1 Celeste2 Celeste3 Celeste4 Flanger1 Flanger2 Flanger3 VARIATION Exclusive Effect Type NoEffect Hall1 Hall2 Room1 Room2 Room3 Stage1... -
Page 85: Effect Parameter List
Effect Parameter List • Parameters marked with a (assignable controller 1) and AC2. However, this is valid only for a Variation effect (when selected for Insertion). • The “ Tbl ”column refers to the Effect Data Assigh Table (page 90). •... - Page 86 Echo No. * Parameter Range Lch Delay1 0.1~355.0ms Lch Feedback Level -63~+63 Rch Delay1 0.1~355.0ms Rch Feedback Level -63~+63 High Damp 0.1~1.0 Lch Delay2 0.1~355.0ms Rch Delay2 0.1~355.0ms Delay2 Level 0~127 Dry/Wet D63>W ~ D=W ~ D<W63 EQ Low Frequency 50Hz~2.0kHz EQ Low Gain -12~+12dB...
- Page 87 Chorus1,2,3,4, Celeste1,2,3,4 No. * Parameter Range Value LFO Frequency 0.00~39.7Hz 0-127 LFO PM Depth 0~127 0-127 Feedback Level -63~+63 1-127 Delay Offset 0~127 0-127 EQ Low Frequency 50Hz~2.0kHz 8-40 EQ Low Gain -12~+12dB 52-76 EQ High Frequency 500Hz~16.0kHz 28-58 EQ High Gain -12~+12dB 52-76 Dry/Wet...
- Page 88 RotarySp No. * Parameter Range LFO Frequency 0.00~39.7Hz LFO Depth 0~127 EQ Low Frequency 50Hz~2.0kHz EQ Low Gain -12~+12dB EQ High Frequency 500Hz~16.0kHz EQ High Gain -12~+12dB Dry/Wet D63>W ~ D=W ~ D<W63 ROTARY SP. Tremolo No. * Parameter Range LFO Frequency 0.00~39.7Hz AM Depth...
- Page 89 Dist, OverDrv No. * Parameter Range Value Drive 0~127 0-127 EQ Low Frequency 50Hz~2.0kHz 8-40 EQ Low Gain -12~+12dB 52-76 LPF Cutoff 1.0k~Thru 34-60 Output Level 0~127 0-127 EQ Mid Frequency 500Hz~10.0kHz 28-54 EQ Mid Gain -12~+12dB 52-76 EQ Mid Width 1.0~12.0 10-120 Dry/Wet...
-
Page 90: Effect Data Assign Table
Effect Data Assign Table Table#1 LFO Frequency (Hz) Data Value Data Value Data Value 0.00 1.81 5.38 0.04 1.85 5.55 0.08 1.89 5.72 0.13 1.94 6.06 0.17 1.98 6.39 0.21 2.02 6.73 0.25 2.06 7.07 0.29 2.10 7.40 0.34 2.15 7.74 0.38 2.19... -
Page 91: Midi Data Format
• Edit the Parts and change parameter values • Edit the effects Note On/Off (Key On/Off) These tell the MU15 which notes to play and how long they are to be played. Velocity values let you change the dynamics or level of the sound, depending on how strongly you play the keys. - Page 92 < MIDI TRANSMIT/RECEIVE FLOW > (1)TRANSMIT FLOW <CHANNEL VOICE MESSAGE> MIDI OUT [SW1] <SYSTEM EXCLUSIVE MESSAGE> <XG PARAMETER CHANGE> <UNIVERSAL NON REALTIME MESSAGE> <XG BULK DUMP> [SW1] MIDI Transmit Channel MIDI Transmit Channel is selected by Par t. (2)RECEIVE FLOW <CHANNEL VOICE MESSAGE>...
- Page 93 M I D I D a t a F o r m a t AEG RELEASE TIME DRUM INST FILTER CUTOFF FREQ. FILTER RESONANCE AEG ATTACK RATE AEG DECAY RATE PITCH COARSE PITCH FINE LEVEL PANPOT CHORUS SEND VARIATION SEND PITCH BEND SENS.
-
Page 94: Channel Messages
1. Channel messages This device transmits only NOTE ON and NOTE OFF. 1.1 Note on/note off These messages convey keyboard performance data. Note-on is transmitted when a note is pressed, and note-off is transmitted when a note is released. These messages contain a note number which indicates the key that was played, and a “velocity”... - Page 95 With a value of 0 there will be no sound, and with a value of 127 the volume will be maximum. 1.2.8 Hold1 This message controls sustain pedal on/off. The notes that are sounding while the pedal is pressed will be sustained.
- Page 96 1.2.16 Portamento Control This message specifies the portamento source key number (the key number at which portamento will begin). Data of 0...127 specifies the portamento source key. When Por tamento Control is received, the currently-sounding pitch will change at a Por tamento Time of 0 to the key of the next-received note-on of the same channel.
- Page 97 1.2.22 RPN (Registered parameter number) This message is used to specify part parameters such as Pitch Bend Sensitivity or Tuning etc. as an offset value. Use RPN MSB and RPN LSB to specify the parameter that you wish to modify, and then use Data Entry (see 1.2.4) to set the value of the specified parameter.
-
Page 98: System Exclusive Messages
By using these messages, it is possible to edit almost all settings of the MU15 from an external MIDI device. The device number of the MU15 is fixed to “All”. And when sending these messages, it is fixed to “0”. - Page 99 SSH. The same applies elsewhere. 2.1.2 Universal non-realtime messages 2.1.2.1 General MIDI System On This system exclusive message causes the MU15 to function as a tone generator that is compatible with GM System Level 1. 11110000 = Exclusive status 01111110...
- Page 100 When this data is received, the MU15 will change the Chorus effect type to “Flanger1”. * Any number is OK, since the device number for the MU15 is fixed to “All”. Be sure to allow enough time for the procedure to take place by inserting an empty measure at the top of the song for every channel.
-
Page 101: Realtime Messages
2.3.1 XG parameter request This message requests transmission of XG parameter settings. Settings are transmitted in the format of an XG parameter change (refer to 2.1.3). 11110000 Exclusive status 01000011 YAMAHA ID 0011nnnn N:device Number 01001100 Model ID 0ggggggg Address High... - Page 102 < Table 1 -1 > Parameter Base Address MODEL ID = 4C Parameter Address XG SYSTEM INFORMATION EFFECT 1 DISPLAY MULTI PART DRUM < Table 1 - 2 > MIDI Parameter Change table ( XG SYSTEM ) Address Size Data 00 - 0F 00 - 0F 00 - 0F...
- Page 103 < Table 1 - 4 > MIDI Parameter Change table ( EFFECT 1) Address Size Data Parameter 00 - 7F REVERB TYPE MSB 00 - 7F REVERB TYPE LSB 00 - 7F REVERB PARAMETER 1 00 - 7F REVERB PARAMETER 2 00 - 7F REVERB PARAMETER 3 00 - 7F...
- Page 104 Address Size Data 00 - 7F 00 - 7F 00 - 7F 00 - 7F 00 - 7F 01 - 7F 00 - 7F 00 - 7F 00 - 01 00 - 7F 00 - 7F 00 - 7F 00 - 7F 00 - 7F 00 - 7F TOTAL SIZE...
- Page 105 < Table 1 - 6 > MIDI Parameter Change table ( MULTI PART ) Address Size Data Parameter 00 - 20 ELEMENT RESERVE 00 - 7F BANK SELECT MSB 00 - 7F BANK SELECT LSB 00 - 7F PROGRAM NUMBER 00-0F,7F Rcv CHANNEL 00 - 01...
- Page 106 Address Size Data 00 - 7F 00 - 7F 00 - 7F 00 - 7F 00 - 7F 00 - 7F 00 - 7F 00 - 7F 00 - 7F 00 - 7F 00 - 7F 00 - 7F 28 - 58 00 - 7F 00 - 7F 00 - 7F...
- Page 107 EG DECAY2 RATE TOTAL SIZE n:Drum Setup Number(0 - 1) rr:note number(0D - 5B) In the following cases, the MU15 will initialize all Drum Setups. XG SYSTEM ON received GM SYSTEM ON received DRUM SETUP RESET received (when in XG mode) NOTE When a part to which a Drum Setup is assigned receives a program change, the assigned Drum Setup will be initialized.
- Page 110 This product, when installed as indicated in the instructions contained in this manual, meets FCC requirements. Modifications not expressly approved by Yamaha may void your authority, granted by the FCC, to use the product. 2. IMPORTANT: When connecting this product to accessories and/or another prod- uct use only high quality shielded cables.
- Page 111 For details of products, please contact your nearest Yamaha or the authorized distributor listed below. Pour plus de détails sur les produits, veuillez-vous adresser à Yamaha ou au distributeur le plus proche de vous figurant dans la liste suivante. NORTH AMERICA CANADA Yamaha Canada Music Ltd.
- Page 112 V328460 901POCP1.5-01A0 Printed in Japan M.D.G., EMI Division © 1999 Yamaha Corporation...
Need help?
Do you have a question about the MU15 and is the answer not in the manual?
Questions and answers