Table of Contents
Advertisement
Quick Links
Technical Support and E-Warranty Certificate www.vevor.com/support
Baby Food mills
MODEL:BFP-1600E
We continue to be committed to provide you tools with competitive price.
"Save Half", "Half Price" or any other similar expressions used by us only represents an
estimate of savings you might benefit from buying certain tools with us compared to the major
top brands and dose not necessarily mean to cover all categories of tools offered by us. You
are kindly reminded to verify carefully when you are placing an order with us if you are
actually saving half in comparison with the top major brands.
Advertisement
Table of Contents

Related Manuals for VEVOR BFP-1600E


Summary of Contents for VEVOR BFP-1600E
- Page 1 Technical Support and E-Warranty Certificate www.vevor.com/support Baby Food mills MODEL:BFP-1600E We continue to be committed to provide you tools with competitive price. "Save Half", "Half Price" or any other similar expressions used by us only represents an estimate of savings you might benefit from buying certain tools with us compared to the major top brands and dose not necessarily mean to cover all categories of tools offered by us.
- Page 2 This is the original instruction, please read all manual instructions carefully before operating. VEVOR reserves a clear interpretation of our user manual. The appearance of the product shall be subject to the product you received. Please forgive us that we won't inform you again if there are any technology or software updates on our product.
-
Page 3: Important Safeguards
IMPORTANT SAFEGUARDS When using electrical appliances, basic safety precautions should always be folowedincluding the following: a) Read all instructions. b) To protect against risk of electrical shock do not put main body in water or other liquid. c) This appliance is not intended for use by persons (including children) with reduced physical,sensory, or mental capabilities, or lack of experience and knowledge,unless they are closelysupervised and instructed concerning use of the appliance by a person responsible for theirsafety. - Page 4 m) The appliance is intended for processing small quantities of food for immediate consumption, and is especially recommended for preparing baby food. The appliance is notintended to prepare large quantities of food at one time. n) Keep hands and utensils away from moving blades or discs while processing food toreduce the risk of severe injury to persons or damage to the food processor.
-
Page 5: Grounding Instructions
ac)To reduce the risk of injury, do not drape cord over the counter top or table top where it canbe pulled on by children or tripped over unintentionally. SAVE THESE INSTRUCTIONS HOUSEHOLD USE ONLY a) A short power-supply cord (or detachable power-supply cord) is provided to reduce risksresulting from becoming entangled in or tripping over a longer cord. - Page 6 2. Do not use the product if the plug, main cord, or appliance is damaged. 3. The damaged cord may only be replaced by VEVOR, VEVOR's authorized service center, or similarly qualified persons to avoid hazards.
- Page 7 2.CAUTION 1. Do not use other parts and accessories produced by manufacturers not recommended by vevor. Using different parts and accessories will invalidate the warranty. 2. Do not immerse the appliance in water nor place the appliance on or near the stove.
- Page 8 7. Do not use the products if there is any damage or broken parts. You can send the product to vevor's authorized servicing facility for repair. 8. Avoid dripping puree or juice into the water tank to prevent the coating of the heating plate from rusting due to the food's acidity and basicity.
-
Page 9: Fcc Information
— by clients in hotels and motels; — bed and breakfast type environments. 21. Always disconnect the appliance from the power supply after every use to avoid the danger of electrocution. 22. This appliance shall not be used or played with by children. Keep the appliance and its cord out of reach of children. -
Page 10: Product Technical Parameters
This product generates, uses and can radiate radio frequency energy, and if not installed and used in accordance with the instructions, may cause harmful interference to radio communications. However, there is no guarantee that interference will not occur in a particular installation. If this product does cause harmful interference to radio or television reception,which can be determined by turning the product off and on, the user is encouraged to try to correct the interference by one or more of the... -
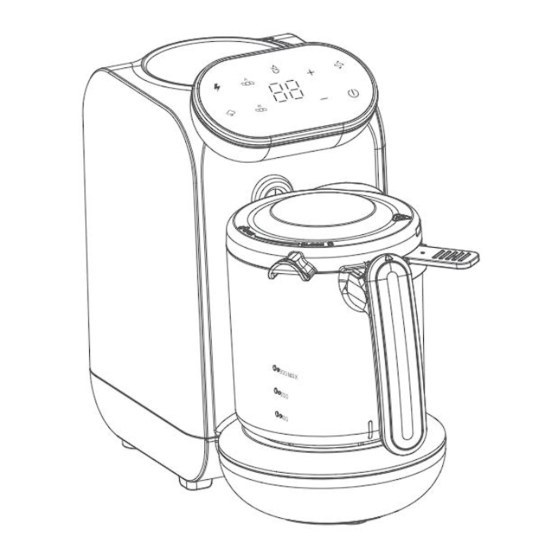
Page 11: Panel Features
5.Panel Features The panel's " " indicator goes red when you connect the appliance. It means that the device is ON and ready to use. A white light indicates that the product is functional and ready to use. The white light turns on when touching the "... - Page 12 Time display:To show working time for STEAM or STERILIZE. To display the working status of blending. Time increase :The working time could be increased manually for steam function or sterilizing. Sterilize :The remaining time will be shown by pressing this button, a "Beep"...
- Page 13 Power button :The Power Button will become red after you connect your appliance to the power supply. To activate your baby food processor, press the power button. (To turn ON, press and hold the power button for three seconds). 6. Parts Of Product Heat Resistant Cold Resistant...
- Page 14 stirring cup ℉ Spill-proof Food-grade 120℃/248 cover -20℃/-4℉ ℉ Steaming Food-grade 120℃/248 -20℃/-4℉ basket ℉ Food-grade 120℃/248 Blade -20℃/-4℉ ℉ Waterproof Food-grade 120℃/248 -20℃/-4℉ circle silicone ℉ Food-grade 120℃/248 Stirring cup -20℃/-4℉ silicone ℉ 120℃/248 Blade holder Tritan -20℃/-4℉ ℉ 7.Preparation Adding water to the tank: Fill the tank with distilled or filtered water until you reach the MAX logo, then turn/rotate the tank's cover.
-
Page 15: Functions And Operation
Pear 15min Peas 15min Pineapple 15min Leaf mustard 15min Plum 15min Potato 20min Asparagus 15min Pumpkin 15min Broccoli 15min Spinach 15min Carrot 20min Cabbage 15min Cauliflower 15min Sweet potato 15min Celery 15min Tomato 15min Chicken / Watermelon 15min Meat 20min Beef/ Mutton Fennel 15min... - Page 16 3. We advise you to "sterilize" the cycle before the initial usage and frequently. Just click the "Sterilize" button; the process takes 10 minutes (the timer will show the time remaining). 4. Refill the water tank up the "Max" line. 5.
- Page 17 9. Place the steaming basket securely inside the stirring cup (To ensure that the handle and the steaming basket are properly aligned). 10. Attach the stirring cup lid by placing it on top and rotating counterclockwise to lock it in place. 11.
- Page 18 4. Reattach the stirring cup lid by twisting it in a counterclockwise direction, and then attach the stirring cup to the main body by aligning the handle with the "Open" label on the base and locking it in place by twisting it in the opposite direction.
- Page 19 once the process is complete. Step4 : Warming Place milk bottle into the water tank, then fill water to MAX line. Press the "Warm" button. The display will show 7 minutes by default (NOTE: time is adjustable from2-15 minutes). The "Warm" indicator will blink three times before it starts working, the machine will beep five times when sterilizing is complete.
- Page 20 milk is too hot, cool it down by placing the bottle into room temperature water; if it is too cold, put it back in the water tank to heat an extra 0.5-1 minute. Check the Milk Heating Timetable for recommended heating time. Milk Warming Time Reference Sheet Put the bottle into the water tank and add room temperature water (22°C/71.6Fto max line, then heat milk to 37°C/98.6°F...
-
Page 21: Step5 : Cleaning & Maintenance
Step5 : Cleaning & Maintenance 1. Switch off and remove the stirring cup. 2. Remove the lid of the stirring cup. 3. Take out the blade from the stirring cup. Disassemble the blade. 4. Add water and the right amount of detergent into the stirring cup to reach the Max Cleaning position. -
Page 22: Troubleshooting
10.Troubleshooting TROUBLE SHOOTING: Q: The timer display showing the error message E1? A: This usually means the stirring cup is not correctly attached to the base unit. Start by lining up the handle of the stirring cup with the "Open" label on the base. - Page 23 Q: The food is not blending properly? A: First, ensure the stirring cup doesn't contain too much food and the consistency isn't too thick; you might need to add a little water. Before attempting to combine the meal, make sure that the food has been cooked properly;...
- Page 24 Technical Support and E-Warranty Certificate www.vevor.com/support...
Need help?
Do you have a question about the BFP-1600E and is the answer not in the manual?
Questions and answers