Advertisement
Quick Links
Technical Support and E-Warranty Certificate
www.vevor.com/support
Meat Mixer/Meat Processing Motor
MODEL:BMM10/BME10/BME20/BME30
/BME40/BME60/BME10-T/BME20-T
/BME30-T/BME40-T/TCX8
/TCX12/TCX22
We continue to be committed to provide you tools with competitive price.
"Save Half", "Half Price" or any other similar expressions used by us only represents an
estimate of savings you might benefit from buying certain tools with us compared to the major
top brands and does not necessarily mean to cover all categories of tools offered by us. You
are kindly reminded to verify carefully when you are placing an order with us if you are
actually saving half in comparison with the top major brands.
Advertisement

Subscribe to Our Youtube Channel
Related Manuals for VEVOR BMM10


Summary of Contents for VEVOR BMM10
- Page 1 Technical Support and E-Warranty Certificate www.vevor.com/support Meat Mixer/Meat Processing Motor MODEL:BMM10/BME10/BME20/BME30 /BME40/BME60/BME10-T/BME20-T /BME30-T/BME40-T/TCX8 /TCX12/TCX22 We continue to be committed to provide you tools with competitive price. "Save Half", "Half Price" or any other similar expressions used by us only represents an estimate of savings you might benefit from buying certain tools with us compared to the major top brands and does not necessarily mean to cover all categories of tools offered by us.
- Page 2 Meat Mixer/Meat Processing Motor MODEL: BMM10/BME10/BME20/BME30/BME40/BME60/BME10-T/BME20-T/BM E30-T/BME40-T/TCX8/TCX12/TCX22 BME-T BME+TCX BME-T TCX8 TCX12 TCX22 - 1 -...
-
Page 3: Important Safeguards
This is the original instruction, please read all manual instructions carefully before operating. VEVOR reserves a clear interpretation of our user manual. The appearance of the product shall be subject to the product you received. Please forgive us that we won't inform you again if there are any technology or software updates on our product. - Page 4 7.Use a wooden or plastic spatula to remove any mixing residues from the bowl. 8.Clean the inside and the parts with a brush or sponge and the warm soapy water (not in the dishwasher). Then rinse under the tap to remove any residues.Always allow the parts and accessories to dry after cleaning, or dry with a soft cloth.
- Page 5 8. Never pull the plug from the main socket by the lead. 9. Do not wrap the lead around the main body of the appliance during or after use. 10. The appliance can be left plugged into the electrical supply when not in use to ensure the batteries are always charged.
-
Page 6: Technical Parameter
Technical Parameter 1.1.BMM series of manual meat mixer Mixing Capacity Model Volume Power BMM10 14.3-16.5 6.5-7.5 Handy 1.2.BME series of manual meat mixer with gear Mixing Capacity Model Volume Power BME10 14.3-16.5 6.5-7.5 Handy BME20 28.6-35.2 13-16 Handy with gear box... -
Page 7: Installation
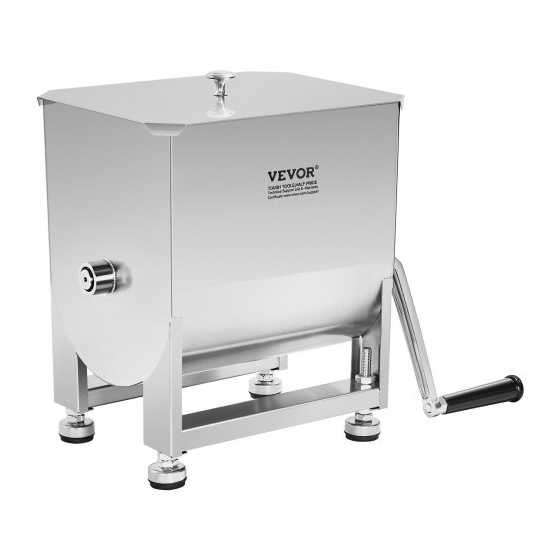
TCX22 AC120V/60Hz Handy 320*290*410 INSTALLATION 2.1.Exploded view,installation drawing and note 2.1.1.BMM Series BMM10 Picture1 Picture 2 Installation steps Step 1: By adjusting the heights of feet ① and nut ②, fasten the meat mixer into the feet of tank ⑥ (see picture 1). - Page 8 fix the handle ④ with the butterfly screw ③ (see picture 1). Step 3: By Aligning the screw ⑧ with the lid handle ⑨, install both of them on the center of lid ⑩ (See picture 1). Place the lid ⑩ on the tank ⑥ (see picture 2).
- Page 9 fix the handle ④ with the butterfly screw ③ (see picture 1). Step 3: By Aligning the screw ⑧ with the lid handle ⑨, install both of them on the center of lid ⑩ (See picture 1). Place the lid ⑩ on the body ⑥ (see picture 2).
- Page 10 fix the handle ④ with the butterfly screw ③ (see picture 2). Step 3: By Aligning the screw ⑧ with the lid handle ⑨, install both of them on the center of lid ⑩ (See picture 1). Place the lid ⑩ on the tank ⑥ (see picture 2).
- Page 11 and adjust the suitable height to avoid the body tilting during operation. 2. clear the tank inside after mixing and put the meat mixer in a cool and dry place (not in the dishwasher). 3. When mixing the minced meat, please don’t put your hand in the tank to avoid injury.
- Page 12 Installation steps Step 1: By adjusting the heights of feet ① and nut ②, fasten the meat mixer into the feet of tank ③ (see picture 1). Step 2: By Aligning the screw ⑧ with the lid handle ⑨, install both of them on the center of lid ⑩...
- Page 13 Picture1 Picture 2 Cleaning steps: When cleaning all the series of meat mixer, remove the butterfly screw ① on left and right sides, then take out the mixing shaft assembly ② (see picture 2). Finally clean the tank with the food safety detergent and the water.
- Page 14 5.Before using the appliance for the first time,it is recommended to clean the appliance according to the manual instruction 6.Remove the lid from the product. 7.Add the mixture from top to down. Do not exceed the recommended maximum capacity. 8.Place the lid back on top. 9.Rotate the handle to stir the mixture.
- Page 16 Technical Support and E-Warranty Certificate www.vevor.com/support...
Need help?
Do you have a question about the BMM10 and is the answer not in the manual?
Questions and answers