
Related Manuals for Modular Closets VANITY 193619


Summary of Contents for Modular Closets VANITY 193619
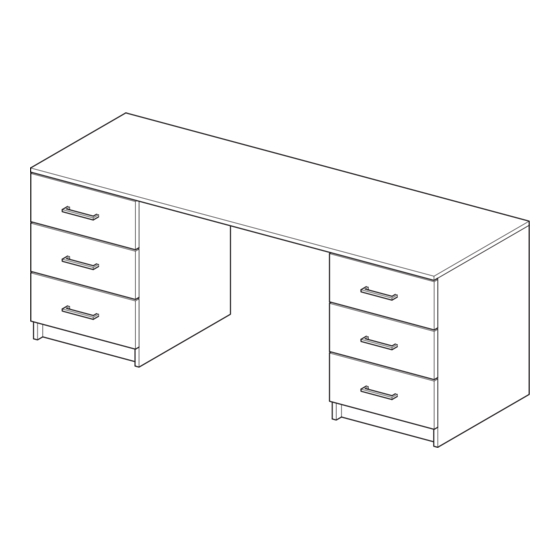
- Page 1 support@modularclosets.com 1-844-969-4247 VANITY, 193619 ASSEMBLY AND INSTALLATION INSTRUCTIONS...
-
Page 2: Parts List
ASSEMBLY AND INSTALLATION INSTRUCTIONS VANITY, 193619 E, F A1, A2 B1, B2 FINISHED EDGE FINISHED EDGE PARTS LIST Left Side Panel (Left Cabinet) (Qty 1) Left Side Panel (Right Cabinet) (Qty 1) Right Side Panel (Left Cabinet) (Qty 1) Right Side Panel (Right Cabinet) (Qty 1) Set Shelf (Qyt 1) FINISHED EDGE Top (Qty 1) -
Page 3: Assembly And Installation Instructions
ASSEMBLY AND INSTALLATION INSTRUCTIONS VANITY, 193619 PARTS LIST Drawer Panel, Front (Qty 3) Drawer Panel, Rear Qty (3) Drawer Panel, Side (Qty 6) Drawer Front (Qty 3) Drawer Bottom (Qty 3) Drawer Slide (Qty 6) Shelf Slide (Qty 6) Drawer Handle (Qty 3) Euro Screw, 5/8"... - Page 4 ASSEMBLY AND INSTALLATION INSTRUCTIONS VANITY, 193619 2.1 Install one Cam Post (H) into each of the six holes on Left Side Panel (A1) and Right Side Panel (B1). Tighten until Cam Posts are seated against Side Panels.
-
Page 5: Important Notes
ASSEMBLY AND INSTALLATION INSTRUCTIONS VANITY, 193619 3.1 Assemble Set Shelf (D), Rear Cleats (E) and Toe Kick (F) onto Right Side Panel (B1) by sliding the Shelves, Cleats and Toe Kick onto Cam Posts (I) on Right Side Panel. BE SURE dowel pins in Shelves, Cleats and Toe Kick engage drilled holes in Right Side Panel, and all parts are pressed flush against Panel. - Page 6 ASSEMBLY AND INSTALLATION INSTRUCTIONS VANITY, 193619 4.1 Install Left Side Panel (A1) onto assembled Set Shelf (D), Rear Hanging Cleats (E) and Toe Kick (F). BE SURE dowel pins in Shelf, Cleats and Toe Kick engage drilled holes in Side Panel, and Side Panel is pressed flush against Set Shelf, Cleats and Toe Kick.
- Page 7 ASSEMBLY AND INSTALLATION INSTRUCTIONS VANITY, 193619 ARROW TOWARD CAM POST OPENING Insert Camlocks (I) in holes in Set Shelf (D), Rear Hanging Cleats (E) and Toe Kick (F) with arrow pointing toward Cam Post opening. Be sure Camlocks engage Cam Posts, and are fully seated in Shelf, Cleats and Toe Kick.
- Page 8 ASSEMBLY AND INSTALLATION INSTRUCTIONS VANITY, 193619 6.1 Install one Cam Post (H) into each of the 13 holes on Top (D). Tighten until Cam Posts are seated against Top. 7.1 Install one Cam Post (H) into the hole on Left Side Panel (A1) and Right Side Panel (B2).
- Page 9 ASSEMBLY AND INSTALLATION INSTRUCTIONS VANITY, 193619 Insert six Wood Dowels (J) into holes in Stretcher (G). Align Wood Dowels (J) in Stretcher (G) with holes in Cabinet Side Panels (A1, B2), and press components together until flush.
- Page 10 ASSEMBLY AND INSTALLATION INSTRUCTIONS VANITY, 193619 ARROW TOWARD CAM POST OPENING Insert Camlocks (I) in holes in Stretcher (G) with arrow pointing toward Cam Post opening. Be sure Camlocks engage Cam Posts, and are fully seated in Stretcher. Tighten Camlocks (I) clockwise to lock.
- Page 11 ASSEMBLY AND INSTALLATION INSTRUCTIONS VANITY, 193619 ARROW TOWARD CAM POST OPENING 10.1 Insert eight Wood Dowels (J) into holes in edges of Left Side Panels (A1, A2) and Right Side Panels (B1, B2). 10.2 Install Top (D) onto assembled components. BE SURE dowel pins in Left Side PanelS (A1, A2) and Right Side Panels (B1, B2) engage drilled holes in Top and Top is pressed flush against Side Panels.
- Page 12 ASSEMBLY AND INSTALLATION INSTRUCTIONS VANITY, 193619 11.1 Insert Wood Dowels (X) into holes in ends of Front Drawer Panel (K) and Rear Drawer Panel (L). 12.1 Align Wood Dowels in Front Drawer Panel (K) and Rear Drawer Panel (L) with holes in one Side Drawer Panel (M), and press components together until flush.
- Page 13 ASSEMBLY AND INSTALLATION INSTRUCTIONS VANITY, 193619 NOTE: Be sure to install Drawer Bottom (O) with finished side facing up. 13.1 Align Drawer Bottom (O) with slots in Front Drawer Panel (K) and Rear Drawer Panel (L), then slide Drawer Bottom into assembled Drawer Panels until Drawer Bottom is seated against Side Drawer Panel (M). 14.1 Align Side Drawer Panel (M) with Wood Dowels in Front Drawer Panel (K) and Rear Drawer Panel (L) and press Side Drawer Panel (N) onto assembled components until flush.
- Page 14 ASSEMBLY AND INSTALLATION INSTRUCTIONS VANITY, 193619 15.1 Secure Side Drawer Panels (M) to Front Drawer Panel (K) and Rear Drawer Panel (L) using 1.5" Screws (V). NOTE: Drawer Slides (P) and Shelf Slides (Q) are shipped assembled. Lift Slide Release to separate Drawer Slide from Shelf Slide.
- Page 15 ASSEMBLY AND INSTALLATION INSTRUCTIONS VANITY, 193619 NOTE: DO NOT overtighten Screws (U) or surface of Drawer Front (N) may become dimpled. 17.1 Position Drawer Front (N) on assembled Drawer and secure to Front Drawer Panel (K) with 1.0" Screws (U). 17.2 Install Drawer Handle (R) on Drawer and secure with two 1.5"...
- Page 16 ASSEMBLY AND INSTALLATION INSTRUCTIONS VANITY, 193619 18.1 Position Shelf Slide (Q) over pre-drilled holes in Side Panels (A, B), then secure with two 5/8" Euro Screws (S) at locations shown. 18.2 Repeat for second Shelf Slide (Q). Tip: For best results, use a small level to ensure Shelf Slides (Q) are properly positioned before tightening.
- Page 17 ASSEMBLY AND INSTALLATION INSTRUCTIONS VANITY, 193619 19.1 Slide Drawer onto Shelf Slides until slides latch. 19.2 Repeat steps 11 through 19 for the remaining five drawers.
Need help?
Do you have a question about the VANITY 193619 and is the answer not in the manual?
Questions and answers