Advertisement
Table of Contents
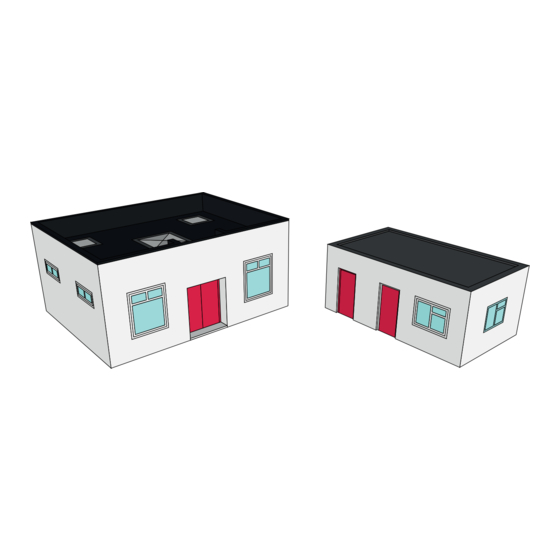
ATD023 - Mess Hut and Store
Instruction Manual
Tools Required
Modellers Knife (with a fresh blade)
Cutting Mat
Modelling Glue (we recommend Deluxe Materials Roket Card Glue)
Fine Tip Applicator
Low-tac Masking Tape
Clips / Clamps
Tips
Prior to starting your build, we recommend reading through the instructions to familiarise
yourself with the build style of the kit.
We recommend painting any white edges as you remove the components from the sheet to
improve the finished look. We advise watercolour paints for the best finish.
The components are held in position using breakout perforations. To remove them, gently pop
them out of the main sheet.
Remove each component as it is required to prevent losing or mixing it up with another component.
Ensure that glue is distributed evenly and not too close to the edge as it may ooze out when
pressure is applied.
Use low-tac masking tape, clamps and weights to aid the assembly process.
Advertisement
Table of Contents

Related Manuals for atd models ATD023


Summary of Contents for atd models ATD023
- Page 1 ATD023 - Mess Hut and Store Instruction Manual Tools Required Modellers Knife (with a fresh blade) Cutting Mat Modelling Glue (we recommend Deluxe Materials Roket Card Glue) Fine Tip Applicator Low-tac Masking Tape Clips / Clamps Tips Prior to starting your build, we recommend reading through the instructions to familiarise yourself with the build style of the kit.
- Page 2 Mess Hut Assembly Components are Labelled in Black Detach Component A and fold the walls along the crease lines. Next, detach Inner Wall A and glue it to the inside of the Component A. Ensure that there is even spacing around the window openings and the bottom of the walls are flush with one another.
- Page 3 6. Form the Roof Kerbs. Kerb A (x2) - Glue 3 x Packer A together. Repeat. Kerb B (x2) - Glue 3 x Packer B together. Repeat. Kerb C (x1) - Glue 3 x Packer C together. Try to ensure the components are as flat/level as possible.
- Page 4 10. Apply glue to the underside of the roof kerb. Then, insert the roof inside the building and bond it to the roof kerb. 11. Detach Packer D (x4). Fold 12. Form Roof Kerb D. 13. Detach Kerb D Wrap (x2). each one along the score line and glue together.
- Page 5 16. Detach the Door Columns (x2) and the Door Beam. Fold each one along the score lines to form the column-like components and glue together. 17. Detach your preferred door. Then, glue the columns and beam around the door. 18. Detach the Column Covers (x2) and glue them to the door columns.
- Page 6 21. Apply glue around the edge of the floor (excluding the door area) and glue it into position. This can be a little fiddly if it’s your first time doing this so try to take your time. Applying even pressure where the floor meets the wall until it’s semi-cured will ensure a firm hold.
- Page 7 4. Locate the Glazing Sheet and cut out the windows along the thin outer lines. Then, glue each one into position. Ensure that the side wall glazing is glued to Component B (the window openings on Component A are slightly bigger). Glue the side walls of Component B to the inside of Component A’s side walls.
- Page 8 We’d love to see photos of your finished models. Please send them to enquiries@atdmodels.co.uk for a chance to be featured on our social media pages. © Copyright ATD Models | All Rights Reserved © Copyright ATD Models | All Rights Reserved...
Need help?
Do you have a question about the ATD023 and is the answer not in the manual?
Questions and answers