Advertisement
Quick Links
Technical Support and E-Warranty Certificate
www.vevor.com/support
METAL SHEAR ATTACHMENT
USER MANUAL
We continue to be committed to offering tools at competitive prices. "Save Half", "Half Price",
or any other similar expressions used by us only represent an estimate of savings you might
benefit from buying certain tools with us compared to the major top brands and do not
necessarily mean to cover all categories of tools offered by us. You are kindly reminded to
verify carefully when placing an order with us if you are saving half in comparison with the top
major brands.
Advertisement

Related Manuals for VEVOR DR12


Summary of Contents for VEVOR DR12
- Page 1 Technical Support and E-Warranty Certificate www.vevor.com/support METAL SHEAR ATTACHMENT USER MANUAL We continue to be committed to offering tools at competitive prices. "Save Half", "Half Price", or any other similar expressions used by us only represent an estimate of savings you might benefit from buying certain tools with us compared to the major top brands and do not necessarily mean to cover all categories of tools offered by us.
- Page 2 CustomerService@vevor.com This is the original instruction, please read all manual instructions carefully before operating. VEVOR reserves a clear interpretation of our user manual. The appearance of the product shall be subject to the product you received. Please forgive us that we won't inform you again if there are any technology or software...
- Page 3 The symbols used in this manual are intended to alert you of the possible risks. Please fully read the safety signs and instructions below. The warning themselves do not prevent the risks and can not be a substitute for proper methods of avoiding accidents.
-
Page 4: Product Specifications
PRODUCT SPECIFICATIONS METAL SHEAR ATTACHMENT Model DR12 Blade Material ADC12 Max Gauge 18GA Shank Size 1/4”Hex Materials to cut Sheet metal, corrugated sheet metal,duct, asphalt shingle, steel mesh, vinyl siding, wire, plastics, cardboard, and rubber Cutting capacity 0.8mm Stainless Steel,1.2mm Galvanized Steel 2.0mm Aluminum plate... - Page 5 to be cut. DO NOT use under wet conditions or in the presence of flammable liquids or gases. DO NOT let children come into contact with the shear. Supervision is required when inexperienced operators use this tool. DO NOT hold the shear attachment as a primary gripping surface. ·Make sure the power tool is set to the“forward”(clockwise)direction before use.
-
Page 6: Replacing Blades
b. Rotate the knobs(3)on both sides to loosen the clamp. Then adjust the length of the clamp by pulling or pushing on the length adjustinglever (4) of the telescoping clamp. c. Lock at the desired length/width by pushing the lock(2)located at the end of the telescoping clamp. - Page 7 2. Separate the casings. NOTE: There is grease in casing 3. Remove the blades. Be sure to keep the reusable washer(D). 4. Place new lower blade(B)onto casing as shown in drawing above. 5. Apply a thin layer of grease(not provided)on side of lower blade(B). 6.
-
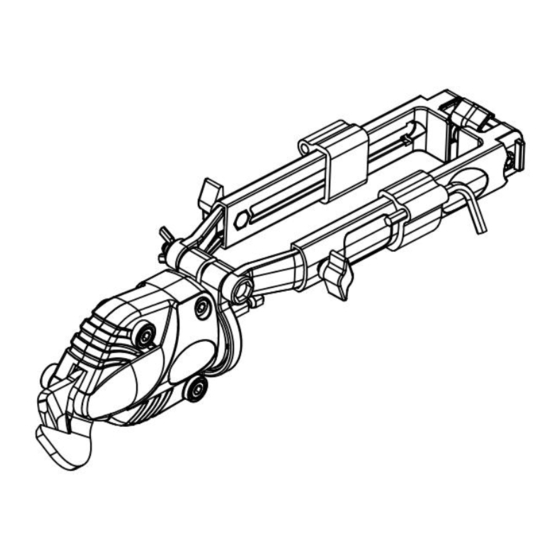
Page 8: Exploded View
3.When cutting, try to parallel the material to be cut with the fixed blade(No.21 in the diagram) EXPLODED VIEW PARTS LIST... - Page 9 WARNING! When servicing, use only original equipment replacement parts. The use of any other parts may create a safety hazard or cause damage to the tool. Any attempt to repair or replace electrical parts on this tool may create a safety hazard unless a qualified technician performs repairs.
- Page 10 Prevailling torque type hexagon nut Washer Hex key Address:Baoshanqu Shuangchenglu 803long 11hao 1602A-1609shi Shanghai Imported to AUS: SIHAO PTY LTD, 1 ROKEVA STREETEASTWOOD NSW 2122 Australia Imported to USA: VEVOR STORE INC, 9448 RINCHMOND PL #E RANCHO CUCAMONGA, California, 91730 United States of America...
- Page 12 Technical Support and E-Warranty Certificate www.vevor.com/support...
Need help?
Do you have a question about the DR12 and is the answer not in the manual?
Questions and answers