Advertisement
Technical Support and E-Warranty Certificate www.vevor.com/support
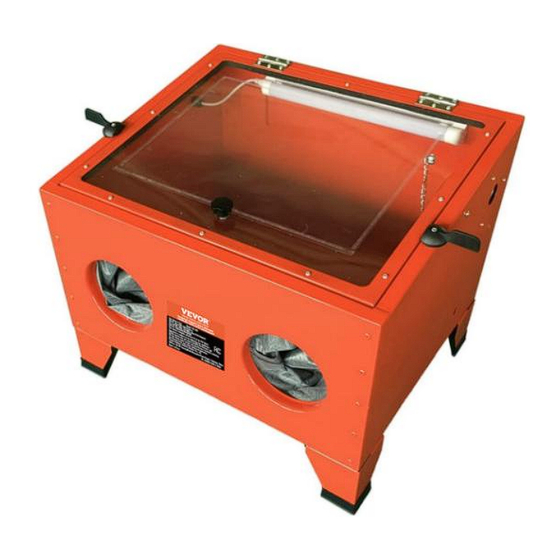
SAND BLASTER CABINET
MODEL:SBC90
We continue to be committed to provide you tools with competitive price.
"Save Half", "Half Price" or any other similar expressions used by us only represents an
estimate of savings you might benefit from buying certain tools with us compared to the major
top brands and does not necessarily mean to cover all categories of tools offered by us. You
are kindly reminded to verify carefully when you are placing an order with us if you are
actually saving half in comparison with the top major brands.
Advertisement
Table of Contents

Related Manuals for VEVOR SBC90


Summary of Contents for VEVOR SBC90
- Page 1 Technical Support and E-Warranty Certificate www.vevor.com/support SAND BLASTER CABINET MODEL:SBC90 We continue to be committed to provide you tools with competitive price. "Save Half", "Half Price" or any other similar expressions used by us only represents an estimate of savings you might benefit from buying certain tools with us compared to the major top brands and does not necessarily mean to cover all categories of tools offered by us.
- Page 2 This is the original instruction, please read all manual instructions carefully before operating. VEVOR reserves a clear interpretation of our user manual. The appearance of the product shall be subject to the product you received. Please forgive us that we won't inform you again if there are any technology or software updates on our product.
-
Page 3: Main Specifications
1. Description The SBC90 shot blasting cabinet is constructed of steel with a transparent access lid on top with internal illumination. The inside of the viewing screen is replaceable. Supplied with a shot blasting gun the unit is suitable for glass beads, silicon carbide, aluminum oxide, silica sand and any other dry media. - Page 4 PLUG. WARNING! It is the user's responsibility to read, understand and comply with the following electrical instructions. You must ensure the risk of electric shock is minimized by the installation of appropriate safety devices. An RCCB (Residual Current Circuit Breaker) should be incorporated in the main distribution board.
-
Page 5: General Safety
indoor use only). WARNING! NEVER substitute the standard 2 pin plug, or any other type of plug, for the transformer plug. 3.2 GENERAL SAFETY WARNING! Ensure Health & Safety, government and local authority regulations relating to the use of shot blasting are adhered to when using this equipment. - Page 6 √ Keep children and non-essential persons away from the work area. × DO NOT use the cabinet for a task it is not designed to perform. × DO NOT operate the cabinet if any parts are damaged or missing as this may cause failure and/or personal injury.
- Page 7 4. Main construction 4.1 Connect four plates by bolts (M5x10)and nuts. Please note there are four fixing sheets for corner use. The front plate is always on the side plate. 4.2 Use M6x12 bolts to connect cabinet,funnel and feet. Please note the bolts must insert from cabinet and nut from bottom Note: If the temperature is low, the...
- Page 8 4.3 Put the net into the cabinet. 4.4 Assemble the LED lamp and switch box. - 7 -...
- Page 9 4.5 Assemble the filter 4.6 Connect the hinges in the top door with ST4*8 screw to the cabinet. Assemble chain with M6x12 screw and tight it. Assemble two bakelite locker on the cabinet with M6x20 screw. Assemble the door handle on the plexiglass and tight it.
- Page 10 4.7 Assemble the gloves to the front plate by clamps Φ120-Φ150. 4.8 After finishing full assembly, check and tight all screws. Fill full the cornor gap with silicone sealant to improve sealing. - 9 -...
- Page 11 Assemble blasting gun 1. Connect sand hose (No.4) with gun(No.2), clamp (No.3)it.Connect sand pipe (No.5) into sand hose and clamp it. 2. Connect air hose (No.8) with gun and clamp(No.7) it. Then connect air connector (No.6), inner thread connector(No.9). Please twine 5 circles teflon tape clockwise rotation on the air connector to avoid leakage.
- Page 12 Install sandblasting gun, rubber and metal washer to the inner thread connector of right cabinet plate. Please note to wrap the Teflon tape for connector if necessary. To make sure no air leakage. Important Note: 1. Due to logistics reasons, few metal sheets may become slightly deformed, which could to be corrected by simple tools.
-
Page 13: Parts List
Parts list Description Hinge Tapping screw ST4*8 Transformer Switch box Cross screw&nut M5*10 Clamp for LED lamp Cross screw&nut for lamp clamp M4*6 LED lamp Glove(pair) Glove clampΦ120-Φ150 Cabinet foot Sand funnel Cross screw&nut for funnel M6*12 Working net Cabinet 11-1 Cross screw&nut for cabinet M5*10 Filter plate... - Page 14 Bakelite locker 15-1 Screw& jam nut for Bakelite locker M6*20 Plexiglass metal frame Plexiglass 17-1 Plexiglass film (sticked1,packed 3) Door handle 18-1 Nut for door handle M8*12 Blasting gun (with 1 nozzle& 1 air connector) Air hose Air hose clamp Φ8-Φ12 Sand pipe Sand hose Sand hose clamp Φ16-Φ25...
- Page 15 - 14 -...
-
Page 16: Fcc Information
5. FCC Information CAUTION: Changes or modifications not expressly approved by the party responsible for compliance could void the user's authority to operate the equipment! This device complies with Part 15 of the FCC Rules. Operation is subject to the following two conditions: 1) This product may cause harmful interference. -
Page 17: Correct Disposal
6. CORRECT DISPOSAL This product is subject to the provision of european Directive 2012/19/EU. The symbol showing a wheelie bin crossed through indicates that the product requires separate refuse collection in the European Union. This applies to the product and all accessories marked with this symbol. Products marked as such may not be discarded with normal domestic waste, but must be taken to a collection point for recycling electrical and electronic devices. - Page 19 Technical Support and E-Warranty Certificate www.vevor.com/support...
Need help?
Do you have a question about the SBC90 and is the answer not in the manual?
Questions and answers