TSC Alpha-3R User Manual
Mobile barcode printer
Hide thumbs
Also See for Alpha-3R:
- Manual (49 pages) ,
- User manual (43 pages) ,
- Service manual (29 pages)

Subscribe to Our Youtube Channel
Related Manuals for TSC Alpha-3R


Summary of Contents for TSC Alpha-3R
- Page 1 Mobile Barcode Printer Alpha-3R Direct Thermal Series Models Alpha-3R User Manual www.tscprinters.com...
- Page 2 All other trademarks are the property of their respective owners. Information in this document is subject to change without notice and does not represent a commitment on the part of TSC Auto ID Technology Co. No part of this manual may be reproduced or transmitted in any form or by any means, for any purpose other than the purchaser’s personal use, without the expressed written...
-
Page 3: Table Of Contents
Using the IP54 Case with Shoulder Strap (optional) ...................... 19 Operator Interface ............................20 LED Indicators and Buttons ............................20 Power-on Utilities ................................22 TSC Console ..............................23 Launching TSC Console..............................23 Adding Wi-Fi Interface ..............................25 Configuring Bluetooth ..............................29 Initializing Printer’s Wi-Fi Settings .......................... - Page 4 Configuring Optional Kits ..............................33 Troubleshooting ............................34 Maintenance ..............................36 Cleaning Supplies ................................37 Cleaning Procedures ..............................38 10 Agency Compliance and Approvals ......................39 Revision History ..............................48...
-
Page 5: Introduction
Thank you very much for purchasing TSC barcode printer. Print receipts and tickets on demand and on the go with TSC's Alpha-3R, a cost-effective 3-inch mobile receipt printer. The Alpha- 3R printer is designed for durability, featuring an IP54-rated protective case to resist dust and water. It is comfortable to wear for a full shift without interfering with the user's tasks. -
Page 6: Specifications
1.1 Specifications Model Alpha-3R Resolution 8 dots/mm (203 dpi) Printing Method Direct Thermal Max. Print Speed Up to 102 mm (4") per second Max. Print Width 72 mm (2.83") Max. Print Length 2,286 mm (90") Enclosure Plastic with rubber over-molded construction... - Page 7 Model Alpha-3R Reflective sensor Sensors Head open sensor 8 alpha-numeric bitmap fonts Internal Fonts One Monotype Imaging® CG Triumvirate Bold Condensed scalable font 1D barcode Code 39, Code 93, Code128UCC, Code128 subsets A.B.C, Codabar, Interleave 2 of 5, EAN-8, EAN-13, EAN-...
- Page 8 Model Alpha-3R Mini type USB 2.0 USB to RS-232 converter cable Li-ion battery 1-slot battery charger User Options 4-slot battery charger IP54-rated protective case with shoulder strap 12-24V DC vehicle power adaptor 12-60V DC vehicle power adaptor...
-
Page 9: Unpacking And Inspecting
2 Unpacking and Inspecting The printer has been specially packaged to withstand damage during shipment. Retaining the packaging materials is recommended in case you need to ship the printer. When unpacking, ensure that you have received all the following items: Barcode printer x1 ▪... -
Page 10: Getting To Know Your Printer
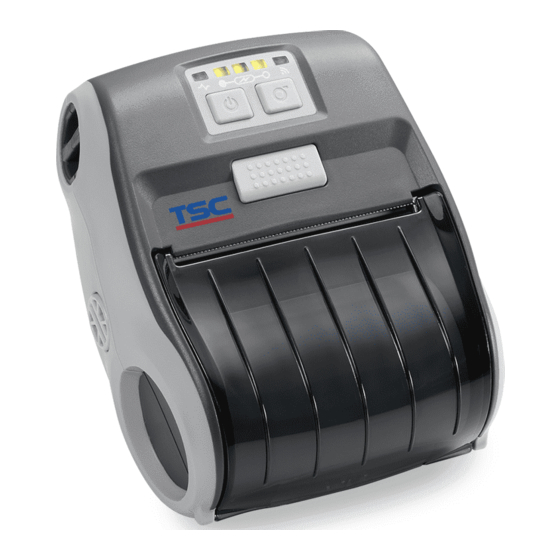
3 Getting to Know Your Printer 3.1 Front View Media cover release button Feed button LED indicators Media cover Power on/off button Media holder adjustment knob... -
Page 11: Inner View
3.2 Inner View Platen roller Media holder Tear bar Printhead Black mark sensor... -
Page 12: Bottom & Rear View
3.3 Bottom & Rear View Li-ion Battery Battery clasp USB interface Interface cover Power jack socket... -
Page 13: Setting Up The Printer
4 Setting up the Printer 4.1 Installing the Battery 1. Install the battery into its compartment as indicated. 2. Press down the battery to lock the battery in place. WARNING: DO NOT throw the battery in fire. DO NOT short circuits the battery terminals. -
Page 14: Charging The Battery
4.2 Charging the Battery It takes about 2 to 3 hours to fully charge the battery for the first time. The battery lifetime is about 300 charge/discharge cycles. The battery’s normal working temperature is from 0°C to 40°C (32°F to 104°F). The device and battery charger are designed to charge battery in a safe and optimized manner. - Page 15 4.2.2 Charging via the Battery Charger Station (optional) Insert the power cable connector into the power jack socket on the charger station. Install the battery in the charger station. Insert the power plug into a power outlet socket. Charger LED Status Description Green / Solid Battery is fully charged.
- Page 16 4.2.3 Charging via the Vehicle Power Adapter (optional) Open the interface cover and then insert the power cable connector into the power jack socket on the printer. Insert the vehicle power adapter into cigarette lighter socket on your car.
-
Page 17: Setting Up The Connection
4.3 Setting up the Connection 4.3.1 Wired Connection USB to USB Cable Open the printer’s interface cover. Insert the mini USB connector to the printer. Insert the other end of the USB cable to your computer. USB to RS-232 Cable Open the printer’s interface cover. -
Page 18: Loading The Media
4.4 Loading the Media Press the media cover release button to open the media cover. Rotate the knob to separate the media holders based on the width of the media ensuring that the media holder overlaps the black line. NOTE: The media holder must NOT overlap the two dots on the black line. - Page 19 Load the media as illustrated and then pull out the media until the media extends out of the tear edge. Press to close the media cover. Use TSC Console utility to perform a calibration for the media in use. NOTE: Performing a calibration is required when using other types of...
-
Page 20: Using Accessories
5 Using Accessories 5.1 Installing the Belt Clip Thread the belt clip through under the bar on the rear side of the printer. Align and press the snap buttons to secure the belt clip in place. -
Page 21: Using The Ip54 Case With Shoulder Strap (Optional)
5.2 Using the IP54 Case with Shoulder Strap (optional) Open the case cover. Slide the printer into the case. Open the transparent cover and print your labels. -
Page 22: Operator Interface
6 Operator Interface 6.1 LED Indicators and Buttons Name & Icon Status Description The printer is turned on and ready. Green (blinking) The printer is in pause state. Printer status LED Red (solid) The media cover is opened. Red (blinking) The printer is encountering errors. - Page 23 Name & Icon Status Description The battery power is low. Please recharge the battery. Green (blinking) The battery is charging. Amber (solid) Battery status LED Indicates that the battery power level is 100%. Indicates that the battery power level is 66%. Green (solid) Indicates that the battery power level is 33%.
-
Page 24: Power-On Utilities
6.2 Power-on Utilities The printer features a set of utilities which provides quick access to the printer’s mostly used functions. Follow the procedures below to launch the power-on utilities and select the function you need. 1. Turn off the printer. 2. -
Page 25: Tsc Console
7.1 Launching TSC Console Follow the steps below to launch TSC Console: 1. Double click the TSC Console icon on the desktop of your computer to launch TSC Console. After launching TSC Console, the following screen will appear. 2. Select Printers > Add Printers to add the new printer to the TSC Console main page. - Page 26 3. Select the connection based on how the printer is connected to your computer and then select OK to add the printer. NOTE: The image below shows that the printer is connected to a computer via the USB cable. 4. Select and start configuring the printer. NOTE: You may refer to TSC Console Programming Manual for further information.
-
Page 27: Adding Wi-Fi Interface
7.2 Adding Wi-Fi Interface It allows users to add Wi-Fi interface to the TSC Console main page and enables users to control the printer through a wireless network. Follow the steps below to add Wi-Fi interface to the TSC Console main page: Add the printer to the TSC Console main page via the USB port or COM port. - Page 28 When using the WPA-Personal encryption: (1) Enter the network name in the SSID field. (2) Select WPA-Personal in the WLAN Encryption field. (3) Enter the Wi-Fi network password in the Key field. (4) Set DHCP to ON. If DHCP is set to OFF, you need to specify information for the IP Address, Subnet Mask, and Gateway fields.
- Page 29 If the IP address does not appear, initialize the printer’s Wi-Fi module and then re- configure the Wi-Fi connection. Remove the interface cable. Go to the TSC Console main page, select Printers > Add Printers and then select Network to add the printer.
- Page 30 Go to the TSC Console main page. Select and then double click the printer. Select Functions > Print Test Page to check if you can print the test page via the Wi-Fi connection.
-
Page 31: Configuring Bluetooth
Follow the steps below to configure Bluetooth for your printer: Add the printer to the TSC Console main page via the USB port or COM port. For how to add the printer to the TSC Console main page, please refer to Launching TSC Console. - Page 32 Enter the new Bluetooth local name or Bluetooth PIN code in the field. The field will be marked in yellow when the value is revised. Press the Set button to set the new Bluetooth name or Bluetooth PIN code. Press the Get button to confirm that the new settings have been correctly written into the printer.
-
Page 33: Initializing Printer's Wi-Fi Settings
7.4 Initializing Printer’s Wi-Fi Settings Go to the TSC Console main page. Select the Functions tab. Select Wi-Fi Default to restore the Wi-Fi settings to factory default values. -
Page 34: Printer's Main Functions
7.5 Printer’s Main Functions The function buttons are located on the left side of the Printer Configuration page. You can use the function buttons to manage and configure the printer. Item Description Calibration Detects the media type and label size. RTC Setup Synchronizes the printer with the real time clock on the computer. -
Page 35: Configuring Optional Kits
If you install an optional kit on the printer, such as cutter, peeler, or media rewinder, you need to configure the kit after finishing the calibration so that the kit works properly. To configure the kit: Add the printer to the TSC Console main page via the USB port or COM port. Set up the wired or wireless connection between the printer and your computer. -
Page 36: Troubleshooting
8 Troubleshooting Problem Possible Cause Recovery Procedure ▪ The battery is not properly installed. ▪ Re-install the battery. Power indicator or display does not ▪ No power. ▪ Recharge or replace battery as necessary. illuminate. ▪ Re-connect the interface cable or try another ▪... - Page 37 Problem Possible Cause Recovery Procedure ▪ Reload the media. ▪ Media is not loaded correctly. ▪ Clean the printhead and platen roller. ▪ Dust or adhesive accumulation on the ▪ Adjust the print density and print speed. printhead. Poor Print Quality ▪...
-
Page 38: Maintenance
9 Maintenance This section provides cleaning and maintenance procedures. Cleaning: Depending on the media used, the printer may accumulate residues (media dust, adhesives, etc.) as a by-product of normal printing. To maintain the best printing quality, you should remove these residues by cleaning the printer periodically. Regularly clean the print head and supply sensors once change a new media to keep the printer at the optimized performance and extend printer life. -
Page 39: Cleaning Supplies
9.1 Cleaning Supplies The following supplies are recommended for cleaning the printer: Cotton swab Lint-free cloth Brush with soft and non-metallic bristles Vacuum cleaner 75% Ethanol used for disinfection 99% Isopropyl alcohol used for cleaning the printhead and platen roller ... -
Page 40: Cleaning Procedures
9.2 Cleaning Procedures Component Method Recommended Cleaning Schedule Power off the printer before cleaning the printhead. Leave the printhead to cool down for at least one minute. Clean the printhead when you load new Printhead Wet a cotton swab with the 99% Isopropyl alcohol and then wipe across the media. -
Page 41: Agency Compliance And Approvals
10 Agency Compliance and Approvals 2014/30/EU(EMC), 2014/35/EU(LVD), 2011/65/EU(RoHS 2.0) EN 55032 Class B EN 55024 EN61000-3-2:2014 EN61000-3-3:2013 EN 60950-1 FCC part 15B, Class B This equipment has been tested and found to comply with the limits for a Class B digital device, pursuant to part 15 of the FCC Rules. - Page 42 AS/NZS CISPR 22 Class B AS/NZS CISPR 32 Class B 10 C.F.R. Section 430.23(aa) (Appendix Y to Subpart B of part 430) TP TC 004/2011 TP TC 020/2011 LP0002 KN 32/35 IS 13252(Part 1)/ IEC 60950-1 Important safety instructions: Read all of these instructions and keep them for later use. Follow all warnings and instructions on the product.
- Page 43 WARNING: Hazardous moving parts, keep fingers and other body parts away. CAUTION: (For equipment with RTC (CR2032) battery or rechargeable battery pack) Risk of explosion if battery is replaced by an incorrect type. Dispose of used batteries according to the Instructions as below. 1.
- Page 44 CE Statement: This equipment complies with EU radiation exposure limits set forth for an uncontrolled environment. This equipment should be installed and operated with minimum distance 20 cm between the radiator & your body. All operational modes: 2.4GHz: 802.11b, 802.11g, 802.11n (HT20), 802.11n (HT40) 5GHz: 802.11a, The frequency, mode and the maximum transmitted power in EU are listed below: 2400 MHz –...
- Page 45 30mW 5470-5725MHz Hereby, TSC Auto ID Technology Co., Ltd. declares that the radio equipment type [Wi-Fi] IEEE 802.11 a/b/g/n is in compliance with Directive 2014/53/EU The full text of the EU declaration of conformity is available at the following internet address: http:// www.tscprinters.com...
- Page 46 Canada, Industry Canada (IC) Notices This Class B digital apparatus complies with Canadian ICES-003 and RSS-210. Operation is subject to the following two conditions: (1) this device may not cause interference, and (2) this device must accept any interference, including interference that may cause undesired operation of the device. Radio Frequency (RF) Exposure Information The radiated output power of the Wireless Device is below the Industry Canada (IC) radio frequency exposure limits.
- Page 47 Canada, avis de l'Industry Canada (IC) Cet appareil numérique de classe B est conforme aux normes canadiennes ICES-003 et RSS-210. Son fonctionnement est soumis aux deux conditions suivantes : (1) cet appareil ne doit pas causer d'interférence et (2) cet appareil doit accepter toute interférence, notamment les interférences qui peuvent affecter son fonctionnement.
- Page 48 設備名稱 (equipment name):可攜式熱感條碼印表機 型號 (Type Designation):Alpha-3R 系列 限用物質及其化學符號 Restricted substances and its chemical symbols 六價鉻 多溴聯苯 多溴二苯醚 單元Unit Hexavalent Polybrominated Polybrominated 鉛Lead 汞Mercury 鎘Cadmium (Pb) (Hg) (Cd) chromium biphenyls diphenyl ethers (PBB) (PBDE) 內外塑膠件 ○ ○ ○ ○ ○ ○...
- Page 49 Note 1:“Exceeding 0.1 wt %” and “exceeding 0.01 wt %” indicate that the percentage content of the restricted substance exceeds the reference percentage value of presence condition. 備考1.〝超出0.1 wt %〞及〝超出0.01 wt %〞係指限用物質之百分比含量超出百分比含量基準值。 Note 2:“○” indicates that the percentage content of the restricted substance does not exceed the percentage of reference value of presence.
-
Page 50: Revision History
Revision History Date Description Technical Writer 2023/11/15 Peter Yao Official release. ▪ Revised format and layout 2024/01/18 Peter Yao ▪ Updated the specifications from page 5 to 7. - Page 51 www.tscprinters.com...
Need help?
Do you have a question about the Alpha-3R and is the answer not in the manual?
Questions and answers