Table of Contents
Advertisement
Quick Links
Advertisement
Table of Contents

Related Manuals for Electrolux EVE8P21X


Summary of Contents for Electrolux EVE8P21X
- Page 1 EN User Manual | Oven EVE8P21X...
-
Page 2: Table Of Contents
Welcome to Electrolux! Thank you for choosing our appliance. Get usage advice, brochures, trouble shooter, service and repair information: www.electrolux.com/support Subject to change without notice. CONTENTS 1. SAFETY INFORMATION................2 2. SAFETY INSTRUCTIONS................4 3. PRODUCT DESCRIPTION................7 4. CONTROL PANEL..................7 5. - Page 3 be kept away from the appliance unless continuously supervised. • Children should be supervised to ensure that they do not play with the appliance. • Keep all packaging away from children and dispose of it appropriately. • WARNING: The appliance and its accessible parts become hot during use.
-
Page 4: Safety Instructions
• Always use oven gloves to remove or insert accessories or ovenware. • Use only the food sensor (core temperature sensor) recommended for this appliance. • To remove the shelf supports first pull the front of the shelf support and then the rear end away from the side walls. Install the shelf supports in the opposite sequence. - Page 5 2.2 Electrical connection 2.3 Use WARNING! WARNING! Risk of fire and electric shock. Risk of injury, burns and electric shock or explosion. • All electrical connections should be made by a qualified electrician. • Do not change the specification of this •...
- Page 6 • Use a deep pan for moist cakes. Fruit the appliance) especially any non-stick juices cause stains that can be pots, pans, trays, utensils, etc. permanent. • Read carefully all the instructions for • Always cook with the appliance door pyrolytic cleaning.
-
Page 7: Product Description
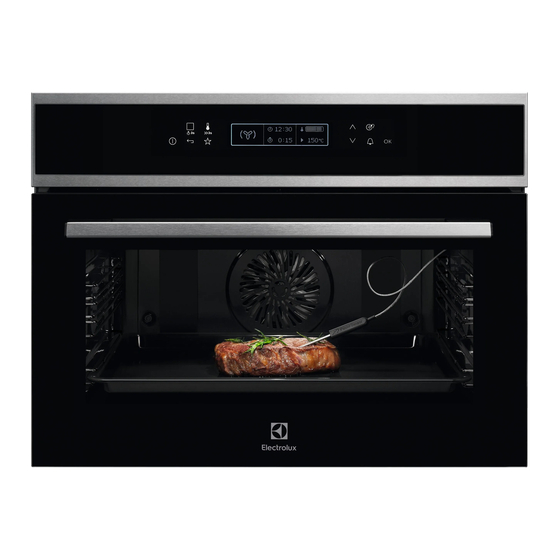
• Use only lamps with the same • Contact your municipal authority for specifications. information on how to dispose of the appliance. 2.7 Service • Disconnect the appliance from the mains supply. • To repair the appliance contact the • Cut off the mains electrical cable close to Authorised Service Centre. - Page 8 Use the sensor fields to operate the oven. Sensor Function Comment field ON / OFF To turn on and off the oven. Heating Functions or Press the sensor field once to choose a heating function or the Assisted Cooking menu: Assisted Cooking. Press the sensor field again to switch between the menus: Heating Functions, Assisted Cooking.
-
Page 9: Before First Use
Fast Heat Up Indicator Heat + Hold The function is on. It decreases the heat The function is on. up time. Weight Automatic The display shows that the automatic weight system is on or that weight can be changed. 5. BEFORE FIRST USE emit unpleasant smell and smoke. - Page 10 6.4 Using: Fast Heat Up Indicator Submenu for: Basic Settings Use this function before you put the food in Symbol / Menu Description the oven. item This function reduces the heat-up time. It is Sets the current time on the not available for some oven functions.
- Page 11 6.7 Heating Functions 6.8 Specials Heating function Application Heating function Application To bake on up to two shelf po‐ To keep food warm. Please sitions at the same time and to note that some dishes may dry food. Set the temperature continue to cook and dry out True Fan Cooking Keep Warm...
- Page 12 The oven door should be closed during cooking so that the function is not interrupted Dish and the oven operates with the highest Rare energy efficiency possible. When you use this function the lamp Rare automatically turns off after 30 sec. Medium For the cooking instructions refer to "Hints Roast beef...
- Page 13 Food Category: Oven Dishes Dish Dish Puff pastry Lasagne / Cannelloni, fro‐ Eclairs Vegetables au gratin Macaroons Sweet dishes Short pastry biscuits Food Category: Pizza / Quiche Christmas stollen Apple strudel, frozen Dish Sponge dough Pizza, thin Cake on tray Yeast dough Pizza, extra topping Cheese cake, tray...
-
Page 14: Clock Functions
Dish When it is necessary to change the Hash browns weight or the core temperature of the dish, use to set the new values. 7. CLOCK FUNCTIONS 7.1 Clock functions table 7.3 Heat + Hold Conditions for the function: Clock func‐ Application •... -
Page 15: Automatic Programmes
8. AUTOMATIC PROGRAMMES 1. Turn on the oven. WARNING! 2. Select the menu: Recipes. Press Refer to Safety chapters. confirm. 3. Select the category and dish. Press 8.1 Recipes online to confirm. You can find the recipes for the automatic 4. - Page 16 • Ingredients should be at room 8. Remove the food sensor plug from the temperature. socket and remove the dish from the • Food sensor cannot be used for liquid appliance. dishes. WARNING! • During cooking the food sensor must remain in the dish and the plug in the There is a risk of burns as the food socket.
-
Page 17: Additional Functions
10. Remove the food sensor plug from the 6. Press in less than 5 seconds to socket and remove the dish from the set the food core temperature. appliance. 7. Set a heating function and, if necessary, the oven temperature. WARNING! 8. -
Page 18: Hints And Tips
10.4 Set + Go The function lets you to set a heating function (°C) or a programme and turn it on later with one 200 - 245 press of any sensor field. 250 - maximum You can turn on or turn off this function in the menu: Basic Settings. -
Page 19: Care And Cleaning
For energy saving tips refer to "Energy • Pizza pan - dark, non-reflective, diameter efficiency" chapter. 28cm • Baking dish - dark, non-reflective, Symbols used in the tables: diameter 26cm • Ramekins - ceramic, diameter 8cm, Food type height 5 cm •... - Page 20 • Clean the interior of the appliance after 2. Remove all accessories and removable each use. Fat accumulation or other shelf supports. residue may cause fire. 3. Clean the oven floor and the inner door • Do not store food in the appliance for glass with warm water, a soft cloth and a longer than 20 minutes.
-
Page 21: Troubleshooting
9. Clean the glass panel with water and 2. Press the clamping levers on the two soap. Dry the glass panel carefully. Do door hinges. not clean the glass panels in the dishwasher. After cleaning, do the above steps in the opposite sequence. - Page 22 13.1 What to do if... Problem Possible cause Remedy You cannot activate or operate the The oven is not connected to an Check if the oven is correctly con‐ oven. electrical supply or it is connected nected to the electrical supply (refer incorrectly.
-
Page 23: Energy Efficiency
14. ENERGY EFFICIENCY 14.1 Product Information Sheet and Product Information according to EU Energy Labelling and Ecodesign Regulations Supplier's name Electrolux Model identification EVE8P21X 944066614 Energy Efficiency Index 80.8 Energy efficiency class Energy consumption with a standard load, conventional mode 0.89 kWh/cycle Energy consumption with a standard load, fan-forced mode 0.59 kWh/cycle... -
Page 24: Environmental Concerns
Keep food warm Moist Fan Baking Choose the lowest possible temperature Function designed to save energy during setting to use residual heat and keep the food cooking. warm. The residual heat indicator or When you use this function the lamp temperature appears on the display. - Page 28 867352200-E-102024...
Need help?
Do you have a question about the EVE8P21X and is the answer not in the manual?
Questions and answers