
Related Manuals for Mount-It! MI-8054


Summary of Contents for Mount-It! MI-8054
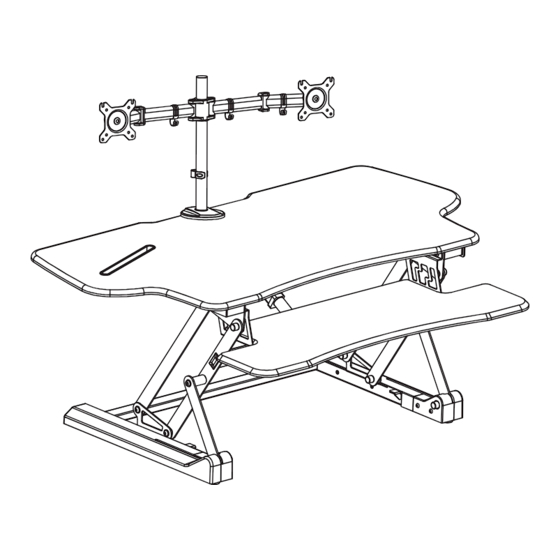
- Page 1 User Manual MI-8054 Please scan this QR code to visit the product page EXTRA WIDE MOTORIZED STANDING DESK CONVERTER WITH DUAL MONITOR MOUNT...
- Page 2 Thank you for choosing Mount-It Read the entire instruction manual before you start installation and assembly. If you have any questions regarding any of the instructions or warnings, please contact Mount-It! for assistance. CAUTION: Use with products heavier than the rated weights indicated may result in instability causing possible injury. •...
- Page 3 MONITOR MOUNT PACKAGE CONTENTS A (x1) B (x1) POLE MONITOR ARM ASSEMBLY C (x1) D (x8) E (x8) F (x8) CLAMP BASE M4x12 BOLT M4x30 BOLT 13X5.5X16.5 SPACERS G (x1) H (x4) I (x1) J (x1) CABLE MANAGEMENT CABLE MANAGEMENT CLIP (POLE) CLIP (ARM) HEX WRENCH...
-
Page 4: Pinch Point
DIMENSIONS & WEIGHT CAPACITY +90°/-35° +90°/-35° 360° 360° Total standing desk converter weight capacity is 33lbs* (desktop + keyboard tray.) Keyboard tray weight capacity 5lbs max. *Maximum weight capacity is 45lbs. 33lbs capacity is the maximum recommended load considered safe for raising and lowering the standing desk converter. The desk is capable of handling heavier monitors and computers if the user is capable of lifting and lowering the converter. - Page 5 Step 1 Remove the Desk Converter from the Box Remove the Desk Converter (#M) from the packaging. Note: Two person lift recommended. Step 2 Place it on a level surface (such as a desk, table, or the floor) Locate the plastic ties on the Desk Converter, there will be one on each leg. Use a pair of scissors to cut the plastic ties.
- Page 6 Step 3 Raise the Desk Converter Connect the power cord on the desk converter to the power adapter. Plug the power adapter into a wall outlet then press the up button and raise the desk Wall to its highest position. Outlet 2.0 USB port for charging devices.
- Page 7 Step 4 Attach the Keyboard Brackets Attach the Keyboard Tray Brackets (#O) to the bolt holes on the underside of the Keyboard Tray (#N) as shown, using the Bolts (#P). Step 5 Attach the Keyboard Tray 1.Attach the Keyboard Tray by sliding it beneath the bolts shown in magnification bubble 1. Ensure the bolts reach the end of the channels on the bracket, by lifting the tray up onto the bolts and pushing it forward.
- Page 8 Step 6 Keyboard Tray Cable Management (Optional Step) Route the cables according to your device placement to determine the best location for the Cable Management Clip. Remove the cover from the adhesive on the Cable Management Clip (#Q) then attach it to the underside of the Desk Converter to manage the cables for the mouse, keyboard or other accessories.
-
Page 9: Step 8 Monitor Arm Installation
Step 8 Monitor Arm Installation Slide the Plastic Cover (#L) on so that it rests at the base of the pole. ● Slide the Monitor Arm Assembly (#B) onto the pole so that the adjustment bolts ● on the arm joints are facing upward as shown in the magnification bubble. Hold the Arm Assembly at the desired height and tighten the bold on the back ●... -
Page 10: Step 9 Monitor Installation
Step 9 Monitor Installation Select the appropriate size mounting bolt (Select one size #D, or #E) for your display’s mounting holes ● and verify the length of the VESA bolt is not too long. If you are unsure of the correct bolt size for your display refer to your monitor user manual or contact the monitor manufacturer for sizing information. -
Page 11: Step 10 Cable Management
Step 10 Cable Management Attach Cable Management Clips (#H) and (#G) as needed. There are 4 clips (#H) for use on the horizontal monitor arm, and 1 clip (#G) for use on the vertical pole. Step 11 Worksurface Cable Management (Optional Step) Use the provided Cable Ties (#S) to collect cables for all peripheral devices on the worksurface. - Page 12 Warnings Keep all monitors, laptops and other Raise the work surface slowly. Raising equipment fully on the work surface at all the work surface too quickly may cause times. Allowing any part of these to hang monitors, laptops and other equipment to off the edge may result in property fall resulting in property damage and/or damage and/or personal injury.
Need help?
Do you have a question about the MI-8054 and is the answer not in the manual?
Questions and answers