
Subscribe to Our Youtube Channel
Related Manuals for Fabtech FTS24048BK


Summary of Contents for Fabtech FTS24048BK
- Page 1 Installation Instructions 8” Rear Crawler System FTS24048BK 1987-1995 JEEP YJ 4WD Fabtech Motorsports 4331 Eucalyptus Ave. Chino, CA 91710 Tech Line 909-597-7800 Fax 909-597-7185 Web www.fabtechmotorsports.com...
-
Page 2: Parts List
8” Rear Crawler System FTS24048BK 1987-1995 JEEP YJ 4WD Parts List: FTS24067BK Sub-Box 1 Part # Description FT50222BK Rear Leaf Shackle FT50264 Bushing & Sleeve Kit FT50243BK Rear Axle Saddle FT50244BK Rear U-Bolt Plate FT730U U-Bolt FT12H 1/2" U-Bolt Hardware FTT20 Pass. - Page 3 8” Rear Crawler System FTS24048BK 1987-1995 JEEP YJ 4WD FT50251 Rear Hardware Kit Qty. Description Location 1/2"-13 X 2 3/4" Hex Cap Bolt Rear Shock Bolts 1/2"-13 C-locks 1/2" SAE Washer 1/2"-13 X 4 1/2" Hex Cap Bolt Rear Shackle @ Leaf Spring 1/2"-13 C-locks...
- Page 4 PROFESSIONAL MECHANICS. DO NOT ALTER THE FINISH OF THESE COMPONENTS, EXAMPLE- CHROMING, ZINC PLATING OR PAINTING. CHANGING THE FINISH CAN CAUSE STRUCTURAL FATIGUE OF COMPONENTS. THIS SUSPENSION SYSTEM MUST BE INSTALLED WITH FABTECH SHOCK ASBORBERS WILL NOT FIT ON 4CYL.
- Page 5 8” Rear Crawler System FTS24048BK 1987-1995 JEEP YJ 4WD REAR DRIVE SHAFT INFORMATION MODELS EQUIPPED WITH A NP231 TRANSFER CASE- INSTALLATION OF A FIXED YOKE CV STYLE REAR DRIVESHAFT AND FIXED YOKE KIT WILL BE REQUIRED WITH THIS SYSTEM TO REDUCE DRIVELINE VIBRATION.
- Page 6 Remove factory transmission crossmember from the frame mounts. Save the factory hardware and the crossmember. (If installing new optional Fabtech Pan section, discard the factory transmission crossmember and hardware) 3. Remove the rear drive shaft and discard with the hardware.
- Page 7 (the part of the shackle without the center gusset goes up) and install with the bend of the boomerang facing towards the rear of the Jeep. Leave loose at this time. SEE PHOTO BELOW Rear of Jeep 11. Locate supplied leaf spring bushings and 9/16” sleeves and install them into the rear leaf springs.
- Page 8 Paint the axle and bracket after they have cooled Long side of the Saddle on rear of axle 14. Locate FT50255 Traction Bar Axle Mount “weld on” and 15. Locate the factory lower shock mounts on the axle. Using a supplied 2¾”...
- Page 9 The outer tab mounts 2” inward Driver Side Shown from the Fabtech axle saddle. Place tack welds on the corners of each tab to the axle. On the passenger side, place the tabs up to the axle and position them so they are at the same position as the driver’s side tabs with the shocks fully...
- Page 10 Passenger Side Shown 18. Locate the factory brake hose from the frame to the rear bend hard axle. Remove and discard hose. Locate the Fabtech rear line to fit brake hose FT50035 and FTT79 brake hose clip. Slide the properly...
- Page 11 21. Install the passenger cable body bracket with factory hardware back into the factory location. Carefully bend the bracket just enough for the cable to clear floor pan. SEE PHOTO BELOW 22. Connect the cables back into the adjuster and set back at original setting (refer to earlier measurement of threads above the adjuster nut).
- Page 12 Photo of Driver’s side 25. Use a drill with a long ¼” drill bit, drill the two holes on the outside of the frame completely through the frame. IT IS VERY IMPORTANT TO DRILL THESE HOLES STRAIGHT!! Follow with a 7/16” drill bit completely through both sides of the frame.
- Page 13 26. Insert two of the supplied 7/16” I.D. frame sleeves in into 27. Locate FT50268 E-Brake Cable Guide and supplied 5/16” the previously drilled holes. Swing the crossmember back self –threading bolt. Place the cable guide onto the end of up onto the frame and attach the brackets using 7/16”...
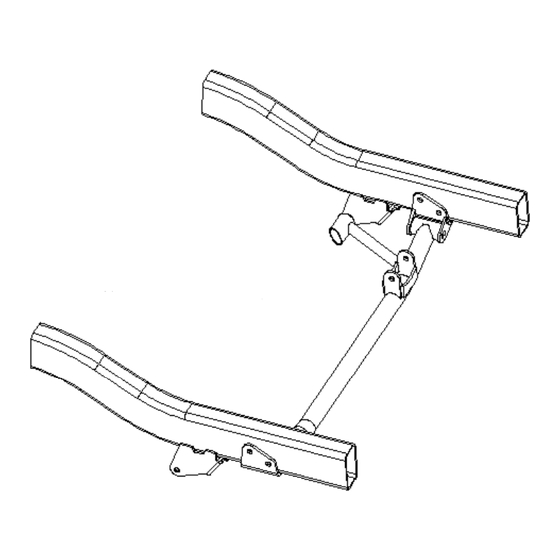
- Page 14 29. Locate FT50259 Traction Bar Shackle and the supplied and on the heims. Torque the ¾” hardware to 110 ft. lbs. bushings and ½” I.D. sleeves. Apply some of the provided and the ½’ hardware to 75 ft. lbs. SEE PHOTOS BELOW. lube to the bushings inside and out and insert them into the shackle.
- Page 15 RETORQUE ALL NUTS, BOLTS AND LUGS AFTER 50 MILES AND PERIODICALLY THEREAFTER. For technical assistance call: 909-597-7800...
-
Page 16: Product Warranty And Warnings
Fabtech cannot be responsible for 100% compatibility, including the fitment of tire and wheel sizes listed. The Tire and Wheel sizes listed in Fabtech’s catalog are only a guideline for street driving with noted fender trimming. Fabtech is not responsible for damages to the vehicle’s body or tires.
Need help?
Do you have a question about the FTS24048BK and is the answer not in the manual?
Questions and answers