
Subscribe to Our Youtube Channel
Related Manuals for WiebeTech ProSATA SS8


Summary of Contents for WiebeTech ProSATA SS8
-
Page 1: User Manual
ProSATA™ SS8 ULTRA 320 SCSI to SATA Disk Subsystem User Manual Revised January 23, 2008 P r o S A T A S S 8 Q u i c k S t a r t G u i d e - 1 -... -
Page 2: About This Manual
Thank you for choosing WiebeTech products. If you have any questions, please support@wiebetech.com e-mail This manual is designed and written for users of the ProSATA SS8. Users should ideally be familiar and have some experience with RAID planning and data storage operations. However, this manual will provide instructions and education for those who have little or no experience in RAID to install and setup the ProSATA SS8. -
Page 3: Table Of Contents
GUI – http ... 10 RS-232 serial port ... 10 Remote control – secure shell ... 10 LCM ... 11 Chapter 4 GUI operation ... 12 ProSATA SS8 Menu ... 12 Login ... 13 Quick install ... 14 System config ... 15 4.4.1 IP address ... - Page 4 WiebeTech LLC 4.7.2 Info ... 28 4.7.3 Shutdown ... 29 Logout ... 29 Chapter 5 Advanced operation ... 30 Create volume group ... 30 Create user data volume ... 31 Attach and detach Bus ID, SCSI ID, and LUN ... 32 5.3.1...
-
Page 5: Chapter 1 Product Overview
RAID technology and advanced array management features. ProSATA SS8 connects to the host system through an U320 SCSI interface for optimized performance in speed. It can be configured to any RAID level to provide the most reliable data protection and fastest data transfer rates as required by user applications. -
Page 6: Specifications
WiebeTech LLC 1.2 Technical Specifications Product Name/Code ProSATA (SS8) Supported RAID RAID 0, 1, 0+1, 3, 5, 6 & JBOD Levels Host Interface Ultra320 SCSI Drive Compatibility SATA1 and SATA2 hard disk drives RAID Processor Intel IOP80331 500MHz 64-bit RISC Processor... -
Page 7: Chapter 2 Environment Setup
• To avoid overheating, ProSATA SS8 should be operated in a well- ventilated area and in such a way that sufficient airflow is maintained across the controller chips. -
Page 8: Product Overview
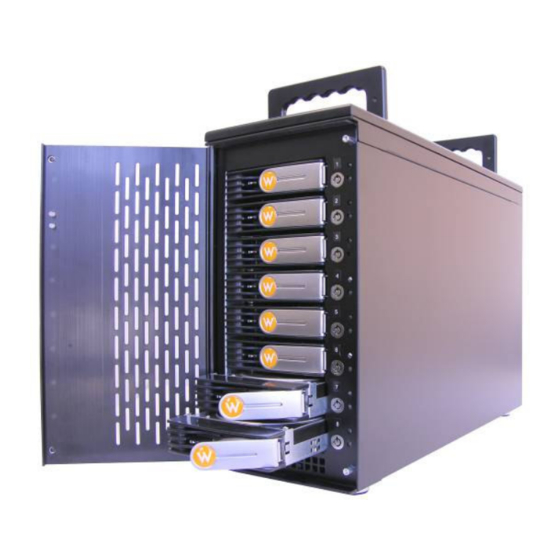
WiebeTech LLC 2.2 Product overview Front view Figure 2.2.1 2.3 Install SATA disks If the hard drives do not come with the RAID system, please follow the instructions for installation below. Press the release button and pull the handle to remove the disk tray. The •... -
Page 9: Connect Cables
• Connect SCSI Ultra 320 cable and SCSI Ultra 320 terminator. The • ProSATA SS8 controller does not have a terminator on board and will need an external terminator to properly work. Connect console cable to the host server (RS-232). -
Page 10: Chapter 3 Gui Connection
Chapter 3 GUI Connection 3.1 GUI – http ProSATA SS8 supports graphic user interface (GUI) to manage the system by any web browser. Be sure to connect LAN cable to the network. The ProSATA will automatically obtain an IP address if connected to a network that has DHCP support. Check the ProSATA’s LCD for this address (found on the bottom side of the unit). -
Page 11: Lcm
WiebeTech LLC 3.4 LCM (LCD Control Module) The LCM is found on the bottom side of the ProSATA. It has four buttons for controlling functions: (up), are pressed to scroll through the functions and options. ENT is pressed to enter functions and to accept selections. -
Page 12: Chapter 4 Gui Operation
WiebeTech LLC Chapter 4 GUI operation 4.1 ProSATA SS8 Menu Upgrade Info Shutdown Logout P r o S A T A S S 8 U s e r ’ s M a n u a l Create / Delete / Details / Rename / Migrate... -
Page 13: Login
WiebeTech LLC 4.2 Login ProSATA SS8 supports graphic user interface (GUI) to operate and monitor the system via any web browser. Be sure to connect LAN cable. The default IP for the system is 192.168.0.200, but if the ProSATA has been connected to a network with DHCP, this address will have been changed automatically. -
Page 14: Quick Install
WiebeTech LLC 4.3 Quick install Use the function to create a volume easily. Step 1: Select choosing the RAID level, click , and setup. Step 2: In this step, the volume can be customized as needed. , and can be assigned specified numbers to be attributed to the volume. -
Page 15: System Config
WiebeTech LLC 4.4 System config selection is for the setting of and for viewing Figure 4.4.1 P r o S A T A S S 8 U s e r ’ s M a n u a l - 15 -... -
Page 16: Ip Address
WiebeTech LLC 4.4.1 IP address Enter to change IP setting. There are 2 selections, address from DHCP server) or static IP. Manually enter the IP address if setting is on 4.4.2 Password Enter to change administrator password. 4.4.3 Date Enter to set up the current date &... -
Page 17: Mail
WiebeTech LLC 4.4.4 Mail Enter to set up to 3 email addresses for receiving event notification. Some mail servers would check “Mail-from address” and need authentication for anti- spam. Please fill the necessary fields. Check “Send test mail” to send test emails to the specified email addresses. -
Page 18: Event Log
WiebeTech LLC 4.4.6 Event log Enter to view the event messages. 4.5 Volume config is for the management and display of volume configurations. Functions include , and P r o S A T A S S 8 U s e r ’ s M a n u a l Figure 4.4.6.1... -
Page 19: Physical Disk
WiebeTech LLC 4.5.1 Physical disk Enter to view the status of hard disks installed in the system. (Figure 4.5.2: Physical disks 2 and 3 have been used for a VG named “R0”. Physical disks 1, 5, 6 are free disks. Disk 4 has been set as a global spare disk.) •... - Page 20 WiebeTech LLC • PD operations description: P r o S A T A S S 8 U s e r ’ s M a n u a l FRee disk. This hard disk is free for use. Dedicated Spare. This hard disk has been set to be a dedicated spare for a specific VG.
-
Page 21: Volume Group
WiebeTech LLC 4.5.2 Volume group Enter to view the status of each volume group. (Figure 4.5.2.1: RAID 0 setup, with 4 physical disks, named “VG-R0”, total size is 227GB. One associated UDV of 100GB has been created, so free space is 127GB. VG status is •... -
Page 22: User Data Group
WiebeTech LLC The RAID level which this volume group is using. The function. Click or change the RAID level of the Volume group. VG operations description: • Create a volume group Delete this volume group 4.5.3 User data group Enter “User data volume” function to view the status of each user data volume. - Page 23 WiebeTech LLC • UDV column description: P r o S A T A S S 8 U s e r ’ s M a n u a l Number of this user data volume. Click UDV No. to shows the details of this User data volume.
-
Page 24: Cache Volume
WiebeTech LLC • UDV operations description: 4.5.4 Cache volume Enter Cache volume function to view the status of cache volume. The global cache volume is a default cache volume automatically created after system is powered on. This number can not be deleted or changed. The size of global cache is base on the RAM size. -
Page 25: Logical Unit
WiebeTech LLC • CV operations description: Create a cache volume function. Delete this cache volume function. 4.5.5 Logical unit Enter Logical unit function to view the status of attached logical unit of each UDV. • LUN operations description: Note Note which channel the SCSI cable is connected to. The SCSI ID of the UDV must correspond to the SCSI channel and cable setup. -
Page 26: Enclosure Management
WiebeTech LLC 4.6 Enclosure management information including functions. 4.6.1 SAF-TE config Enter function to enable or disable the management of SAF-TE from buses. 4.6.2 Voltage & Temperature Enter voltage & Temperature. P r o S A T A S S 8 U s e r ’ s M a n u a l function allows monitoring of enclosure and drive Figure 4.6.1... -
Page 27: Maintenance
WiebeTech LLC 4.6.3 SMART Enter function to view SMART (Self-monitoring analysis & reporting technology) for physical disks health information. 4.7 Maintenance function allows operation of the system functions including of the latest firmware, to either reboot or shutdown the system. -
Page 28: Upgrade
WiebeTech LLC 4.7.1 Upgrade Enter function to upgrade firmware. Please contact our tech support to receive the latest firmware. Once the firmware has been downloaded and saved to a designated location, press Click to start upgrade automatically. After upgrading finishes, reboot the system. -
Page 29: Shutdown
WiebeTech LLC 4.7.3 Shutdown Enter function to do a shutdown or reboot. Before powering off system, it is recommended to perform a system SHUTDOWN to allow the data from cache to be written to hard disks. 4.8 Logout For security reason, name and password must be entered to get access again. -
Page 30: Chapter 5 Advanced Operation
WiebeTech LLC Chapter 5 Advanced operations 5.1 Create volume group To create the volume group, please follow these procedures: Enter Enter Click Enter a VG Name, choose a RAID level from the pull down menu, press VG, then press Check the setting. Press Done. -
Page 31: Create User Data Volume
WiebeTech LLC 5.2 Create user data volume To create a user data volume (UDV), please follow these procedures. Enter Enter Click Enter a name for this UDV. Select which VG this UDV will be created from. Select the CV no. if a dedicated CV has been created (Global CV will be used as default). -
Page 32: Attach And Detach Bus Id, Scsi Id, And Lun
WiebeTech LLC (Figure 5.2.2: Setup of a UDV named “UDV-R0”, created from “VG-R0”. The size is 100GB, status is online, write back, high priority with cache volume 107MB.) Note VG & UDV can be deleted by simply checking the one you want to delete then clicking 5.3 Attach and detach Bus ID, SCSI ID, and LUN... -
Page 33: Detach Bus Id, Scsi Id And Lun From Udv
WiebeTech LLC Select which UDV to attach. Choose Bus ID, SCSI ID and LUN to attach, and then click Done. Note Note which channel the SCSI cable is connected to. The SCSI ID of the UDV must correspond to the SCSI channel and cable setup. -
Page 34: Create Dedicated Cache
WiebeTech LLC 5.4 Create dedicated cache Each UDV will be associated with one specific cache volume (CV) to execute the data transaction, whether it’s a global CV or a dedicated CV. Each CV can be assigned a different size. Unless specified, each UDV will use the default global cache volume. -
Page 35: Set Global Spare And Dedicated Spare Disks
WiebeTech LLC 5.5 Set global spare and dedicated spare disks Spare disks are used to provide an added layer of protection in case a member disk of a VG fails. The system will automatically switch a spare disk in place of a failed disk and start a rebuild. -
Page 36: Migration / Expansion
WiebeTech LLC 5.6 Migration / Expansion Migration and expansion allows users to change RAID levels to improve performance and reliablity, and to add drives to increase capaciy. For migration and expansion, the total size of new array must be larger or equal to the original array. - Page 37 WiebeTech LLC Figure 5.6.3 (Figure 5.6.3: A 4-Way RAID 1 array migrates to RAID 3 array, completion is 9%.) P r o S A T A S S 8 U s e r ’ s M a n u a l...
-
Page 38: Appendix
Q: What type of cable connector plugs into the Ultra-320 SCSI port on the back of this product? A: The Ultra-320 SCSI port on the ProSATA SS8 is of the HD68 (female) connector type. A SCSI cable with a HD68 male connector will plug into the ProSATA. -
Page 39: Raid Explained
WiebeTech LLC Appendix B: RAID Explained RAID 0 Disk striping of any number of drives. Minimum of 2 disks. RAID 1 Disk mirroring of 2 disks. N-way Disk Mirroring of N disks. mirroring Choose N number of disks and set as RAID 1 array. -
Page 40: Glossary
WiebeTech LLC Appendix C: Glossary Cache Volume Cache is memory used to speed up data transfer to and from a disk. A Cache Volume is assigned to each UDV for execution of the data transaction. Each CV can have different cache memory size. - Page 41 WiebeTech LLC SAF-TE SCSI Accessed Fault-Tolerant Enclosures SAF-TE commands are used to monitor information about the status of the drives in the array, such as rebuilding, failed, and spare. SAF-TE also monitors certain environmental information about the system such as temperature, voltage, power supply, and fan health.
Need help?
Do you have a question about the ProSATA SS8 and is the answer not in the manual?
Questions and answers