Advertisement
SilverSATA™ II SR
Table of Contents
Installation Instructions
Accessories List
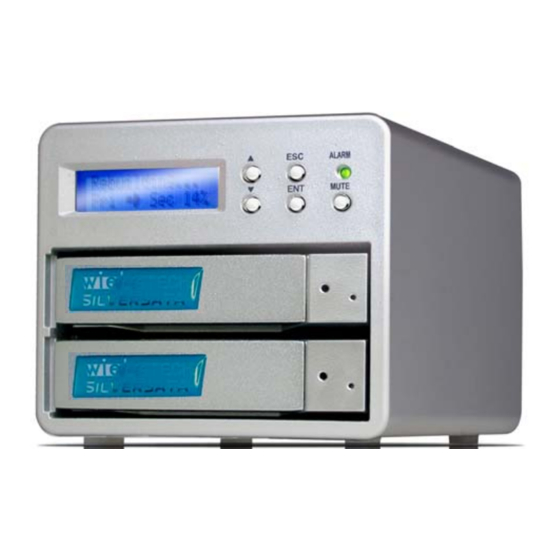
Identifying the parts of the product
Choosing the RAID type
Installing Hard Drives
Connecting the SilverSATA II to the computer
General Usage with Macs
General Usage with Windows Computers
Warnings and Notices
Special RAID Instructions
LCD Interface Buttons
LCD Messages
Password Feature
Updating the Firmware
Technical Specifications
S i l v e r S A T A I I S R U s e r M a n u a l
USER'S MANUAL
Revised 9/21/2006
Features
• Connects through either widely-compatible
USB 2.0, or fast eSATA.
• Hardware RAID 1 offers best possible
protection of data by mirroring the drives in real
time.
• Hot-swappable trays allow you to remove and
replace failed drives without shutting down the
system.
• Auto-rebuilding of data – after changing a
drive, the system automatically begins
reconstructing the data on the new drive.
• Windows-based GUI monitoring software can
optionally be used to monitor the system's
status remotely.
• Tiny footprint for such large storage capability.
• Simple, plug and play configuration with
Windows 2000/XP/Server 2003 and Mac OS X.
2
2
2
3
3
4
5
5
6
6
7
7
8
8
10
- 1 -
Advertisement
Table of Contents

Subscribe to Our Youtube Channel
Related Manuals for WiebeTech SIS2-SR


Summary of Contents for WiebeTech SIS2-SR
- Page 1 SilverSATA™ II SR Table of Contents Installation Instructions Accessories List Identifying the parts of the product Choosing the RAID type Installing Hard Drives Connecting the SilverSATA II to the computer General Usage with Macs General Usage with Windows Computers Warnings and Notices Special RAID Instructions LCD Interface Buttons LCD Messages...
-
Page 2: Installation Instructions
WiebeTech LLC Installation Instructions Check the accessories with your SilverSATA II. Please contact WiebeTech if any parts are missing or damaged. The box should contain the following items: Take a moment to familiarize yourself with the parts of the SilverSATA II. This will help you to better understand the remaining instructions. - Page 3 WiebeTech LLC Consider your RAID configuration. If you purchased the SilverSATA II with drives pre-installed and pre-configured, you can skip to step 6. The SilverSATA II supports both RAID 0 and RAID 1 in hardware. Consider which RAID type best suits your specific needs.
- Page 4 WiebeTech LLC Plug in the data cable. The SilverSATA II connects to your computer through either fast eSATA or USB2. One end of the cable connects to the back of the unit. Insert the other end into an available port on your computer.
- Page 5 WiebeTech LLC Usage with Macintosh computers Compatibility The SilverSATA II is fully plug-and-play under Mac OS 10.2.6 or later. No additional drivers are needed. However, the SATA host you are plugging into will probably require driver or firmware installation. Mounting and Ejecting Volumes When you connect the unit to the Mac for the first time and turn on the power, you’ll probably see a message saying that the disk is unreadable.
- Page 6 WiebeTech LLC Warnings and Notices • The SilverSATA II supports drives of various specifications and different capacities. However, we recommend using drives of the same brand and type for optimal performance. If drives of different capacities are used, the unit will consider both drives to have the same capacity as the smaller drive.
-
Page 7: Lcd Messages
WiebeTech LLC LCD Interface Buttons ▲ ▼ : Move up or down through the menu system, or adjust a setting. ENT: Enters a new setting into the system. NOTE: If you hesitate too long on a given menu screen, the unit will time out and return to the main menu. -
Page 8: Updating The Firmware
WiebeTech LLC Using the Password Feature For additional data protection, the SilverSATA II offers a password feature. This prevents unauthorized users from tampering with the configuration. If you change your password, write it down and store it in a safe place away from the unit. The default password is either “1234” or “0000”. - Page 9 WiebeTech LLC Next, click the “Open Files” button to open the location of the firmware. Specify the correct file path for the new firmware. You will see the message “Verifying….Address: xxxxx” during the Firmware update process. When the update has successfully completed, you will be prompted to restart your computer.
-
Page 10: Technical Specifications
Dimensions: Warranty: SilverSATA II is a trademark of WiebeTech LLC. Other marks are the property of their respective owners. © 2005 WiebeTech LLC. All rights reserved. FCC Compliance Statement: “This device complies with Part 15 of the FCC rules. Operation is subject to the following two conditions: (1) This device may not cause harmful interference, and (2) this device must accept any interference received, including interference that may cause undesired operation.”...
Need help?
Do you have a question about the SIS2-SR and is the answer not in the manual?
Questions and answers