
Related Manuals for ADE AUTOMATIC-L


Summary of Contents for ADE AUTOMATIC-L
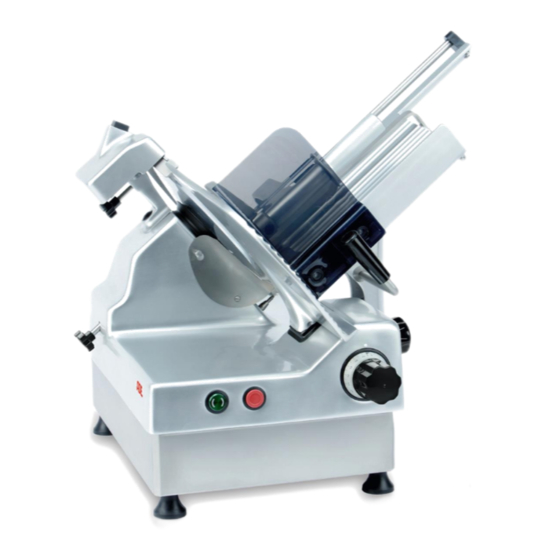
- Page 1 OPERATING INSTRUCTIONS Slicer with automatic transmission Similar to illustration. * AUTOMATIC-L Automatic-L-230411-Rev002-UM-en...
-
Page 2: Table Of Contents
STORAGE AND TRANSPORTATION CONDITIONS ............12 DISPOSAL .......................... 12 WARRANTY ........................12 TECHNICAL DATA ......................12 DIAGRAMS ......................... 13 DECLARATION OF CONFORMITY ..................14 * The illustration shows a machine with accessories not included. An integrated blade sharpener is not part of the machine. Automatic-L-230411-Rev002-UM-en... -
Page 3: Foreword
The slicers must never be used for cutting frozen goods, charcuterie, and meat on the bone or fruit with stones. Any attempt to slice said products or similar foods may result in severe damage to the machine and shall cause the warranty to become void. Automatic-L-230411-Rev002-UM-en... -
Page 4: Illustrations
Power button / start button (green) with status lights: Green only: normal operation Green and blue: automatic operation Stop button (red) Graduated knob for cutting thickness adjustment Adjustable foot Product carriage guide handle Guide Residual holder handle Blade guard not applicable Blade Stop plate Aluminum housing Automatic-L-230411-Rev002-UM-en... -
Page 5: Start-Up And Safety Precautions
The slicer is a single-phase machine equipped with a Schuko plug. Before plugging the machine into the outlet, ensure the power grid features an electrical overload cutout. Before connecting the machine to the power supply, always ensure that the local power supply rating matches that on the machine's nameplate! Automatic-L-230411-Rev002-UM-en... -
Page 6: Mechanical Safety Devices
- Check that the slice assembly cannot be opened when the product carriage is removed from the machine. In the event of malfunctions, immediately shut down the machine, tag it clearly as “DEFECTIVE,” and contact customer service! Automatic-L-230411-Rev002-UM-en... -
Page 7: Operating The Slicer
The product carriage can be guided manually. The product carriage is guided automatically. Press the green start button once to switch on the machine in manual mode. The green light on the start button indicates manual operation. The blade is rotating. Automatic-L-230411-Rev002-UM-en... -
Page 8: Automatic Operation
7. Push the product carriage back and forth to slice the product using the handle of the product carriage or food holder. Alternatively, use the automatic mode. 8. Once you have finished using the machine, switch it off by pressing the red stop button and set the graduated knob for cutting thickness adjustment to “0”. Automatic-L-230411-Rev002-UM-en... -
Page 9: Cleaning And Care
3. Unscrew the handle on the carriage arm completely. Pull the product carriage towards the operator so the locking mechanism engages and the product carriage locks in place. Remove the product carriage from the machine. The slice assembly remains locked in the “0” position. Automatic-L-230411-Rev002-UM-en... -
Page 10: Lubricating
Spread a few drops of oil on the bar and move the slice assembly back and forth several times. Clean as necessary to remove excess oil. Automatic-L-230411-Rev002-UM-en... -
Page 11: Sharpening The Blade
2. Clean the blade thoroughly before sharpening and ensure there are no traces of grease left on it. 3. Check that the sharpening device is in the zero position. 4. To position the sharpening device, fully open the slice assembly. 5. Position the product carriage in the middle position. Automatic-L-230411-Rev002-UM-en... - Page 12 Then set the knob back to the “0” position. 9. Switch off the machine. 10. Remove the sharpening device. First, loosen the star knob screw (1) and then press the star knob screw to release the handle (2). 11. Clean the blade thoroughly before using it again. Automatic-L-230411-Rev002-UM-en...
-
Page 13: Training
If the product malfunctions within 2 years from the date of purchase (receipt required) due to defects in material and workmanship, ADE will repair or replace the product. The warranty does not cover moving parts such as cables, blades, etc. The warranty does not extend to external normal wear and tear or damage caused by accident or misuse. -
Page 14: Diagrams
13. DIAGRAMS Automatic-L-230411-Rev002-UM-en... -
Page 15: Declaration Of Conformity
14. DECLARATION OF CONFORMITY Automatic-L-230411-Rev002-UM-en... - Page 16 Distributor: Manufacturer: ADE Germany GmbH New Höltigbaum 15 22143 Hamburg +49 40 432 776 - 0 +49 40 432 776 - 10 info@ade-germany.de www.ade-germany.de Automatic-L-230411-Rev002-UM-en...
Need help?
Do you have a question about the AUTOMATIC-L and is the answer not in the manual?
Questions and answers