
Related Manuals for Malmbergs EVON DUAL


Summary of Contents for Malmbergs EVON DUAL
- Page 1 Modell / Malli / Model: xxxxx 27 006 31, 77-79 EVON DUAL WiFi/Bluetooth/4G NOTE! Please read through the manual carefully before using the appliance and keep it for future reference.
-
Page 2: Table Of Contents
WiFi Charging Station for Electric Vehicles Content ABOUT THIS MANUAL 1.1 Function of this manual 1.2 Disclaimer 1.3 Abbreviations SAFETY AND WARNINGS PRODUCT OVERVIEW TECHNICAL SPECIFICATIONS INSTALLATION 8-11 5.1 Check upon delivery 5.2 Install the back plate 5.3 Connect power cable 5.4 Connect network cable and insert SIM card 5.5 Plug the core box into the back plate CONFIGURE NETWORK... -
Page 3: About This Manual
• Do basic maintenance tasks 1.2 Disclaimer Malmbergs shall not be liable for any damages, losses, costs or expenses resulting from the improper handling of the charging station, in particular resulting from noncompliance with the instructions of this document and other applicable regulations and standards (e.g. installation, transport, occupa- tional health and other safety standards). -
Page 4: Safety And Warnings
SAFETY AND WARNINGS Caution • Failure to follow instructions may result in danger. • Children are prohibited from touching the charging station. • Do not disassemble the charging station while connected to the mains. • Install the charging station away from pyrotechnics, dusty or corrosive places. •... -
Page 5: Product Overview
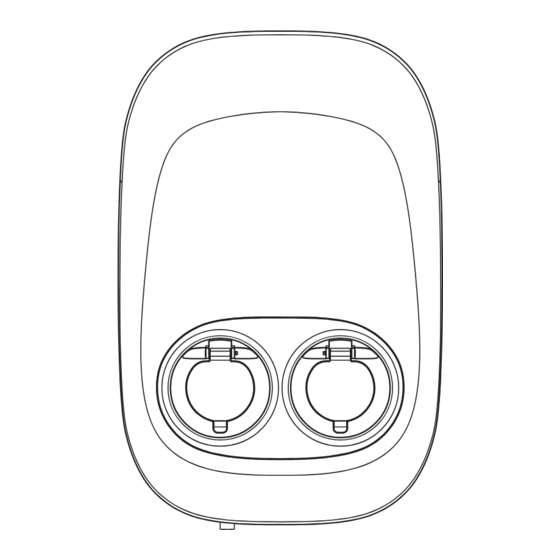
PRODUCT OVERVIEW External overview of the wall box 1. Front cover 4. Circuit breaker 7. Power cable inlet/outlet (bottom side) 2. Charging socket 5. Energy meter 8. Power cable inlet/outlet 3. Back plate 6. Network cable inlet (top side) 9. Power cable inlet/outlet (rear side) - Page 6 Internal overview of the wall box 1. RCBO 7. Ethernet port 2. Smart meter 8. SIM card 3. RS 485 port 9. Socket 4. Cable entry 10. Socket details 5. Cooling fan 11. RCBO details* 6. Terminals 12. RS485 port, SIM, Ethernet port details Note: press the “Reset”...
-
Page 7: Technical Specifications
TECHNICAL SPECIFICATIONS Art.no. 27 006 31, 77-79 Power Supply 3P+N+PE Rated Voltage 400V AC Input Rated Current Frequency 50/60Hz Output Voltage 400V AC Maximum Current Output Output Power 2x11kW/1x22kW Connector Type 2xType 2 Socket Enclosure User Interface LED Indicator Green/Yellow/Red RFID Reader Mifare ISO/IEC 14443A Start Mode... -
Page 8: Check Upon Delivery
For and on behalf of: IEC 62321-3-1:2013, IEC 62321-4:2013+A1:2017, IEC 62321-5:2013, IEC 62321-7-1:2015, IEC 62321-7-2:2017, ISO 17075-1:2017, IEC 62321-6:2015, IEC 62321-8:2017 Malmbergs Elektriska AB, Sweden. RF & Health Mr. Anders Folke / Product Manager EN 300 328 V2.2.2:2019, EN 300 330 V2.1.1:2017, Date: 26/12/2023 EN 301 489-1 V2.2.3:2019, EN 301 489-3 V2.1.1:... -
Page 9: Install The Back Plate
5.2 Install the back plate 320 mm 170 mm Ø7 170 mm Installation Diagram 5.3 Connect power cable TT/TN Single-phase IT For three-phase IT wiring, in addition to the regular wring, the L2 and N lines should be short-circuited. 12 mm Based on the cabling positions 4-M6x40... -
Page 10: Connect Network Cable And Insert Sim Card
Method 1: Series Connection (Max. 100A) 5.4 Connect network cable and insert SIM card RJ45 ports RS485 ports SIM card slot Ethernet cable: Connect the cable to the RJ45 connector then plug the connector into the port. Method 2: Parallel Connection SIM card: Push the cover down and flip it open, then put the SIM card in the slot. -
Page 11: Plug The Core Box Into The Back Plate
5.5 Plug the core box into the back plate Tighten the screws on the both sides of the wall- box to secure it to the back plate firmly. CONFIGURE NETWORK Decide what internet connection should be used for the installation. There are three types of internet connection that is possible to use for installation. - Page 12 Private scenario: If you use the charging station in a private scenario, you can bind the charging station to the Evchargo APP directly, please go to page 14 to check the Evchargo user manual to get more information. Public scenario: If you use the charging station in a public scenario, please remember to add the charging station SN to the Evchargo platform via the backend account first, and then check the AP Mode Instruction below to configure the network.
-
Page 13: Conduct A Function Test
Step 4: Configure WiFi After logging in, you will be prompted with the following interfaces: Choose WiFi as your charge point's communication method. Choose a WiFi hotspot. Enter the WiFi password wss://ocpp16.evchargo. com:33033 Choose the grid type: TN, TT or IT. Click to complete the Network configuration Your charging station will automatically restart once the network configuration is complete,... -
Page 14: Connect The Charging Station To Evchargo Cloud
CONNECT THE CHARGING STATION TO EVCHARGO CLOUD Evchargo Cloud is a software that serves business operators, and it addresses the demands for charg- ing points, charge point monitoring and management, and intelligent and efficient operation and maintenance. To connect the charging station to the Evchargo Cloud, please scan the code below for instructions. USE EVCHARGO APP TO CHARGE ELECTRIC VEHICLE Evchargo is an app that allows EV drivers to locate public charging points to charge their electric vehicles and bind the charge point to the Evchargo APP as a private charge point, please scan the... -
Page 15: Troubleshooting
TROUBLESHOOTING Problems LED Status Warning (Ground fault, Solid yellow light tampering, etc.) Relay adhesion Solid red light Leakage current fault The LED blinks red once and then goes out for 3s, cycling. CP fault The LED blinks red twice and then goes out for 3s, cycling. Over current fault The LED blinks red three times and then goes out for 3s, cycling. - Page 16 Malmbergs Elektriska AB, PO Box 144, SE-692 23 Kumla, SWEDEN Phone: +46 19 58 77 00 info@malmbergs.com www.malmbergs.com...
Need help?
Do you have a question about the EVON DUAL and is the answer not in the manual?
Questions and answers