Table of Contents
Advertisement
Quick Links
Advertisement
Table of Contents

Related Manuals for Carimali BlueDot 26 Plus


Summary of Contents for Carimali BlueDot 26 Plus
- Page 1 USER’S MANUAL Translation of original instructions BlueDot 26 Plus...
-
Page 3: Table Of Contents
TABLE OF CONTENTS GENERAL SAFETY WARNINGS ....5 4 INSTRUCTIONS FOR USE ....40 HANDLING AND STORAGE ..9 GETTING STARTED ....40 PACKAGING CONTENTS ... 10 4.1.1 Water tank filling (where applicable) ....40 PRIOR CHECKING 4.1.2 Product filling ....... 41 AFTER RECEIPT ...... -
Page 5: General Safety Warnings
After having unpacked the machine, provisions. verify its integrity. In case of damage or doubts about the packaging con- WARNING tents, please contact the Carimali Always observe the Service Centre. maintenance plans Handle the machine with care to pre-... - Page 6 Keep packaging parts (box, inner For more detailed information about protections, etc.) out of reach of recycling of this product, contact the children since they are potentially local authority, the local waste dispos- dangerous. al service. Do not dump those parts into the The equipment is not suitable for the environment, but dispose them ac- installation in close proximity of wa-...
- Page 7 In case of fault or malfunctioning of NOTE the machine, switch it off, unplug it and contact the Carimali Service When required and Centre. in case of operations not described in this...
- Page 8 The Manufacturer reserves the right NOTE to carry out technical and aesthetic modifications to the machine and/ The appliance must or this manual for manufacturing or be installed only in sales reasons without obligation to places where it can update the previous versions. be checked by skilled personnel.
-
Page 9: Handling And Storage
HANDLING AND STORAGE Handle the packaging by means of the specific transport handles. WARNING WARNING In case of prolonged storage at temperatures below 2°C, the water circuit in the machine must be drained by the Customer. Do not switch the machine before having reconditioned it for at least 1 hour at a suitable room temperature. -
Page 10: Packaging Contents
PACKAGING CONTENTS Machine Front door key Shut-off key Container key User manual Filler pipe 95.01889 PRIOR CHECKING AFTER RECEIPT Check the integrity of: ● External and internal packaging; ● External and internal machine parts; ● Accessories supplied. -
Page 11: Positioning
IMPORTANT: ● Use the certified Carimali power The consents and the procedures cord. described below must be per- ● Unroll the power cord for its entire length to prevent the risk of dan- formed by a skilled technician. -
Page 12: Water Mains Connection
● For electric safety of the machine, WATER MAINS CONNECTION provide a grounding system com- The connection to water mains plete with circuit breaker (max must be done by a skilled techni- IDN = 30mA). cian in compliance with applicable ●... -
Page 13: External Pump Power Supply
EXTERNAL PUMP POWER SUPPLY Press the “Fill boiler” button to fill the boiler. The machine features an external 24V power supply used to connect the immersion pump for the water tank. Await until boiler filling is completed. BOILER FILLING This operation allows the filter, the At the end of the procedure, the “Pow- pump and the boiler circuit to be er on”... -
Page 14: Residual Risks
Via Industriale, 1 - 24040 Chignolo d’Isola - ITALY MADE IN ITALY BD26 PLUS -1x11 82101 s/n XX123456 TYPE: 11/2020 BLUEDOT 26 PLUS -1F-0M-2G-0S-0S(XL)-0X Anyway, some inconveniences may MODEL: 220-240V ~ 50-60Hz INPUT: occur in certain conditions and/or 1700 W... -
Page 15: Introduction
INTRODUCTION USER TYPES ICON DESCRIPTION This manual is a basic component for USER the use of the machine. It contains User in charge only of the instructions and information about simple use of the machine. handling and usage of the machine in QUALIFIED TECHNICIAN safety. -
Page 16: Intended Use
INTENDED USE The machine is not intended for outdoor use. The machine was designed and man- ufactured for dispensing drinks, such ● Coffee; ● Instant products; ● Fresh milk; ● Hot water. The machine is intended for profes- sional use, such as: ●... -
Page 17: Description Of The Machine
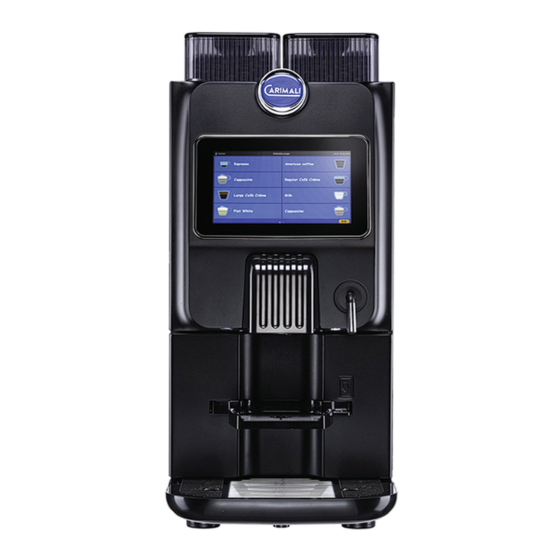
DESCRIPTION OF THE MACHINE OUTER COMPONENTS Components may vary depending on the configuration purchased Product containers Upper front door RFID reading sensor (optional) Door closing lock Touch screen display Hot water spout Dispensing nozzles Cup support grid Drip tray Lower front door Power on switch Wiring Water mains connection... -
Page 18: Inner Components
INNER COMPONENTS Components may vary depending on the configuration purchased. The machine can be set up (modular) according to customer’s requirements. The main components are listed below. All configurations can have more or less options installed depending on the customer's needs. 14 - Version with two grinders 14 - Version with two grinders Coffee bean container 2... -
Page 19: 2.2.1 Coffee Containers
2.2.1 COFFEE CONTAINERS Coffee bean container capacity: ● Standard: 0.6 kg ● Expanded: 1.2 kg When the container is filled with the product, close the lock protec- tion; open it after filling. Never fill the containers above the max. level indicated. 2.2.2 REDUCED BUSH FOR CONTAINERS Replace the standard bush with the supplied reduced one (Code 37.05443) -
Page 20: Touch Screen Display
TOUCH SCREEN DISPLAY 2.3.1 DISPLAY USE 17 - Sample page 17 - Sample page Button pressure Up/down scrolling Right/left scroll-... -
Page 21: Power On
2.3.2 POWER ON RFID sensor GSM/WiFi module GSM/WiFi signal Variable light activation status reception level message User presence Available detector credit Time and Boiler temperature date Machine alarm and extra Information water signalling Machine Large / small set-up cup detector Dose setting Power ON... -
Page 22: Heating Waiting Screen (Boiler-Exchanger)
2.3.3 HEATING WAITING SCREEN (BOILER-EXCHANGER) The page appears when switching the machine on or any time the boiler or ex- changer (if applicable) temperature goes below the minimum drink dispensing temperature. The heating of the steam exchanger begins after the one of the boiler. - Page 23 The hot water dispensing page is located at the end of the beverage selection pages. When dispensing, the selected drink is displayed with its progress bar. Selected drink memo Dispensing progress bar At the end of dispensing, an acoustic alarm signals that the machine complet- ed its cycle and is ready to dispense a new drink.
- Page 24 If the “Stop Dispensing” function is enabled, the user has the possibility to stop dispensing manually. Press “Stop dispensing” to manually stop dispensing a drink. The manual dispensing stop is not instant, but occurs when the system detects a safe situation for machine operation. If there is an MDB payment module, the necessary credit for dispensing is subtracted in full, even if dispensing is interrupted before completion.
-
Page 25: Set-Up Menu - Recipe Setting
2.3.5 SET-UP MENU - RECIPE SETTING From the “Power ON” screen, press the “Dose setting” key to enter the product screen with yellow labels showing the possibility of modify the recipes. Recipes are password protected and only accessible by the SKILLED TECHNICIAN. 24 - Drink setting page 24 - Drink setting page To main... - Page 26 26 - General setting page 26 - General setting page Option scrolling Option scrolling Confirm According to setting of the parameter “product number”, the menus “product composition” and “product settings” will vary. The composition of the available drinks, according to the machine configura- tion, are listed below: ●...
- Page 27 Each drink composition defines the type and the parameters to set in the “Product setting” menu. The composition of the drink can be directly modified by modifying its param- eters. 27 - Product setting page 27 - Product setting page Settable parameters Selected product...
- Page 28 Comp. Unit of Element Other /Notes beverage measure Grinder 1 Origin Grinder 2 Grinder 1 and 2 Delayed start time Tenths of a second Grinding time Tenths of a second Water time 1 Tenths of a second Pre-infusion pause Tenths of a second Pump air time Tenths of a second Recommended...
-
Page 29: Display Versions
DISPLAY VERSIONS 2.4.1 CUP STATION If the “Cup Station” option is enabled, every time drink dispensing is selected, the system checks the closing state of the front door. The "Cup Station" version allows for a "single door" option, whereby the door is not split into upper and lower segments but comes as a single piece. -
Page 30: Yes" Option
2.4.2 “YES” OPTION When the coffee grounds drawer is full, the machine will show: Open the upper front door, which will be one single piece. The machine will switch off automatically and will restart when the front door is closed. - Page 31 Remove the grounds drawer and empty out the coffee grounds. Refit the grounds drawer and close the front door again. The machine will restart, showing the “Power On” screen. Turn on the machine. Press to confirm that the ground drawer is empty and reset the grounds counter.
-
Page 32: Yes+?" Option
2.4.3 “YES+?” OPTION Regardless of the coffee grounds drawer being full, when “Power on” is pressed, the machine will ask if the grounds or Fresh Brew drawers have been emptied. Press to con- firm that the ground drawer Press to start is empty. -
Page 33: Energy Savings
2.4.4 ENERGY SAVINGS When the energy saving option is enabled, it will be applied only with the ma- chine on. The software will activate the energy saving mode according to five conditions: • User’s presence, if no user is detected. •... -
Page 34: 2.4.5 Dose Counter View
2.4.5 DOSE COUNTER VIEW Press Machine Set-up to access the maintenance management menu. Press “Dose counters” to access the dose counters menu. - Page 35 Access this menu to view: ● Total counter of the dispensed drinks ● Partial counter of the dispensed drinks ● Detailed dispensed drink counter. Total coun- ter of the dispensed drinks Detailed Partial counter of the counter of dispensed the dispensed drinks drinks Accessing the detailed counter of the dispensed drinks, a screen can be viewed...
-
Page 36: Mdb Payment System
2.4.6 MDB PAYMENT SYSTEM If the MDB payment system is installed and enabled, it is necessary to insert the required money for beverage dispensing. NOTE Beverage management can be managed from software (technician) and it is different according to the type of MDB installed. - Page 37 Confirmation is then requested for dispensing the selected drink. Confirm dispensing If the credit inserted is more than the price of the beverage, the machine will dispense change (if present and a compatible MDB module has been ena- bled). For further details on the MDB module, refer to the specific documentation.
-
Page 38: Technical Specifications
TECHNICAL SPECIFICATIONS TECHNICAL DATA UNIT DESCRIPTION DATA OF MEASURE Coffee boiler capacity Litres Steam boiler capacity Exchanger Coffee ground drawer capacity Pieces (7 g/each) Coffee bean container capacity Capacity of larger coffee bean container (optional) Max ~ 10 (1.0) Water mains pressure bar (Mpa) Min ~ 1 (0.1) Drip tray capacity... -
Page 39: Overall Dimensions
OVERALL DIMENSIONS OPTIONAL Direct Discharge 121.5 80.5 383.5... -
Page 40: Instructions For Use
INSTRUCTIONS FOR USE Fill the tank. GETTING STARTED 4.1.1 WATER TANK FILLING (WHERE APPLICABLE) Open the lower door. NOTE Fill the tank up to the max. level. Re-position the water tank. Remove the water tank. Close the lower door. -
Page 41: Product Filling
4.1.2 PRODUCT FILLING Close the container using the lock. Properly close the containers to prevent a machine stop. The process is valid, even if the op- tional larger containers are fitted. Open the required product container using the corresponding key. SWITCHING ON After carrying out the installation and Pour the coffee beans into the special... -
Page 42: Drink Dispensing
When the machine is on, the follow- DRINK DISPENSING ing screens appear. Press “Power On” to switch on the machine. Once the machine reaches the work- ing temperature, it is possible to pro- ceed with drink dispensing. For dispensing, press the key corre- sponding to required drink. -
Page 43: Dispensing Circuit Cleaning
4.3.1 DISPENSING CIRCUIT CLEANING WARNING When using for the first time, or after a long period of disuse, clean the dispensing circuit to eliminate any impurities that may be in the boiler or system. Perform the following method in se- quence: 1. -
Page 44: Ordinary Maintenance
WARNING For cleaning and sani- tising operations of the various circuits, use only Carimali products or the ones having the features indicated in this manual. - Page 45 TYPE OF OPERATION FREQUENCY PARAGRAPH OPERATION Display cleaning Manual Daily 5.1.1 External cleaning Manual Daily 5.1.2 of machine surfaces Emptying and Daily or before cleaning the liquid Manual if necessary grounds container 5.1.3 Emptying and When counting cleaning the solid Manual is reached grounds container...
-
Page 46: External Cleaning
For cleaning the inner components, open the front door of the machine by using the keys supplied. 5.1.2 CLEANING OF MACHINE SURFACES Proceed with the daily external clean- ing of the machine using a cloth EXTERNAL CLEANING dampened with water and then dry thoroughly. -
Page 47: Cleaning The Instant Product And Coffee Bean Containers
5.1.4 CLEANING THE INSTANT PRODUCT AND COFFEE BEAN CONTAINERS Carry out the following procedures for cleaning the containers of instant products and coffee beans: ● Open the upper front door. ● Clean with a solution of hot water and sanitizing product. ●... -
Page 48: Cleaning Of Functional Units
CLEANING OF FUNCTIONAL Press “Clean” to open the cleaning UNITS menu. 5.2.1 CLEANING MODE ACCESS Turn on the machine by pressing “Power On”. If enabled, the machine can require washing for a unit/circuit. To open the menu, scroll down from the information bar. -
Page 49: All In One Cleaning
● If there is a Milker circuit, insert the float in a container with water and Carimali sanitizer (06.00136). Follow the instructions on the sanitizer package for a proper di- lution. ● Put a container of approx. 2 l un-... - Page 50 From the cleaning menu, select “All 2. Open the rear door of the machine in One”. and insert a CARIMALI tablet (06.00133) into the Coffee unit. 1. The insertion of the cleaning tablet in the Coffee unit will be requested ATTENTION on the display.
- Page 51 3. Close the door and the machine will turn on automatically. 5. Connect the Milker circuit to a con- tainer with water and CARIMALI Press START to start the cleaning cy- sanitizer (06.00136), if fitted in the cle. machine configuration.
- Page 52 6. Clean the milk dip tube. The machine will run the cleaning cy- cle. ATTENTION Once the “All in One” washing cycle has been completed, re- move the milk float (if present) from the container water sanitizer rinse it carefully. ATTENTION NOTE Before...
-
Page 53: Semi-Automatic Coffee Unit Cleaning (Caribrew Unit)
Once having selected the cleaning instructions on the mode, the following screen is dis- display. played. Open the door and insert a CARIMALI tablet (06.00133) into the From the cleaning menu, select “Unit unit. Cleaning”. Select “Semi-Automatic ES” to pro-... - Page 54 Close the door and the machine will NOTE turn on automatically. If the washing cycle is suddenly interrupted before it is complet- ed, the unit will return to the idle position (HOME) and the ma- chine will carry out an automatic rinse cycle.
-
Page 55: Light Coffee Unit Cleaning (Caribrew Unit)
5.2.4 LIGHT COFFEE UNIT CLEAN- Select “Light ES” to proceed with ING (CARIBREW UNIT) cleaning of the Coffee unit (CariBrew) NOTE This type of washing does not require the use of tablets or the need of opening the machine. only ingredient used for cleaning is hot water from the water distri-... -
Page 56: Manual Cleaning Of The
Select the entry “Manual (Quick 5.2.5 MANUAL CLEANING OF THE ESPRESSO UNIT Guide)”. NOTE NOTE Perform this proce- The unit moves to the dure at least once a rest position. month or every 2000 cycles. Open the front door. NOTE To carry out this proce- dure, follow the instruc- tions on the display. - Page 57 Required tools for cleaning: ● CARIMALI brush (95.01806); ● Lukewarm water. After removing the CariBrew unit from Insert the brush into the CariBrew the machine, thoroughly clean it with and remove the residues.
-
Page 58: Mixer Automatic Cleaning (Optional)
From the cleaning menu, select “Mix- 5.2.6 MIXER AUTOMATIC CLEANING (OPTIONAL) er Cleaning”. NOTE This procedure can be carried out follow- ing the instructions on the display. ATTENTION In the machine ver- sion with tank (WT), check and fill the water tank up to the MAX level if neces- NOTE... -
Page 59: Disassembly And Manual Cleaning Of The Instant Products Mixer (Optional)
5.2.7 DISASSEMBLY AND MANUAL Rotate the ring nut to match the tabs CLEANING OF THE INSTANT with the relevant slots and free the PRODUCTS MIXER (OPTIONAL) mixer. ATTENTION Open the upper front door of the machine and disconnect the hoses that might in- terfere with this pro- cedure. - Page 60 Immerse all components in a solution NOTE of hot water and cleaning agent CA- For cleaning oper- RIMALI. ations, use the CA- RIMALI detergent (06.00136). Rinse all components with running hot Required tools for cleaning: water. ● Hot water; ● Cleaning agent. ATTENTION Make sure the com- Immerse all components in a solution...
-
Page 61: Milker Circuit Cleaning (Optional)
NOTE Put a container of Connect the Milker circuit to a con- approx. 2 l under the tainer with water and CARIMALI san- dispensing nozzle to itizer (06.00136). Follow the instruc- collect the cleaning tions on the sanitizer package for a liquids. -
Page 62: Disassembly And Manual Cleaning Of The Milker (Optional)
Await until the cleaning of the Milker Wait until Milker rinsing is completed. is complete. ATTENTION NOTE If the cleaning cycle complete is stopped suddenly rinsing of the Milker before comple- circuit, use more than tion, always repeat 1 l of fresh water. the procedure from the beginning, mak- ing sure the rinsing... - Page 63 NOTE Check O-ring condi- tions and replace if necessary. NOTE Assemble the Milker by proceeding in the reverse order com- pared to the above instructions. Disconnect the milk circuit connection ATTENTION pipes. To avoid the risk of contaminating dis- pensed drinks, carry out cleaning opera- tions periodically at regular intervals and...
-
Page 64: 5.2.10 Water Tank Cleaning
Required tools for cleaning: Rinse all components with running hot ● Brush (CARIMALI 95.01806); water. ● Hot water; ATTENTION ● Cleaning agent. Make sure the com- ponents are perfectly NOTE dry before installing them again on the Components are dish- machine, to prevent washer safe. - Page 65 From the cleaning menu, select “Unit Cleaning”. Close the door and the machine will turn on automatically. Select “Semi-Automatic FB” to pro- Press to start the cleaning cycle. ceed with cleaning of the Fresh Brew unit. The selected unit sets itself in posi- tion for tablet insertion.
-
Page 66: Light Cleaning Of The Fresh Brew Unit
ATTENTION If the washing cycle is suddenly interrupted before it is complet- ed, the unit will return to the idle position (HOME) and the ma- chine will carry out an automatic rinse cycle. To perform a com- Select “Light FB” to proceed with plete cleaning cycle, cleaning of the Fresh Brew unit. -
Page 67: Troubleshooting
TROUBLESHOOTING ATTENTION For faults or situations not described in this manual or when necessary, contact the Service centre. FAULT POSSIBLE CAUSE POSSIBLE SOLUTION USER Check the plug and the Wrong connection to main switch of the room. the power mains. The front door is not fully closed. -
Page 68: Coffee Unit Errors
COFFEE UNIT ERRORS Error NO POSSIBLE CAUSE INTERVENTION ● Disconnect and then connect power to machine again. The SLIDER does not reach the dis- ● Clean the coffee unit under running water. pensing position. Fully remove the unit and clean under running water (see chapter 5). - Page 69 MESSAGE POSSIBLE CAUSE INTERVENTION USER VERSION WITH DIRECT CONNECTIONS TO THE Await the water filling in the Air- MAINS ONLY Break. Check the loading solenoid valve Minimum level of water inside filter and clean if necessary. (Air break). When the number of grounds Empty the drawer and clean it.
-
Page 70: Decommissioning And Disposal
DECOMMISSIONING AND DISPOSAL This machine is compliant with the Directive 2012/19/EU. When the machine is no longer used, render it inoperative after having un- plugged it and having cut the power cord. The Manufacturer is not liable for machine disposal which must be carried out in compliance with the applicable regulations. - Page 72 Carimali S.p.A. Via Industriale, 1 Chignolo d’Isola (BG) 24040 - ITALY +39 035 4949555 +39 035 905447 info@carimali.com carimali.com...
Need help?
Do you have a question about the BlueDot 26 Plus and is the answer not in the manual?
Questions and answers
Una pregunts,que pasa si mi cafetera viene **** una contraseña desde que la compre