Table of Contents
Advertisement
Available languages
Available languages
Quick Links
Advertisement
Chapters
Table of Contents

Related Manuals for Silverline AS 5443 X01


Summary of Contents for Silverline AS 5443 X01
- Page 1 AS5443X01 - AS5444X01 Manuale d'uso del piano cottura da incasso...
- Page 3 Our Valued Customer, Thank you for your purchase of our product. Please read all instructions and warnings in this manual carefully. This manual includes the important information about safe installation, usage and maintenance and the required warnings for your utilization of your equipment. Please keep this manual at a safe and easily accessible place to be used as future reference.
-
Page 4: Table Of Contents
CONTENTS SAFETY INFORMATION ............. 1 GENERAL SAFETY WARNINGS ..........3 SAFETY OF THE GAS ..............5 INFORMATION ON TRANSPORTATION…………………………6 TECHNICAL PROPERTIES OF HOB .......... 7 MODELS ..................9 USAGE OF HOBS ..............12 UTILIZATION OF HOT PLATE ..........17 INSTALLATION OF THE UNIT ..........21 INSTALLATION INFORMATION ON THE UNIT ...... -
Page 5: Safety Information
SAFETY INFORMATION This device is produced for domestic use. Our firm is not liable for any losses or damages which may occur due to wrong or faulty installation. Although this is a simple use product, we recommend you to read this manual carefully. In this sense, you may get best performance from your device and protect yourself and your surrounding from the possible dangers. - Page 6 WARNING: Cooking with vegetable oil or fat without required care may be dangerous and may cause fire. Do not attempt to extinguish any fire with water, the circuit of the equipment is closed and then the flame is covered with a cover or flame blanket. ...
-
Page 7: General Safety Warnings
Natural gas pressure is 200 mmSS (20mbar). Please consult authorized service conversion to natural gas or LPG. Note: Usage of the gas baking products shall cause heat and steam formation at the places of existence. sure that your kitchen ventilated well. - Page 8 Do not let your hob in operation without supervision control it with frequently. Take out the plug from the wall socket during handling, cleaning or maintenance of the unit. Do not ever attempt to remove the cable from the wall socket by handling the cable.
-
Page 9: Safety Of The Gas
SAFETY FOR CHILDREN The exposed parts of the product shall be heated during and after the use; the children should be kept away. Do not place any object on the unit that the children may reach. Packaging materials may be dangerous for children. Keep the packaging materials in a place that the children may not reach or classify and recycle them as per the waste instructions. -
Page 10: Information On Transportation
INFORMATION ON TRANSPORTATION Keep the original packaging of the product. Carry the product in its original packaging, and abide the markings thereon. If the original packaging is not available; Take care for the impacts which may be applied on the outer surfaces of the product. -
Page 11: Technical Properties Of Hob
Before disposal or scraping of the device it is required to prevent harmful and negative effects on human and environment. Otherwise it would be incompliant waste. This symbol indicates that the unit should not be disposed as domestic waste rather it should be returned to some electronic wastes collection center. - Page 12 AS5443X01 AS5444X01 CS 5222-CS 5224- CS 5224 W- CS 5289 CS 5284 CS 5249-CS CS 5243 CS 5284 5249W CS 5243 W CS 5244 860x520 mm CS 5217 320x520 CS 5244 AS 5216- AS 5271 CS 5217 W AS 5274 AS5323 CS 5218 CS 5309...
-
Page 13: Models
MODELS AS5444X01 AS5443X01... -
Page 16: Usage Of Hobs
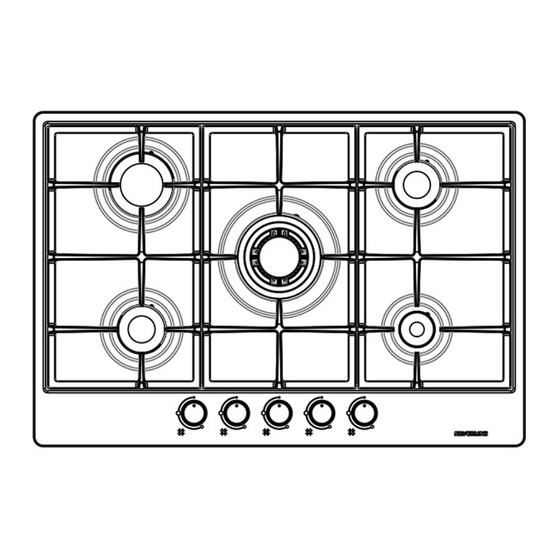
USAGE OF HOBS GAS BURNERS Gas is supplied to the burners by turning the switches. Although the symbols change from model to model, they are indicated either on the switches or the control panel. The following settings may be conducted to match with the illustrated symbols. 1. - Page 17 1. Hot- plate control switch 2. Left lower burner control switch 3. Right upper burner control switch 4. Right lower burner control switch 1. Hot- plate control switch 2. Left lower burner control switch 3. Right upper burner control switch Right lower burner control switch 1.
- Page 18 1.Upper burner control switch 1.Wok burner control switch 2.Lower burner control switch 1. Left lower burner control switch 2. Left upper burner control switch 3. Upper hot- plate control switch 4. Lower hot- plate control switch 5. Right upper burner control switch 6.
- Page 19 MODELS EQUIPPED WITH LIGHTER SWITCH (Automatic ignition) In order to burn one of the burners, press the switch down and bring the switch to maximum position. When it burns, flame is adjusted to the desired intensity with the switch. RIGHT WRONG Figure 1.
- Page 20 Figure 2. If the flame is gone when you release the switch You should repeat the above process. But this time press the switch and hold for about 10 seconds. WARNING; Do not use burning system more than 15 seconds. If the burner will not be burned within such time or if the flame will be cut for any reason whatsoever, repeat burning process after waiting for 1 minute.
-
Page 21: Utilization Of Hot Plate
UTILIZATION OF HOT PLATE Warnings Before use of electrical plate the plate should be elevated to the maximum level and rest it for 5 minutes without putting any container thereon. It is Ok if any smell or smoke will rise from the plate. - Page 22 Turning on the Plate: Bring the control switch to the proper position by turning it to right or left by the cooking type, food quantity and using below scheme. The red warning light will be on when the switch is set to any value other than off position.
- Page 23 Using Right Burner The pan diameter and the burner power should match in order to efficiently use it. The diameters proper for each burner are given in the table. Select the proper pan diameter and volume in order to define the proper burner.
- Page 24 Do not cook with pans without lid or semi closed pans to avoid energy loss. Do not place the containers directly on the burner covers use grill always. Place the cooking pan on the burner evenly. The containers placed on the burner inappropriately may be tipped.
-
Page 25: Installation Of The Unit
Pay attention that the burner place will not have any impact. And do no place heavy objects on the grill. Do not heat the pans as empty. The pan sole may be deformed. The heat on the sole may damage the hob’s top plate surface. -
Page 26: Installation Information On The Unit
When the unit was taken off its packaging make sure that it is strong, not bent and has no fault at all. In the event of any doubt consult the dealer. Cut off the electric connection of the unit from the main switch during installation. - Page 27 A safe distance should be left between the hob and the counter walls (Figure 4). The hole to be provided for the hob on the counter should be as per the figure. (Figure 4) The distance between the hob sole and the partition should be at least 25 mm.
- Page 28 The distance between the cook top ad another device (e.g.kitchen hood)shall not be less than 700mm(Figure 5). If 60 cm Hobs will be place on a built in oven without any cooling system, it is recommended to leave 300 cm² of ventilation hole in order to insure air circulation.
- Page 29 1. Cooktop 2. Aspirator 3. Electrical ventilator Figure 6 . 4. Ventilation Opening VOLUME OF VENTILATION THE ROOM (m³) OPENING (cm²) Less than 5 m³ Minimum 100 cm² Between 5m³ Minimum 50 cm² and 10 m³ Larger than 10 m³ Not required Basement or Cellar Minimum 65 cm²...
-
Page 30: Electric Connection
counter hole without allowing any overlapping before the installation. (Figure 7) Place the hob on the counter hole to center the installation hole. Secure the unit on the counter by using the installation sheet and screws. (Figure 7 and 8) Counter Gasket Installation Clamp... -
Page 31: Gas Connection
When the power cable is damaged this cable should be changed with a special cable to be supplied by a special cable agency or the authorized service dealer. No reducer, adapter, and switch should be used for electrical connection since it will cause excessive heat and fire. - Page 32 If the unit will be connected to a flexible hose, the length of the hose shall not exceed 120 cm. Before starting works related to gas installation, please cut the gas supply. Make the connection so that no pressure will be applied on the connection nuts and piping.
-
Page 33: Adjustment Of Hob Per Gas Types
ADJUSTMENT OF HOB PER GAS TYPES These instructions are prepared for specialist personnel having required competence, the installation of the equipment should be suitable as per the applicable standards. All gas related works should be conducted when the electric connection was cut. -
Page 34: Technical Information On Gas Burners
used with the unit. After completing the injector installation, check the gas sealing with foam. Apply foam to the bottom of the injectors for this purpose. Press on the injector with your finger so that the gas outlet is closed and check for any bubbles on the connection areas of the injector. -
Page 35: Hob's Energy Efficiency
Complete the installation by using gasket in the middle for the LPG hose entrance indicated on the above figure during the natural gas LPG conversion. HOB’S ENERGY EFFICIENCY Use flat sole pans on the hob. In this manner, thermal energy shall be used to the maximum. - Page 36 In order that you use the glass hob and grills for longer periods you need to clean them with appropriate cleaning agents at certain intervals. Cleaning on stainless surfaces should be conducted in accordance with the steel surfaces, and the surface should be dried preferably with a soft leather part.
- Page 37 Clean the hob regularly after waiting for cooling after each use in order to keep your hob at the best manner. Do not take out the control switches in any manner during cleaning. Enamel Parts All enamel parts are used by using water with soap and suitable detergents.
- Page 38 This device, in Europe, accords to the directives 2012/19/EU Waste Electrical and Electronic Equipment. (WEEE) this device prior to disposing of junk and trash, the environment and human health against the potential negative consequences need to block. Otherwise, this would be an inappropriate waste. This symbol on the product, the product treated as household waste, electrical electronic alert is for the delivery of waste collection facilities.
- Page 39 The information in the product data sheet is given in accordance with the Commission delegated Regulation (EU) No 66/2014 supplementing Directive of the European Parliament and of the Council 2009/125/EC Information for domestic gas-fired hobs Brand SILVERLINE Type of hob Built-in Gas Hob CS 5243- CS CS 5217- CS...
- Page 40 The information in the product data sheet is given in accordance with the Commission delegated Regulation (EU) No 66/2014 supplementing Directive of the European Parliament and of the Council 2009/125/EC Information for domestic gas-fired hobs Brand SILVERLINE Type of hob Built-in Gas Hob AS 5275 CS 5234-...
- Page 41 The information in the product data sheet is given in accordance with the Commission delegated Regulation (EU) No 66/2014 supplementing Directive of the European Parliament and of the Council 2009/125/EC Information for domestic gas-fired hobs Brand SILVERLINE Type of hob Built-in Gas Hob CS 5249 AS 5214...
- Page 42 The information in the product data sheet is given in accordance with the Commission delegated Regulation (EU) No 66/2014 supplementing Directive of the European Parliament and of the Council 2009/125/EC Information for domestic gas-fired hobs Brand SILVERLINE Type of hob Built-in Gas Hob CS 5218 CS 5224...
- Page 43 The information in the product data sheet is given in accordance with the Commission delegated Regulation (EU) No 66/2014 supplementing Directive of the European Parliament and of the Council 2009/125/EC Information for domestic gas-fired hobs Brand SILVERLINE Type of hob Built-in Gas Hob CS 5223 AS 5241...
- Page 44 The information in the product data sheet is given in accordance with the Commission delegated Regulation (EU) No 66/2014 supplementing Directive of the European Parliament and of the Council 2009/125/EC Information for domestic mixed hobs Brand SILVERLINE Type of hob GAS AND ELECTRIC BUILT-IN HOB CS 5244 Model identification...
- Page 45 Modello: AS5443X01 - AS5444X01 Manuale d'uso del piano cottura da incasso...
- Page 46 Gentile Cliente, grazie per aver deciso di acquistare il nostro prodotto. Consigliamo di leggere attentamente tutte le istruzioni e le avvertenze contenute in questo manuale utente. Il presente manuale contiene informazioni importanti per l'installazione, l'uso e la manutenzione in condizioni di sicurezza e le avvertenze necessarie per l'utilizzo dell'apparecchio.
- Page 47 CONTENUTI INFORMAZIONI DI SICUREZZA ..........1 AVVERTENZE GENERALI DI SICUREZZA ....... 3 SICUREZZA GAS ............... 5 INFORMAZIONI SUL TRASPORTO ........... 6 SPECIFICHE TECNICHE PIANO COTTURA ......7 MODELLI ..................9 USO DEL PIANO COTTURA ............ 12 UTILIZZO DELLA PIASTRA ............. 17 INSTALLAZIONE DELL'UNITÀ...
-
Page 48: Informazioni Di Sicurezza
INFORMAZIONI DI SICUREZZA Questo dispositivo è stato progettato per l’utilizzo domestico. La nostra azienda non è responsabile per eventuali perdite o danni che possono verificarsi a causa di un'installazione errata o impropria. Sebbene si tratti di un prodotto semplice da usare, si raccomanda di leggere attentamente questo manuale. - Page 49 • AVVERTENZA: Cucinare con olio o grasso vegetale, senza la dovuta attenzione, può essere pericoloso e può causare incendi. ’ • Non tentare di spegnere l'incendio con l acqua, chiudere il circuito dell'apparecchio, quindi domare il fuoco coprendolo o con una coperta antincendio. •...
-
Page 50: Avvertenze Generali Di Sicurezza
La pressione del gas naturale è di 200 mmSS (20 • mbar). Consultare il servizio clienti autorizzato per la conversione a gas naturale o GPL. • Nota: L'uso di forni a gas deve provoca la formazione di calore e vapore nei luoghi in cui sono presenti. Assicurarsi che la cucina sia ben ventilata. - Page 51 • Non lasciare il piano cottura in funzione senza supervisione, controllarlo frequentemente. • Togliere la spina dalla presa a muro durante la manipolazione, la pulizia o la manutenzione dell'apparecchio. • Non tentare mai di rimuovere la spina dalla presa a muro tirandone il cavo.
-
Page 52: Sicurezza Gas
SICUREZZA PER BAMBINI • Le parti esposte del prodotto saranno calde durante e dopo l'uso; i bambini devono esserne tenuti lontani. • Non appoggiare alcun oggetto sull'unità che i bambini possano raggiungere. • I materiali di imballaggio potrebbero essere pericolosi per i bambini. -
Page 53: Informazioni Sul Trasporto
INFORMAZIONI SUL TRASPORTO • Conservare la confezione originale del prodotto. • Trasportare il prodotto nella sua confezione originale e rispettare i relativi contrassegni. • Se manca la confezione originale; Prestare attenzione agli urti che possono verificarsi sulle superfici esterne del prodotto. ... -
Page 54: Specifiche Tecniche Piano Cottura
Prima dello smaltimento o della manipolazione del dispositivo è necessario prevenire effetti nocivi e negativi sull'uomo e sull'ambiente. In caso contrario sarebbe un rifiuto non conforme. Il presente simbolo indica che l’unità non deve essere smaltita come rifiuto domestico, ma portata presso un centro di raccolta per rifiuti elettrici. - Page 55 MODELLI AS5443X01 AS5444X01 4 fuochi a 4 fuochi a 4 fuochi a 3 fuochi a 2 fuochi a 4 fuochi a Numero fuochi 5 fuochi a gas 4 fuochi a gas bruciator bruciatori 4 fuochi a gas fuochi e a gas a gas 1 Unità...
-
Page 56: Modelli
MODELLI AS5443X01 AS5444X01... -
Page 59: Uso Del Piano Cottura
USO DEL PIANO COTTURA FUOCHI A GAS Il gas viene fornito ai fuochi girando le manopole. Sebbene i simboli cambino da modello a modello, essi sono indicati sulle manopole o sul pannello di controllo. Le seguenti impostazioni possono essere eseguite in base ai simboli illustrati. Manopola fuoco inferiore sinistro Manopola fuoco superiore sinistro Manopola fuoco centrale... - Page 60 Manopola piastra di riscaldamento Manopola fuoco inferiore sinistro Manopola fuoco superiore destro Manopola fuoco inferiore destro Manopola piastra di riscaldamento Manopola fuoco inferiore sinistro Manopola fuoco superiore destro Manopola fuoco inferiore destro Manopola fuoco inferiore sinistro Manopola fuoco superiore sinistro Manopola fuoco superiore destro Manopola fuoco inferiore destro...
- Page 61 1.Manopola fuoco wok Manopola fuoco superiore Manopola fuoco inferiore Manopola fuoco inferiore sinistro Manopola fuoco superiore sinistro Manopola piastra di riscaldamento superiore Manopola piastra di riscaldamento inferiore Manopola fuoco superiore destro Manopola fuoco inferiore destro Accensione fuochi Se il piano cottura non è dotato di accendino incorporato o in caso di black-out, posizionare una fiamma viva sul bruciatore e premere la manopola, per portarla nella posizione desiderata, con movimento in senso antiorario.
- Page 62 MODELLI CON ACCENDINO (Accensione automatica) Per accendere uno dei bruciatori, premere l'interruttore verso il basso e portare l'interruttore nella posizione massima. Quando è acceso, la fiamma viene regolata con la manopola all'intensità desiderata. SBAGLIATO GIUSTO Figura 1. • Affinché il piano cottura funzioni correttamente, le griglie e i componenti del bruciatore devono essere posizionati correttamente (Figura 1) •...
- Page 63 Figura 2. Se la fiamma è spenta quando si rilascia l'interruttore, ripetere la procedura di cui sopra. Questa volta però premere l'interruttore e tenerlo premuto per circa 10 secondi. AVVERTENZA: Non utilizzare il sistema di combustione per più di 15 secondi. Se il bruciatore non si accende entro tale lasso di tempo o se la fiamma non compare per qualsiasi motivo, ripetere il processo di combustione dopo aver atteso 1 minuto.
-
Page 64: Utilizzo Della Piastra
UTILIZZO DELLA PIASTRA Attenzione Prima dell'uso della piastra elettrica, essa deve essere portata al livello massimo e lasciata così per 5 minuti senza mettervi sopra alcun contenitore. È NORMALE se dalla piastra fuoriesce odore o fumo. Tali effetti scompariranno dopo l'inizio del normale utilizzo. Dopo tale primo utilizzo, non azionare la piastra elettrica senza alcun contenitore. - Page 65 Accensione della piastra: Portare l'interruttore di comando nella posizione corretta, ruotandolo a destra o a sinistra in base al tipo di cottura, alla quantità di cibo e utilizzando lo schema sottostante. La spia rossa si accende quando l'interruttore è impostato su un valore diverso dallo spegnimento.
- Page 66 Uso del bruciatore adatto • Il diametro della pentola e la potenza del bruciatore devono corrispondere per poterlo utilizzare in modo efficiente. I diametri di ciascun bruciatore sono riportati nella tabella. • Utilizzare pentole di diametro e volume corretti per scegliere il bruciatore appropriato.
- Page 67 • Non cucinare con pentole senza coperchio o semi chiuse per evitare sprechi di energia. • Non appoggiare i contenitori direttamente sui bruciatori, utilizzare sempre la griglia. • Posizionare la pentola sul bruciatore simmetricamente. I recipienti collocati sul bruciatore in modo inappropriato possono rovesciarsi. Non collocare contenitori di grandi dimensioni sul lato degli interruttori, poiché...
-
Page 68: Installazione Dell'unità
• Fare attenzione che il bruciatore non subisca alcun impatto. Non posizionare oggetti pesanti sulla griglia. • Non riscaldare le pentole da vuote. Il fondo della pentola può deformarsi. Il calore sul fondo può danneggiare la superficie della piastra superiore del piano cottura. •... -
Page 69: Informazioni Sull'installazione Dell'unità
• Tolto l'apparecchio dall'imballo, assicurarsi che sia resistente, non deformato e non abbia alcun difetto. In caso di dubbi consultare il rivenditore. • Interrompere il collegamento elettrico dell'unità dall'interruttore principale durante l'installazione. • Affinché i piani cottura da incasso funzionino senza problemi, le misure del piano su cui sarà... - Page 70 • Lasciare una distanza di sicurezza tra il piano cottura e le contro pareti (Figura 4). • Il foro da prevedere per il piano cottura sul banco deve essere come quelli indicato in figura. (Figura 4) • La distanza tra il fondo del piano cottura e la parete divisoria deve essere di almeno 25 mm.
- Page 71 • La distanza tra il piano cottura e un altro dispositivo (ad es. cappa da cucina) non deve essere inferiore a 700 mm (Figura 5). • Se i piani cottura da 60 cm sono posizionati su un forno a incasso senza sistema di raffreddamento, si raccomanda di lasciare 300 cm di foro di ventilazione per assicurare la circolazione dell'aria.
- Page 72 1. Piano cottura 2. Aspiratore 3. Ventola elettrica Figura 6. 4. Apertura ventilazione VOLUME APERTURA DI DELLA VENTILAZION STANZA (m E (cm Meno di 5 m Minimo 100 cm Minimo 50 cm2 Tra 5m3 e 10 m3 Superiore a 10 m3 Non richiesto Seminterrato o cantina Minimo 65 cm2...
-
Page 73: Collegamento Elettrico
foro del bancone, senza consentire alcuna sovrapposizione prima dell'installazione. (Figura 7) • Posizionare il piano cottura sul foro del piano, centrando il foro di installazione. • Fissare l'unità sul piano di lavoro, utilizzando la scheda di installazione e le viti. (Figura 7 e 8) Bancone Guarnizione Morsetto di installazione... -
Page 74: Collegamento Gas
• Se il cavo di alimentazione è danneggiato, sostituirlo con un cavo speciale fornito da un'agenzia che si occupa di cavi speciali o dal rivenditore di assistenza autorizzato. • Per il collegamento elettrico non si devono utilizzare riduttori, adattatori e interruttori, in quanto causano eccessivo calore e incendi. - Page 75 Se l'unità sarà collegata ad un tubo flessibile, la lunghezza del tubo non deve superare i 120 cm. Prima di iniziare i lavori relativi al collegamento al gas, interrompere l'alimentazione del gas. Effettuare il collegamento in modo che non venga esercitata alcuna pressione sui dadi di collegamento e sui tubi.
-
Page 76: Regolazione Piano Cottura Per Tipo Di Gas
REGOLAZIONE PIANO COTTURA PER TIPO DI GAS Queste istruzioni sono destinate al personale specializzato che possiede la competenza richiesta; l'installazione dell'attrezzatura deve essere eseguita secondo le norme applicabili. Tutti i lavori relativi al gas devono essere eseguiti quando il collegamento elettrico è stato interrotto. FIGURA FIGURA I. -
Page 77: Informazioni Tecniche Sui Fuochi A Gas
utilizzare con l'unità. Dopo aver completato l'installazione dell'iniettore, controllare la tenuta al gas con la schiuma. Applicare la schiuma sul fondo degli iniettori per questo scopo. Premere con il dito sull'iniettore in modo che l'uscita del gas sia chiusa e controllare la presenza di eventuali bolle sulle aree di collegamento dell'iniettore. -
Page 78: Efficienza Energetica Pian0 Cottura
Completare l'installazione utilizzando la guarnizione al centro per l'ingresso del tubo GPL indicato nella figura precedente durante la conversione del gas naturale GPL. EFFICIENZA ENERGETICA PIAN0 COTTURA • Utilizzare padelle con fondo piano sul piano cottura. In questo modo, l'energia termica viene utilizzata al massimo. •... - Page 79 • Per utilizzare il piano cottura in vetro e le griglie per periodi più lunghi è necessario pulirle con detergenti appropriati a determinati intervalli di tempo. • La pulizia delle superfici in acciaio inox deve essere eseguita secondo le superfici in acciaio e la superficie deve essere asciugata preferibilmente con una panno in pelle morbida.
- Page 80 Pulire regolarmente il piano cottura dopo ogni utilizzo, dopo averne atteso il raffreddamento, per mantenere il piano cottura al meglio. Non estrarre in alcun modo le manopole durante la pulizia. Parti in smalto Tutte le parti smaltate vengono pulite utilizzando acqua, sapone e detergenti adatti.
- Page 81 Questo dispositivo, in Europa, è conforme alle direttive 2012/19/UE riguardo le apparecchiature elettriche ed elettroniche. (AEEE) questo dispositivo deve essere smaltito a noma di legge, per la tutela dell'ambiente e la salute umana, oltre che per prevenire possibili conseguenze negative. In caso contrario, questo sarebbe uno smaltimento inappropriato dei rifiuti.
- Page 82 (UE) n. 66/2014 della Commissione, che integra la direttiva 2009/125/CE del Parlamento e del Consiglio europeo Informazioni per i piani cottura alimentati a gas a uso domestico Marca SILVERLINE Tipo di piano cottura Piano cottura a incasso CS 5217- CS 5217 CS 5243-CS 5243 Identificaz.
- Page 83 (UE) n. 66/2014 della Commissione, che integra la direttiva 2009/125/CE del Parlamento e del Consiglio europeo Informazioni per i piani cottura alimentati a gas a uso domestico Marca SILVERLINE Tipo di piano cottura Piano cottura a incasso Identificaz. modello...
- Page 84 (UE) n. 66/2014 della Commissione, che integra la direttiva 2009/125/CE del Parlamento e del Consiglio europeo Informazioni per i piani cottura alimentati a gas a uso domestico Marca SILVERLINE Tipo di piano cottura Piano cottura a incasso AS 5214 Identificaz. modello...
- Page 85 (UE) n. 66/2014 della Commissione, che integra la direttiva 2009/125/CE del Parlamento e del Consiglio europeo Informazioni per i piani cottura alimentati a gas a uso domestico Marca SILVERLINE Tipo di piano cottura Piano cottura a incasso Identificaz. modello AS 5216...
- Page 86 (UE) n. 66/2014 della Commissione, che integra la direttiva 2009/125/CE del Parlamento e del Consiglio europeo Informazioni per i piani cottura alimentati a gas a uso domestico Marca SILVERLINE Tipo di piano cottura Piano cottura a incasso CS 5223 CS 5284 Identificaz.
- Page 87 2009/125/CE del Parlamento e del Consiglio europeo Informazioni per i piani di cottura misti per uso domestico Marca SILVERLINE Tipo di piano cottura PIANO COTTURA DA INCASSO ELETTRICO E A GAS CS 5244 CS 5244 Identificaz. modello...
- Page 88 Manufacturer-Produttore / Importer-Importatore:...
Need help?
Do you have a question about the AS 5443 X01 and is the answer not in the manual?
Questions and answers