Table of Contents
Advertisement
Available languages
Available languages
Quick Links
Model:
CS 5222 - CS 5224- CS 5224 W- CS 5289 - CS 5249 - CS 5249 W
CS 5246 - CS 5223 - CS 5223 W - CS 5236- CS 5236W - CS 5253
CS 5307- CS 5310 - CS 5308- CS 5311- AS 5241- AS 5215
AS 5242 - AS 5216 - AS 5271 - AS 5274 - AS 5277- AS 5280
CS 5309 - CS 5243 - CS 5243 W - CS 5217 - CS 5217 W - CS 5218
CS 5218 W- CS 5234 - CS 5234 W - CS 5303 - CS 5306 - AS 5233
AS 5238 - AS 5239 - AS 5275 - AS 5286 - AS 5214- AS 5276
CS 5244 - AS 5278 - AS 5283- AS 5287 - CS 5284 - AS 5240
AS 5279 - CS 5264 - CS 5263 - CS 5244 W - CS5243B01
AS5323X01 - AS5324X01
Ocak Kullanım Kılavuzu
TR
Built-in Hob User Manual
EN
AR
Utilisateur Cuisinière Manuel
FR
Advertisement
Chapters
Table of Contents

Related Manuals for Silverline CS 5222


Summary of Contents for Silverline CS 5222
- Page 1 Model: CS 5222 - CS 5224- CS 5224 W- CS 5289 - CS 5249 - CS 5249 W CS 5246 - CS 5223 - CS 5223 W - CS 5236- CS 5236W - CS 5253 CS 5307- CS 5310 - CS 5308- CS 5311- AS 5241- AS 5215...
- Page 2 DEĞERLİ MÜŞTERİMİZ, Öncelikle ürünümüzü satın aldığınız için teşekkür ederiz. Bu kullanım kılavuzundaki tüm talimat ve uyarıları dikkatlice okuyunuz. Bu kılavuz; ürününüzün güvenli kurulumu, kullanımı ve bakımı hakkında önemli bilgileri ve cihazınızdan en yararlı biçimde faydalanmanız için gerekli uyarıları içermektedir. Bu kılavuzu ileride gerekli olduğunda kullanmak üzere güvenli ve kolay ulaşılabilir bir yerde saklayınız.
-
Page 3: Table Of Contents
İÇİNDEKİLER GÜVENLİK İLE İLGİLİ BİLGİLER ..........1 GENEL GÜVENLİK UYARILARI ..........3 ÇOCUKLAR İÇİN GÜVENLİK ............5 GAZ ÇALIŞMALARINDA GÜVENLİK .......... 5 NAKLİYE İLE İLGİLİ BİLGİLER ............ 6 OCAK TEKNİK ÖZELLİKLERİ ............. 7 MODELLER ................. 9 OCAKLARIN KULLANIMI ............11 ELEKTRİKLİ... -
Page 4: Güvenli̇k İle İlgi̇li̇ Bi̇lgi̇ler
GÜVENLİK İLE İLGİLİ BİLGİLER Bu cihaz ev kullanımı için üretilmiştir. Yanlış montaj ya da hatalı kullanım sonucu oluşabilecek zararlardan firmamız sorumlu değildir. Satın almış olduğunuz ürünün kullanımı basit olmakla beraber, ürünü kullanmadan önce bu kılavuzu dikkatlice okumanızı tavsiye ederiz. Bu sayede cihazınızdan en iyi performansı alabilir ve olası... - Page 5 UYARI: Katı veya sıvı yağ ile ocakta dikkatsizce yapılan pişirme işlemi tehlikeli olabilir ve yangına neden olabilir. ASLA yangını su ile söndürmeye çalışmayınız, ancak cihazın devresi kapatılır ve sonra; Örneğin bir kapak veya bir yangın battaniyesi ile alev örtülür. ...
-
Page 6: Genel Güvenli̇k Uyarilari
Cihaz için kullanacağınız LPG dedantörlerde TSE damgasının mmSS (30mbar) çıkış basıncında olması gerektiğine dikkat ediniz Doğalgaz basıncı 200 mmSS (20mbar)’dır. Doğalgaza veya LPG’ye çevirmek için yetkili servise müracaat ediniz. Not: Gazlı pişirme ürünlerinin kullanılması, bulundukları yerlerde ısı ve buhar oluşmasına yol açar. - Page 7 Ocağınızı kendi halinde çalışmaya bırakmayınız, sık aralıklarla kontrol ediniz. Ürünü taşırken, temizlerken veya ocağa bakım yaparken fişini elektrik prizinden çıkarınız. Hiçbir zaman fişi prizden kablosunu çekerek çıkarmaya çalışmayınız. Elleriniz veya ayaklarınız ıslak veya nemli ise kesinlikle ürüne dokunmayınız ve cihazı...
-
Page 8: Çocuklar İçi̇n Güvenli̇k
ÇOCUKLAR İÇİN GÜVENLİK Ürün kullanımdayken ve kullanım sonrasında soğuyana kadar ürünün açıktaki kısımları ısınacaktır; çocuklar uzak tutulmalıdır. Ürünün üzerine çocukların ulaşabilecekleri nesneleri koymayın. Ambalaj malzemeleri çocuklar için tehlikeli olabilir. Ambalaj çocukların ulaşamayacakları yerde malzemelerini, muhafaza edin veya atık talimatlarına uygun bir şekilde tasnif ederek çöpe atın. -
Page 9: Nakli̇ye İle İlgi̇li̇ Bi̇lgi̇ler
İtfaiyeyi arayın. Evin dışındaki bir telefonu kullanın. Güvenli olduğu bildirilene kadar eve girmeyin. NAKLİYE İLE İLGİLİ BİLGİLER Ürünün orjinal ambalajını saklayınız. Ürünü orjinal ambalajı ile taşıyınız, ambalaj üzerindeki taşıma işaretlerine uyunuz. Orjinal ambalajı yok ise; ... -
Page 10: Ocak Tekni̇k Özelli̇kleri̇
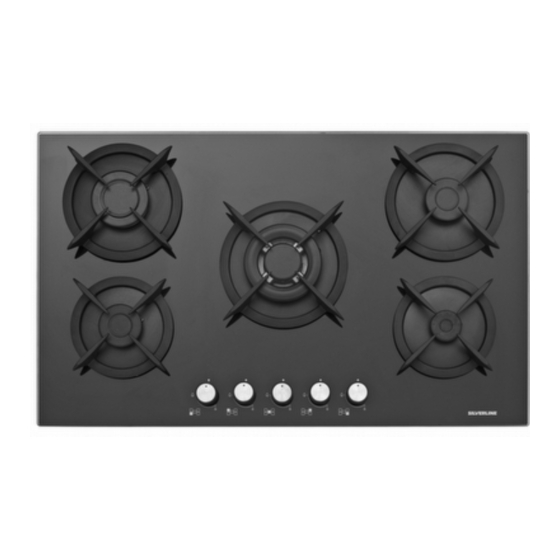
Kullanma kılavuzunun saklanması bu cihazın el değiştirmesi durumunda cihazın işleyişi konusunda bilgi sağlaması açısından bilgi vereceğinden önerilmektedir. Bu cihazı hurdaya ya da çöpe atmadan önce, çevreye ve insan sağlığına karşı potansiyel negatif sonuçlarının engellenmesi gerekmektedir. Aksi takdirde bu cihaz uygunsuz bir atık olacaktır. Ürün üzerindeki bu sembol, cihazın ev atığı... - Page 11 1. Tencere taşıyıcıları 2. Kontrol düğmeleri 3. Ocak tabanı 4. İnox bek tablası MODELLER CS 5222 - CS 5224 CS 5243 CS 5224 W- CS 5289 CS 5243 W CS 5249 - CS 5249 W CS 5217 CS 5246 - CS 5223...
-
Page 12: Modeller
CS 5222-CS 5224- CS 5224 W- CS 5289 CS 5243 CS 5249-CS 5249W CS 5284 CS 5243 W CS 5244 CS 860x520 mm CS 5217 5244 W AS 5216- AS 5271 320x520 CS 5217 W AS 5274 CS 5309 CS 5218... -
Page 14: Ocaklarin Kullanimi
OCAKLARIN KULLANIMI GAZ BEKLERİ Gazın beklere dağılımı, düğmelerin çevrilmesi suretiyle gerçekleştirilir. İlgili semboller, modellere göre değişmekle birlikte, düğmelerin üzerinde kontrol panelinde gösterilmiştir. Göstergede resmedilmiş sembollerle eşleştirmek için aşağıdaki ayarlamalar yapılabilir. - Page 15 1. Sol alt bek kontrol düğmesi 2. Sol üst bek kontrol düğmesi 3. Orta bek kontrol düğmesi 4. Sağ üst bek kontrol düğmesi 5. Sağ alt bek kontrol düğmesi 1. Sol bek kontrol düğmesi 2. Orta alt bek kontrol düğmesi 3.
- Page 16 1.Üst bek kontrol düğmesi 1.Wok bek düğmesi 2. Alt bek kontrol düğmesi 1. Sol alt bek kontrol düğmesi 2. Sol üst bek kontrol düğmesi 3. Üst hot- plate kontrol düğmesi 4. Alt hot- plate kontrol düğmesi 5. Sağ üst bek kontrol düğmesi 6.
- Page 17 ATEŞLEME DÜĞMELİ MODELLER (Otomatik Ateşleme) Her hangi bir bek (göz) yakmak için, ilgili düğmeyi aşağı doğru bastırıp en yüksek alev konumuna getirmek gerekir. Yanma gerçekleştiğinde, düğmeyi çevirmek suretiyle istenilen alev yoğunluğu ayarlanabilir. DOĞRU YANLIŞ Şekil 1. Ocağın doğru çalışması için ızgaraların ve bek parçalarının doğru konumlandırılmış...
- Page 18 Ocağınızın alevinin mavi renkte ve sessiz çalıştığından emin olunuz. Eğer ocak ilk yakma sırasında alev, sarı renkli olarak yanıyorsa ya da sesli çalışıyorsa ocağı kapatarak beklerin tam olarak oturduğundan emin olunuz. Yanışta değişiklik olmuyorsa yetkili servise müracaat ediniz. Beklerin çalıştırılması ve güç seviyeleri Seçilen bekin kontrol düğmesini maksimum noktasına gelene kadar sola doğru çeviriniz.
-
Page 19: Elektri̇kli̇ Plaka Kullanimi
Beklerin kapatılması Ocağı kapatmak için kontrol düğmesini sağa doğru çevirerek kapalı konuma getiriniz. Alev sönme emniyeti (FFD) Ocağınızdaki tüm bekler alevin herhangi bir sebeple sönmesi (su taşması, rüzgar, vb.) riskine karşı alev sönme emniyeti sistemi ile donatılmıştır. Alev, bek düğmesi açık iken söndüğünde bu sistem beke giden gazı... - Page 20 Tabanı tamamıyla düz, kalın ve ısıtıcı parçanın boyuna yakın kaplar kullanınız; asla daha küçük tabanlı kaplar kullanmayınız. Sıvıların plakanın üzerine taşmamasına ve ıslak kapların plaka üzerine konmamasına dikkat ediniz. Plaka üzerine sirke, tuz, limon suyu vb. değmesinden mümkün olduğunca kaçınınız. Ocak üzerinde bulunan cam ve metal yüzeylerin birleşim noktalarının ya da alüminyum parçaların temizliğinde spatula ve benzeri keskin maddelerin kullanımından kaçınınız.
- Page 21 Önerilen bu pozisyonlar yol göstermek içindir. Aşağıdaki durumlarda gücü yükseltmek gerekmektedir: - Bol miktarda sıvı kullanılarak pişirme yapıldığında - Büyük porsiyonlarda - Kapaksız kaplarla pişirme yapıldığında Öneriler Uzun süreli kullanım sonucu elektrikli plakaların yüzeyi eskidiyse birkaç damla yağ veya piyasada bulunan diğer bakım ürünleri ile temizleyiniz.
- Page 22 Izgaraların Kullanımı ve Öneriler Ocak üzerinde bulunan tencere ızgaraları, ocağın güvenli kullanımı için dizayn edilmiştir. Kullanım öncesinde ızgaraların doğru yerleştirildiğinden ve lastik ayaklarının tam olduğundan emin olunuz. Izgaralar üzerine dengesizlik oluşturabilecek tabanı deforme olmuş kaplar koymayınız. Enerji kaybına uğramamak için kapaksız veya yarı kapalı pişirme yapmayınız.
- Page 23 koymayınız düğmeler hasar görebilir. Tencereyi ızgaraların üzerlerine çarpmayınız. Bek tablasına darbe gelmemesine dikkat ediniz. Tabla üzerine ağır nesneler koymayınız. Tencerelerin boş bir şekilde ısıtmayınız. Tencere tabanı deforme olabilir. Tabanda biriken ısı bek tablası yüzeyine zarar verebilir. Yüzey sıcakken soğuk sıvılar cam yüzeyine ya da bekler üzerine dökülmemelidir.
-
Page 24: Ci̇hazin Kurulumu
CİHAZIN KURULUMU Kurulum, talimatlara göre yetkili bir servis tarafından yapılmalıdır. Firmamız, yanlış kurulumdan dolayı insanlara, hayvanlara veya eşyalara gelebilecek zararlardan sorumlu tutulamaz. KURULUM ÖNCESİ UYARILARI DİKKAT: Montajdan önce, ocağınızın altına yapıştırılmış olan etiketteki gaz tipi ve gaz basıncını evinizdeki değerlere uygun olup olmadığını... -
Page 25: Ci̇hazin Montaj Bi̇lgi̇leri̇
Ocakların kurulması için lütfen aşağıdaki şekilleri dikkatle inceleyiniz. CİHAZIN MONTAJ BİLGİLERİ UYARI; Bu cihaz yürürlükteki yönetmeliklere göre sadece iyi havalandırılmış yerlerde tesis edilmelidir. Bu cihazı tesis etmeden veya kullanmadan önce talimatları okuyunuz. UYARI; Bu cihaz bir yanma ürünlerini tahliye tertibatına bağlanmamıştır. - Page 26 Şekil 4. Ocak üstü ile diğer cihaz(örneğin havalandırma aspiratörü) arasındaki mesafe en az 700 mm olmalıdır. (Şekil 5) 60 cm ocaklar soğutucu bir sistemi olmayan bir ankastre fırın üzerine yerleştirilecek ise; doğru hava sirkülasyonunun sağlanması için mobilyada en az 300 cm² havalandırma deliğinin oluşturulması...
- Page 27 MIN. 700 mm 25 mm Şekil 5. Yanmış gazın tahliyesi Yanma için gerekli hava, ocağın bulunduğu ortamdan alınır ve çıkan yanmış gazlar ortama verilir. Ocağın güvenli çalışması için iyi bir ortam havalandırması şarttır. Ortam hacmine göre belirlenmiş havalandırma açıklıkları tabloda verilmiştir. (Tablo ...
- Page 28 1. Ocak 2. Aspiratör 3. Elektrikli Vantilatör 4. Havalandırma Açıklığı Şekil 6. ODA HACMİ HAVALANDIRMA (m³) AÇIKLIĞI (cm²) 5 m³ den küçük En az 100 cm² 5m³ ile 10 m³ En az 50 cm² arasında 10³ m den büyük Gerekmez En az 65 cm²...
-
Page 29: Elektri̇k Bağlantisi
Tezgah Conta Montaj Kelepçesi Şekil 7. MONTAJ KELEPÇESİ Şekil 8. ELEKTRİK BAĞLANTISI Elektrik bağlantısı yetkili ve ehliyetli bir kişi tarafından yapılmalıdır. Ocağınızın elektrik kablosu sıcak bölgelerden geçirmemelidir. Ocağın besleme kablosu hasarlandığında, bu kablo özel bir kablo acentesi ya da yetkili servis tarafından temin edilen özel bir kablo grubu ile değiştirilmelidir ... -
Page 30: Gaz Bağlantisi
Şebeke kablosunu mutlaka topraklı prize takınız. Üretici firma, bu kurala uyulmadığı takdirde, tüm sorumluluklardan muaf olacağını ilan eder. Elektrik şebekesi besleme verileri ürünün tip etiketinde belirtilen verilerle aynı olmalıdır. GAZ BAĞLANTISI Bu talimatlar sadece ehliyet sahibi uzman personel için hazırlanmıştır, ekipmanın kurulumu geçerli standartlara uygun olmalıdır. - Page 31 Bazı modeller için konik bağlantının zorunlu olduğu ülkelerde montaj için konik bir bağlantı verilmektedir, bu durumda konik bağlantı parçası ocağa bağlanmalıdır. Ocak, gaz kaynağına esnek hortumla bağlanılacak ise, hortumun uzunluğu en fazla 120 cm olmalıdır. Gaz tesisatı kurulumu ile ilgili işlemlere başlamadan önce lütfen gaz beslemesini kesin.
-
Page 32: Ocağin Farkli Gaz Türleri̇ne Ayarlanmasi
UYARI; Sabunlu bir çözelti yardımıyla son kez borularda sızıntı olup olmadığını kontrol edin ve asla ateş kullanmayın. OCAĞIN FARKLI GAZ TÜRLERİNE AYARLANMASI Bu talimatlar sadece ehliyet sahibi uzman personel için hazırlanmıştır, ekipmanın kurulumu geçerli standartlara uygun olmalıdır. Tüm işlemler elektrik bağlantısı kesilmiş durumda yapılmalıdır. Ocağın dönüşümünü... -
Page 33: Gazli Yanicilar Hakkinda Tekni̇k Bi̇lgi̇ler
tamamlayınız. Bu talimatlar, yetkili servis tarafından uygulanmalıdır. Ürün yürürlükteki yönetmeliklere uygun olarak ve doğru şekilde monte edilmelidir. Herhangi bir işlem yapılmadan önce ocağın elektrik bağlantıları mutlaka kesilmelidir. Ocak üzerindeki etiketi, ocakla birlikte kullanılması tasarlanmış, olan gaz türünü göstermektedir. GAZLI YANICILAR HAKKINDA TEKNİK BİLGİLER A beki SR beki R beki... -
Page 34: Ocak Enerji̇ Veri̇mli̇li̇ği̇
Doğalgaz LPG dönüşümü esnasında yukarıdaki şekilde gösterimi yapılmış olan LPG hortum girişini arada conta kullanarak montajı tamamlayınız. OCAK ENERJİ VERİMLİLİĞİ Ocak üzerinde düzgün tabanlı tencereler kullanınız. Bu şekilde ısı enerjisi maksimum kullanılmış olur. Dışa dönük (dış bükey) tabanlı tencereler kullanılmaması tavsiye edilir. - Page 35 UYARI; Cihaz sadece pişirme amaçlıdır. Odayı ısıtma gibi diğer amaçlarla kullanılmamalıdır. Emniyet tedbiri olarak kapatınız. Eğer cihazınız doğalgaza ayarlı ise doğalgaz musluğunu kapatınız. LPG ocaklar için dedantörü kapatınız. Cihazınızın fişini prizden çekiniz. Ocak sıcak ise soğumasını bekleyiniz. ...
- Page 36 Tencerelerin boş bir şekilde ısınmasına müsade etmeyiniz tabanda biriken ısı cam yüzeyine zarar verebilir. Yüzey sıcakken soğuk sıvılar cam yüzeyine ya da yanıcı gözler üzerine dökülmemelidir. Termal şok nedeniyle cam çatlayabilir. Ocağınızı en iyi durumda muhafaza etmek için, her kullanımdan sonra soğumasını...
- Page 37 2009/125/EC dayanılarak, Ev Tipi Ocaklar ile İlgili Çevreye Duyarlı Tasarım Gereklerine Dair Avrupa Birliğinin (EU) 66/2014 sayılı Komisyon Tüzüğüne paralel olarak aşağıdaki ürün bilgileri verilmiştir. Ev tipi gazlı ocaklara dair bilgi Ev tipi gazlı ocaklara dair bilgi Marka Silverline Marka Silverline Model CS 5246 Model AS 5271 Ürün Tipi...
- Page 38 Ev tipi gazlı ocaklara dair bilgi Ev tipi gazlı ocaklara dair bilgi Marka Silverline Marka Silverline Model CS 5243- CS 5243 W- CS5243B01 Model AS 5275- AS 5286 Ürün Tipi Ankastre Ocak Ürün Tipi Ankastre Ocak Sembol Değer Birim Sembol Değer...
- Page 39 Ev tipi gazlı ocaklara dair bilgi Ev tipi gazlı ocaklara dair bilgi Marka Silverline Marka Silverline Model AS 5233 Model AS 5283 Ürün Tipi Ankastre Ocak Ürün Tipi Ankastre Ocak Sembol Değer Birim Sembol Değer Birim Gazlı brülör sayısı Gazlı brülör sayısı...
- Page 40 EE gazlı ocak 56,5 Ev tipi gazlı ocaklara dair bilgi Ev tipi gazlı ocaklara dair bilgi Marka Silverline Marka Silverline Model AS 5239 Model CS 5222 Ürün Tipi Ankastre Ocak Ürün Tipi Ankastre Ocak Sembol Değer Birim Sembol Değer Birim Gazlı...
- Page 41 Ev tipi gazlı ocaklara dair bilgi Ev tipi gazlı ocaklara dair bilgi Marka Silverline Marka Silverline Model AS 5242 Model CS 5253 Ürün Tipi Ankastre Ocak Ürün Tipi Ankastre Ocak Sembol Değer Birim Sembol Değer Birim Gazlı brülör sayısı Gazlı brülör sayısı...
- Page 42 Ev tipi gazlı ocaklara dair bilgi Ev tipi gazlı ocaklara dair bilgi Marka Silverline Marka Silverline Model CS 5284 Model AS 5241 Ürün Tipi Ankastre Ocak Ürün Tipi Ankastre Ocak Sembol Değer Birim Sembol Değer Birim Gazlı brülör sayısı Gazlı brülör sayısı...
- Page 43 Ev tipi karışık ocaklara dair bilgi Marka SILVERLINE Model tanımlayıcı CS 5309 Ocağın tipi ANKASTRE GAZLI VE ELEKTRİKLİ OCAK Sembol Değer Birim Pişirme bölgesi ve/veya alanlarının sayısı Isıtma teknolojisi (endüksiyon pişirme bölgeleri ve pişirme Döküm alanları, ısı yayan pişirme bölgeleri, döküm pişirme gözü...
- Page 44 Ev tipi karışık ocaklara dair bilgi Marka SILVERLINE Model tanımlayıcı AS5324X01 Ocağın tipi ANKASTRE GAZLI VE ELEKTRİKLİ OCAK Sembol Değer Birim Pişirme bölgesi ve/veya alanlarının sayısı Isıtma teknolojisi (endüksiyon pişirme bölgeleri ve pişirme Döküm alanları, ısı yayan pişirme bölgeleri, döküm pişirme gözü...
-
Page 45: Müşteri̇ Servi̇s Ve Garanti̇
MÜŞTERİ SERVİS VE GARANTİ 1.Garanti süresi malın teslim tarihinden itibaren başlar ve 2 yıldır. 2.Bütün parçaları dahil olmak üzere malın tamamı firmamız tarafından garanti süresince garanti kapsamındadır. 3.Malın garanti süresi içerisinde arızalanması durumunda, tamirde geçen süre garanti süresine eklenir. Malın tamir süresi en fazla 20 iş günüdür. - Page 46 ürün garanti kapsamına girmez. a)Garanti Belgesi üzerinde malın seri numarasında tahrifat yapıldığı haller, b)SILVERLINE yetkili personeli ya da yetkili servisleri haricinde kişilerin cihazın tamir ve tadiline müdahale etmesi sonucu oluşan arızalar, c)Cihaza bağlanan dış donanımdan (regülatör, kesintisiz güç kaynağı...
- Page 47 Kullanma kılavuzunda zamanla ve kullanıma bağlı olarak değiştirilmesi gerektiği belirtilen sarf malzemeler garanti dışındadır. SILVERLINE tarafından verilen bu garanti ürünün normalin dışında kullanılmasından doğacak arızaların giderilmesini kapsamadığı gibi, aşağıdaki durumlarda garanti dışıdır. 1. Kullanma hatalarından meydana gelen hasar ve arızalar, 2.
- Page 48 Tüketiciler; Şikayet ve itirazlar için tüketici mahkemelerine ve tüketici hakem heyetlerine başvurabilir. Size en yakın Silverline Yetkili Servis acentesini öğrenmek için ürün ile beraber sağlanan yetkili servis listesine başvurabilirsiniz. Listeniz 1–2 yıldan eski ise güncel servis noktalarını öğrenmek ve sorularınıza cevap...
- Page 49 Bu cihaz, Atık Elektrikli ve Elektronik Cihazlar (WEEE) hakkındaki 2012/19/EU Avrupa Birliği Yönergesine uygun biçimde işaretlenmiştir. AEEE, hem kirletici maddeleri (bunlar çevre üzerinde olumsuz etkilere neden olabilir) hem de temel bileşenleri (bunlar yeniden kullanılabilir) içerir. Bu cihazı hurdaya ve çöpe atmadan önce, çevreye ve insan sağlığına karşı...
- Page 53 Model: CS 5222 - CS 5224- CS 5224 W- CS 5289 - CS 5249 - CS 5249 W CS 5246 - CS 5223 - CS 5223 W - CS 5236- CS 5236W - CS 5253 CS 5307- CS 5310 - CS 5308- CS 5311- AS 5241- AS 5215...
- Page 54 Our Valued Customer, Thank you for your purchase of our product. Please read all instructions and warnings in this manual carefully. This manual includes the important information about safe installation, usage and maintenance and the required warnings for your utilization of your equipment. Please keep this manual at a safe and easily accessible place to be used as future reference.
- Page 55 CONTENTS SAFETY INFORMATION ............. 1 GENERAL SAFETY WARNINGS ..........3 SAFETY OF THE GAS ..............5 TECHNICAL PROPERTIES OF HOB .......... 7 MODELS ..................9 USAGE OF HOBS ..............11 UTILIZATION OF HOT PLATE ..........16 INSTALLATION OF THE UNIT ..........20 INSTALLATION INFORMATION ON THE UNIT ......
-
Page 56: Safety Information
SAFETY INFORMATION This device is produced for domestic use. Our firm is not liable for any losses or damages which may occur due to wrong or faulty installation. Although this is a simple use product, we recommend you to read this manual carefully. In this sense, you may get best performance from your device and protect yourself and your surrounding from the possible dangers. - Page 57 WARNING: Cooking with vegetable oil or fat without required care may be dangerous and may cause fire. Do not attempt to extinguish any fire with water, the circuit of the equipment is closed and then the flame is covered with a cover or flame blanket. ...
-
Page 58: General Safety Warnings
Natural gas pressure is 200 mmSS (20mbar). Please consult authorized service conversion to natural gas or LPG. Note: Usage of the gas baking products shall cause heat and steam formation at the places of existence. sure that your kitchen ventilated well. - Page 59 Do not let your hob in operation without supervision control it with frequently. Take out the plug from the wall socket during handling, cleaning or maintenance of the unit. Do not ever attempt to remove the cable from the wall socket by handling the cable.
-
Page 60: Safety Of The Gas
SAFETY FOR CHILDREN The exposed parts of the product shall be heated during and after the use; the children should be kept away. Do not place any object on the unit that the children may reach. Packaging materials may be dangerous for children. Keep the packaging materials in a place that the children may not reach or classify and recycle them as per the waste instructions. - Page 61 INFORMATION ON TRANSPORTATION Keep the original packaging of the product. Carry the product in its original packaging, and abide the markings thereon. If the original packaging is not available; Take care for the impacts which may be applied on the outer surfaces of the product.
-
Page 62: Technical Properties Of Hob
Before disposal or scraping of the device it is required to prevent harmful and negative effects on human and environment. Otherwise it would be incompliant waste. This symbol indicates that the unit should not be disposed as domestic waste rather it should be returned to some electronic wastes collection center. - Page 63 1. Pan supports 2. Control switches 3. Hob bottom plate 4. Top plate MODELs CS 5222 - CS 5224 CS 5243 CS 5224 W- CS 5289 CS 5243 W CS 5249 - CS 5249 W CS 5217 CS 5246 - CS 5223...
-
Page 64: Models
CS 5222-CS 5224- CS CS 5284 5224 W- CS 5289 CS 5243 CS 5244 CS 5249-CS 5249W CS 5243 W CS 5244 320x520 860x520 mm CS 5217 AS 5216- AS 5271 CS 5309 CS 5217 W AS 5274 860x520 CS 5218... -
Page 66: Usage Of Hobs
USAGE OF HOBS GAS BURNERS Gas is supplied to the burners by turning the switches. Although the symbols change from model to model, they are indicated either on the switches or the control panel. The following settings may be conducted to match with the illustrated symbols. - Page 67 1. Left lower burner control switch 2. Left upper burner control switch 3. Medium burner control switch 4. Right upper burner control switch 5. Right lower burner control switch 1. Left burner control switch 2. Medium lower burner control switch 3.
- Page 68 1.Upper burner control switch 1.Wok burner control switch 2.Lower burner control switch 1. Left lower burner control switch 2. Left upper burner control switch 3. Upper hot- plate control switch 4. Lower hot- plate control switch 5. Right upper burner control switch 6.
- Page 69 RIGHT WRONG Figure 1. In order that the hob will operate properly the grills and burner components should be properly positioned.(Figure 1) Make sure that the flame of your burner is in blue color and work quietly. If the burner will burn in yellow color or work with voice make sure that all burners fit properly.
- Page 70 flame to burn. Release the switch in few seconds after burning of the burner, and bring the control switch to the desired flame position between the maximum and minimum levels. (Figure 2) Figure 2. If the flame is gone when you release the switch You should repeat the above process.
-
Page 71: Utilization Of Hot Plate
Figure 3. UTILIZATION OF HOT PLATE Warnings Before use of electrical plate the plate should be elevated to the maximum level and rest it for 5 minutes without putting any container thereon. It is Ok if any smell or smoke will rise from the plate. - Page 72 Usage Power control switch Electrical plate is managed with a switch with which you may select proper power for the food you will cook. Turning on the Plate: Bring the control switch to the proper position by turning it to right or left by the cooking type, food quantity and using below scheme.
- Page 73 It is recommended to set maximum level at the beginning of cooking process and to use intervals and burning levels as per the characteristic and quantity of the foods to be cooked. Using Right Burner The pan diameter and the burner power should match in order to efficiently use it.
- Page 74 Do not cook with pans without lid or semi closed pans to avoid energy loss. Do not place the containers directly on the burner covers use grill always. Place the cooking pan on the burner evenly. The containers placed on the burner inappropriately may be tipped.
-
Page 75: Installation Of The Unit
Do not heat the pans as empty. The pan sole may be deformed. The heat on the sole may damage the hob’s top plate surface. The cold liquids should not be thrown on the glass surface or burners when the surface is hot. ... -
Page 76: Installation Information On The Unit
When the unit was taken off its packaging make sure that it is strong, not bent and has no fault at all. In the event of any doubt consult the dealer. Cut off the electric connection of the unit from the main switch during installation. - Page 77 A safe distance should be left between the hob and the counter walls (Figure 4). The hole to be provided for the hob on the counter should be as per the figure. (Figure 4) The distance between the hob sole and the partition should be at least 25 mm.
- Page 78 The distance between the cook top ad another device (e.g.kitchen hood)shall not be less than 700mm(Figure 5). If 60 cm Hobs will be place on a built in oven without any cooling system, it is recommended to leave 300 cm² of ventilation hole in order to insure air circulation.
- Page 79 1. Cooktop 2. Aspirator 3. Electrical ventilator Figure 6 . 4. Ventilation Opening VOLUME OF VENTILATION THE ROOM (m³) OPENING (cm²) Less than 5 m³ Minimum 100 cm² Between 5m³ Minimum 50 cm² and 10 m³ Larger than 10 m³ Not required Basement or Cellar Minimum 65 cm²...
-
Page 80: Electric Connection
counter hole without allowing any overlapping before the installation. (Figure 7) Place the hob on the counter hole to center the installation hole. Secure the unit on the counter by using the installation sheet and screws. (Figure 7 and 8) Counter Gasket Installation Clamp... -
Page 81: Gas Connection
When the power cable is damaged this cable should be changed with a special cable to be supplied by a special cable agency or the authorized service dealer. No reducer, adapter, and switch should be used for electrical connection since it will cause excessive heat and fire. - Page 82 If the unit will be connected to a flexible hose, the length of the hose shall not exceed 120 cm. Before starting works related to gas installation, please cut the gas supply. Make the connection so that no pressure will be applied on the connection nuts and piping.
-
Page 83: Adjustment Of Hob Per Gas Types
ADJUSTMENT OF HOB PER GAS TYPES These instructions are prepared for specialist personnel having required competence, the installation of the equipment should be suitable as per the applicable standards. All gas related works should be conducted when the electric connection was cut. -
Page 84: Technical Information On Gas Burners
used with the unit. TECHNICAL INFORMATION ON GAS BURNERS A Burner SR Burner R Burner Wok Burner Wok Burner (3,3 kW) (3,8 kW) G 30-30 mbar G 30-30 mbar G 30-30 mbar G 30-30 mbar G 30-30 mbar (0,50 mm) (0,65 mm) (0,85 mm) (0,89 mm) -
Page 85: Hob's Energy Efficiency
HOB’S ENERGY EFFICIENCY Use flat sole pans on the hob. In this manner, thermal energy shall be used to the maximum. It is recommended not to use concave pans. Use pans with proper diameters. Do not use smaller pans in the diameter of the burner. - Page 86 Cleaning on stainless surfaces should be conducted in accordance with the steel surfaces, and the surface should be dried preferably with a soft leather part. In order to avoid any damage to the burning system do not use burning system when the burners are not installed. ...
- Page 87 Enamel Parts All enamel parts are used by using water with soap and suitable detergents. The hob should be dried thoroughly after the process. Pan Supports Enamel grills may be washed in the dishwasher. Burner The burners consisting of two parts may be leaned by using detergent.
- Page 88 The information in the product data sheet is given in accordance with the Commission delegated Regulation (EU) No 66/2014 supplementing Directive of the European Parliament and of the Council 2009/125/EC Information for domestic gas-fired hobs Information for domestic gas-fired hobs Silverline Silverline Brand Brand CS 5246...
- Page 89 Information for domestic gas-fired hobs Information for domestic gas-fired hobs Silverline Silverline Brand Brand CS 5243- CS 5243 W- CS5243B01 AS 5275- AS 5286 Model Model Built-in Gas Hob Built-in Gas Hob Product Type Product Type Symbol Rate Unit Symbol...
- Page 90 Information for domestic gas-fired hobs Information for domestic gas-fired hobs Silverline Silverline Brand Brand AS 5238 AS 5287 Model Model Built-in Gas Hob Built-in Gas Hob Product Type Product Type Symbol Rate Unit Symbol Rate Unit Number of Gas Burner...
- Page 91 Information for domestic gas-fired hobs Information for domestic gas-fired hobs Silverline Silverline Brand Brand AS 5239 CS 5222 Model Model Built-in Gas Hob Built-in Gas Hob Product Type Product Type Symbol Rate Unit Symbol Rate Unit Number of Gas Burner...
- Page 92 Information for domestic gas-fired hobs Silverline Information for domestic gas-fired hobs Brand Silverline AS 5241 Brand Model CS 5284 Built-in Gas Hob Model Product Type Built-in Gas Hob Symbol Rate Unit Product Type Symbol Rate Unit Number of Gas Burner...
- Page 93 Energy efficiency per left front gas burner EEgas burner 58,1 Energy efficiency for the gas hob EEgas hob 59,1 Information for domestic mixed hobs Brand SILVERLINE Model identification AS5323X01 Type of hob GAS AND ELECTRIC BUILT-IN HOB Symbol Value Unit...
- Page 94 Model: CS 5222 - CS 5224- CS 5224 W- CS 5289 - CS 5249 - CS 5249 W CS 5246 - CS 5223 - CS 5223 W - CS 5236- CS 5236W - CS 5253 CS 5307- CS 5310 - CS 5308- CS 5311- AS 5241- AS 5215...
- Page 95 العزيز عميلنا جنا ت من شراءكم على نشكركم البداية في على يحتوي الدليل هذا هذا االستخدام دليل في التحذيرات و التعليمات جميع بانتباه قرءوا الصيانة و االستخدام كيفية عن هامة معلومات , و بأمان المنتج لتركيب االزمة التحذيرات جميع الجهاز من...
- Page 96 المحتويات بالحماية متعلقة معلومات 1..............بالنقل متعلقة معلومات 4..............التقنية الموقد خصائص 5..............الموديالت 7..................المواقد استخدام ههع 9................. الكهربائية الشعلة استخدام 14.............. الجهاز إعداد 18.................. الجهاز تركيب مات معلو 19..............الكهرباء توصيالت 24................توصيالت الغاز 24................المختلفة الغازات النواع وفقا...
- Page 97 بالحماية متعلقة معلومات أ خط عن الناتجة األضرار عن مسؤولة غير شركتنا المنزلي لالستخدام مصنوع الجهاز هذا االستخدام كيفية في خطأ أو التركيب في االستخدام دليل بقراءة نوصيكم لكن , و بسيطة بشراءه قمتم الذي المنتج استخدام طريقة أن مع و...
- Page 98 استخدام جراء من التحكم على القدرة فقدانك حالة في المنتج تستخدم ال ● العقارات او الكحول خط وجود ن م تأكد أرضي خط به يوجد بجهازكم الخاص الكهرباء قابس ألن ● لديكم الكهرباء مخرج في أرضي ساخنة ال المناطق من يمر...
- Page 99 إغلق ثم " مقفل " وضعية في المفاتيح جميع ضع بكم الخاص الموقد استخدام عدم حالة في ● الغاز صنبور الخر وقت من افحصه بمفرده يعمل بكم الخاص الموقد تترك ال ● الكهرباء مخرج من الكهرباء قابس اخرج الموقد صيانة او...
- Page 100 جهاز تركيب او مفتوحا دائما الطبيعية التهوية مجرى اجعل جيدا المطبخ تهوية من تأكد ● الشفاط مثل صناعية تهوية . ين معتمد او مؤهلين اشخاص قبا من الصيانة عمل يجب جيدا تعمل الغاز معدات لجعل ● باستمرار الغازي للموقد اللهب عيون...
- Page 101 يمكن الوقت نفس وفي القديمة االلكترونية او الكهربائية االجهزة في لالستخدام قابلة مفيدة قطع استشارة بعد ا هذ اجل من لالستخدام قابلة الغير او القديمة االجهزة في للبيئة ضارة مواد وجود االستفادة لتوفير مدينتك في الموجودة التجميع مراكز الى الجهاز بتسليم...
- Page 102 الموقد قاعدة للصدأ المقاوم الفوالذ حة لو MODELs CS 5222 - CS 5224 CS 5243 CS 5224 W- CS 5289 CS 5243 W CS 5249 - CS 5249 W CS 5217 CS 5246 - CS 5223 CS 5217 W AS 5233...
- Page 103 CS 5222-CS 5224- CS 5284 CS 5224 W- CS 5289 CS 5243 CS 5244 CS 5249-CS 5249W CS 5243 W CS 5244 320x520 860x520 mm CS 5217 AS 5216- AS 5271 CS 5217 W AS 5274 CS 5309 CS 5218...
- Page 105 المواقد استخدام ههع عيون الغاز موديل من تختلف انها مع المتعلقة الرموز االزرار ادارة بواسطة يتم الغاز عيون توزيع...
- Page 106 مع لتتناسب التالية التعديالت إجراء ويمكن التحكم لوحة او االزرار فوق اظهارها تم الخر المؤشر على صورت التي الرموز اليسار أسفل في بالعين التحكم زر اليسار أعلى في بالعين التحكم زر الوسطى بالعين التحكم زر اليمين أعلى في بالعين التحكم زر...
- Page 107 اليسار أعلى في بالعين التحكم زر اليسار أسفل في بالعين التحكم زر اليمين أعلى في بالعين التحكم زر اليمين أسفل في بالعين التحكم زر أعلى التحكم زر الوسط أعلى في بالعين التحكم زر أسفل التحكم زر . زر التحكم بالعين في أسفل اليسار .
- Page 108 الطفاء اإليقاف او األقصى الحد بين وضعه ينبغي ال األحوال من حال بأي االقصى الحد او عة السا عقارب اتجاه في " مقفل ز ا الغ صمام " وضعية الى يصل حتى الزر ادر العين اشتعال ذاتي اشعال االشعال زر ذات...
- Page 109 العيون غطاء ان من تأكد و الموقد قفل , ا صوت باصدار يقوم او اصفر بلون االول االشتعال الخدمة عميل مراجعة يجب االشتعال طريقة تتغير لم اذا الصحيحة وضعيتها في موضوعة المعتمد الطاقة ومستويات الشعالت تشغيل التحكم زر ضغطك عند نقطة...
- Page 110 شكل هربائية الك الشعلة استخدام تنبيه اتركها و األقصى للحد العين شغل الموقد تركيب من االنتهاء بعد الكهربائية العين استخدام قبل من ورائحة دخان خروج المتوقع من االثناء هذه في شيئ فوقها يوضع ان بدون دقائق لمدة ثانية مرة يحدث لن...
- Page 111 طهيه المراد الطعام نوع لتناسب مفتاح بواسطة الكهربائية العين طاقة تعدير يمكن العين يل تشغ اجل من في اتركه , و التالي الجدول و الطعام كمية و الطهي لنوع وفقا لليمين التحكم زر ادر غير وضعية اي في التحكم مفتاح ترك...
- Page 112 اء قطر الوع العيون )القطر األصغر (سم )القطر األكبر (سم ( العين المساعدةA) (عين متوسطة القوةSR) ( عين قويةR) عين ووك اللوحة الكهربائية والتوصيات الشبكات استخدام من تأكد االستخدام ل . قب امن بشكل الموقد الستخدام الموقد فوق الموجودة الشبكات تصميم...
- Page 113 دائما الشبكات استخدم العين غطاء فوق مباشرة االوعية ضع ت ال ● . ال تقلب ان يمكن ذلك بخالف الموضوعة االوعية العين منتصف في الطهي وعاء ضع ● ء ا الوع تصدم . ال االزرار تضرر في تتسبب ال حتى االزرار...
- Page 114 الموقد فوق اجة ح اجسام تضع ال ● .ي السفل السطح الى الزائدة الحرارة توجه التي االوعية تستخدم ال ● ثم و بالكهرباء الموقد اتصال اقطع حريق حدوقث عند المياه بواسطة اللهب اطفاء تحاول ال ● اللهب عن الهواء قطع قطعه...
- Page 115 السطح على الموقد لتثبيت أدناه اإلرشادات اتبع الالصق الشريط بلصق قم السطح و الموقد بين الدخول من السوائل و الخارجية المواد لمنع .الموقد تثبيت قبل السطح جوف في المنتج مع المرسل المنتصف في ادراجه و السطح فتحة على بحذر الموقد بوضع...
- Page 116 شكل مم التهوية شفاط مثل االخرى االجهزة بين و الموقد اعلى بين المسافة تكون ان يجب ● شكل األقل على...
- Page 117 تحوية فتحة بعمل ينصح تبريد نظام على يحتوي ال فرن فوق سم موقد وضع عند ● يون ان يجب سم او الموقد كان . اذا التهوية لتوفير االثاث في سم مساحتها تبريد نظام على يحتوي الفرن مم االقل على شكل تصريف...
- Page 118 الموقد الشفاط كهربائية مروحة تهوية فتحة شكل حجم الغرفة (م فتحة التهوية (سم م اقل من على االقل سم الى م من على االقل سم م م اكبر من ال يحتاج طابق سفلي او قبو على االقل سم جدول...
- Page 119 تركيب الموقد على السطح المطاطي الشريط بوضع قم السطح و الموقد بين الدخول من السوائل و الخارجية المواد لمنع ● فوق بعضه لتف ي الشريط جعل عدم مع الموقد تثبيت قبل السطح جوف في المنتج مع المرسل شكل بعض المنتصف في...
- Page 120 الكهرباء توصيالت معتمد مؤهل شخص قبل من الكهربائي التوصيل تنفيذ يتم أن يجب ● الساخنة المناطق من بالقرب يعبر ال ان يجب بموقدكم الخاص الكهرباء كابل ● او معتمد خدمة وكيل قبل من تغييره يجب الموقد كابل يتضرر عندما خاص الكابل...
- Page 121 العالمية المعايير مع تتوافق التي المطاطية القطع و الخراطيم فقط استخدم في الدول بعض في الزامي يكون النه مخروطية وصلة معها يرسل الموديالت بعظ في بالموقد وصلها يجب المخروطية الوصلة الحالة هذه اقصى كحد سم الخرطزم طول يكون ان يجب مرن...
- Page 122 المختلفة الغازات النواع وفقا الموقد إعداد التركيب معدات تكون ات يجب , و رخصة اصحاب المؤهلين للموظفين التعليمات هذه اعداد تم بها المعمول المعايير مع تتوافق الكهرباء قطع اثناء االعمال جميع تتم ان يجب ● شكل شكل بتغيير قم الشعالت عيون...
- Page 123 الغاز مواقد حول فنية معلومات WOK (3,3 kW) WOK (3,8 kW) A شعلة SR شعلة R شعلة شعلة شعلة G 30-30 mbar G 30-30 mbar G 30-30 mbar G 30-30 mbar G 30-30 mbar غاز سائل غاز سائل غاز سائل غاز...
- Page 124 الموقد في الطاقة استخدام كفاءة .قد. بهذه الطريقة تستخدم الطاقة الحرارية للدرجة القسوى استخدم طناجر ذات قاعدة مستوية على المو ● .)ينصح بعدم استخدام طناجر ذات قاعدة متجه للخارج (محدبة ● استخدم طناجر ذات اقطار مناسبة. قدر االمكان, ال تستخدم طناجر قطرها اقل من قطر الموقد. عند ●...
- Page 125 كانها م في العيون تكون ال عندما االشتعال نظام تستخدم ال االشتعال نظام في االضرار الحاق لمنع ● جافة هي و مكانها في العيون وضع يجب االمان نظام و البوجيه بها التي الحرارية القطعة تنظيف بعد ● فترات على فرشاة بواسطة...
- Page 126 مناسبة تنظيف مواد باستخدام تنظيفها يجب جزئين من المتكونة العيون بعناية مكانها في وضعها و جيدا العيون تجفيف يجب التنظيف انتهاء بعد دائما نظيفا االشتعال قطب يبقى ان يجب الكتروني اشتعال ذات الموديالت في العمل اثناء اخطاء في يتسبب ال حتى...
- Page 127 المعلومات المتعلقة بالمواقد المنزلية المشتركة Silverline Silverline ة عالمة تجاري عالمة تجارية CS 5246 AS 5271 يسخر يصل يسخر يصل طباخ حراري غاطس طباخ حراري غاطس نوع المنتج نوع المنتج وحدة معدل الرمز وحدة معدل الرمز عدد غاز قابلة لالشتعال...
- Page 128 Silverline Silverline عالمة تجارية عالمة تجارية CS 5234- CS 5234 W- CS 5303 AS 5276- AS 5279 يسخر يصل يسخر يصل طباخ حراري غاطس طباخ حراري غاطس نوع المنتج نوع المنتج وحدة معدل الرمز وحدة معدل الرمز عدد غاز قابلة لالشتعال...
- Page 129 Silverline Silverline عالمة تجارية عالمة تجارية AS 5233 AS 5283 يسخر يصل يسخر يصل طباخ حراري غاطس طباخ حراري غاطس نوع المنتج نوع المنتج وحدة معدل الرمز وحدة معدل الرمز عدد غاز قابلة لالشتعال عدد غاز قابلة لالشتعال 60,3 EE Gas Burner...
- Page 130 كفاءة استخدام الطاقة قابلة لالشتعال 56,5 EE Gas Burner كفاءة استخدام الطاقة قابلة لالشتعال Silverline Silverline عالمة تجارية عالمة تجارية AS 5239 CS 5222 يسخر يصل يسخر يصل طباخ حراري غاطس طباخ حراري غاطس نوع المنتج نوع المنتج وحدة معدل...
- Page 131 Silverline Silverline عالمة تجارية عالمة تجارية AS 5240 CS 5224- CS 5224 W- CS 5308 يسخر يصل يسخر يصل طباخ حراري غاطس طباخ حراري غاطس نوع المنتج نوع المنتج وحدة معدل الرمز وحدة معدل الرمز عدد غاز قابلة لالشتعال عدد غاز قابلة لالشتعال...
- Page 132 Silverline عالمة تجارية CS 5264 يسخر يصل ي غاطس طباخ حرار نوع المنتج وحدة معدل الرمز عدد غاز قابلة لالشتعال 56,9 EE Gas Burner كفاءة استخدام الطاقة في لالشتعال 56,9 EE Gas Burner كفاءة استخدام الطاقة قابلة لالشتعال Silverline Silverline عالمة...
- Page 133 المعلومات المتعلقة بالمواقد المنزلية المشتركة ELVLSEVLIS عالمة تجارية التعريف بالموديل CS 5244- CS 5244 W موقد بلت ان كهرباء/ غاز وقد نوع الم الوحدة القيمة الرمز منطقة الطهي و/أو عدد األقسام اللوحات الصلبة تقنيات الحرارة سم Ø قطر سطح األماكن المفيدة الكهربائية المستخدمة في أقسام الطهي الدائرية 14,5 حساب...
- Page 134 Model: CS 5222 - CS 5224- CS 5224 W- CS 5289 - CS 5249 - CS 5249 W CS 5246 - CS 5223 - CS 5223 W - CS 5236- CS 5236W - CS 5253 CS 5307- CS 5310 - CS 5308- CS 5311- AS 5241- AS 5215...
- Page 135 CHER CLIENT, Nous vous remercions d’avoir choisi notre produit. Pour votre sécurité et le bon fonctionnement de l'appareil, lisez attentivement ce manuel avant l'installation et l'utilisation. Conservez ces instructions à proximité de l'appareil. Les utilisateurs doivent connaître parfaitement fonctionnement et les fonctions de sécurité de l'appareil. Le fabricant n’est pas responsable de tous types de dommages résultant d’une mauvaise traduction ou impression de la notice d’utilisation.
- Page 136 SOMMAİRE CONSIGNES DE SECURITE ............1 CONSIGNES DE TRANSPORT ..........7 CARACTERISTIQUES TECHNIQUES ........8 MODELES ................. 10 UTILISATION DES PLAQUES DE CUISSON ......13 UTILISATION PLAQUE ELECTRIQUE ........18 INSTALLATION DE L’APPAREIL ..........23 CONSIGNES DE MONTAGE ............ 25 CONNEXION ELECTRIQUE .............
-
Page 137: Consignes De Securite
CONSIGNES DE SECURITE Votre appareil est destiné à un usage domestique normal. Le fabricant ne peut être tenu pour responsable des dommages et blessures liés à une mauvaise installation ou utilisation de l’appareil. Même si l’utilisation de l’appareil est très simple, nous vous conseillons fortement de lire attentivement cette notice pour éviter tous types de dommages. - Page 138 l'expérience sont insuffisantes, à condition d'être surveillés ou d'avoir reçu des instructions concernant l'utilisation sécurisée de l'appareil et de comprendre les risques encourus. Ne laissez pas les enfants jouer avec l'appareil. Les enfants ne doivent pas nettoyer ni entreprendre une opération de maintenance sur l'appareil.
- Page 139 L'appareil a une prise de terre et doit donc être relié à la terre. Faite attention à ne pas passer le câble dans des zones chaudes. Contrôler que le tuyau est conforme à la réglementation en cour. ...
- Page 140 Contrôlez que la plaque de cuisson et/ou le cordon est en bon état et complet ; et assurez-vous que la partie inferieur de l’appareil est en bon état. Si non, contactez votre vendeur. Votre appareil est destiné à un usage domestique normal et n’est pas conçu pour une utilisation industrielle ou commerciale.
- Page 141 Ne pas placer d'objets pointus sur la plaque de cuisson. Attention à ne pas cogner/faire tomber de lourd récipient sur la plaque. Les chiffres figurant dans cette notice sont schématiques et peuvent ne pas être entièrement en accord avec votre produit.
- Page 142 SECURITE LORS DES TRAVAUX DE GAZ L’équipement et les installations de tout type de gaz doivent être effectués par une personne qualifiée et compétente. L'utilisation d'un appareil de cuisson a gaz conduit à la production de chaleur et d'humidité. ...
-
Page 143: Consignes De Transport
CONSIGNES DE TRANSPORT Gardez l’emballage original du produit. Transportez le produit avec son emballage original et suivez les indications de transport qui se trouve sur l’emballage. S’il n’y a pas d’emballage original ; Prenez toutes mesures précautions nécessaires contre tous types d’impact. -
Page 144: Caracteristiques Techniques
Ce symbole signifie qu’il ne doit pas être traité comme un déchet ménager, et qu’il doit être livré dans un centre de collecte approprié. La destruction du produit doit être en conformité avec la règlementation environnementale locale. Pour plus d’information à propos de la destruction, réutilisation et recyclage de l’appareil, contactez les autorités compétentes. - Page 145 1. Grille support de casserole 2. Bouton control 3. Base de l’appareil 4. Plaque de bruleur MODELs CS 5222 - CS 5224 CS 5243 CS 5224 W- CS 5289 CS 5243 W CS 5249 - CS 5249 W CS 5217...
-
Page 146: Modeles
Allumage éléctronique CS 5222-CS 5224- CS CS 5284 5224 W- CS 5289 CS 5244 CS 5249-CS 5249W CS 5243 CS 5244 320x520 860x520 mm CS 5243 W AS 5216- AS 5271 CS 5309 CS 5217 AS 5274 860x520 CS 5217 W... -
Page 149: Utilisation Des Plaques De Cuisson
UTILISATION DES PLAQUES DE CUISSON BRULEURS A GAZ Tourner les boutons de contrôle permet la distribution du gaz dans les bruleurs. Les symboles ci-dessous, qui varies selon le model, sont des boutons ou panneau de contrôle. Vous pouvez trouver ci-dessous celle qui est approprié à votre plaque de cuisson. - Page 150 1. Bouton contrôle du bruleur gauche 2. Bouton contrôle du bruleur du milieu en bas 3. Bouton contrôle du bruleur du milieu en haut 4. Bouton contrôle du bruleur du haut à droite 5. Bouton contrôle du bruleur du bas à droite Bouton contrôle hot-plate Bouton contrôle du bruleur du bas à...
- Page 151 Bouton contrôle du bruleur du bas 1. Bouton contrôle du bruleur en bas à gauche 2. Bouton contrôle du bruleur en haut à gauche 3. Bouton contrôle hot-plate du haut 4. Bouton contrôle hot-plate du bas 5. Bouton contrôle du bruleur du haut à droite 6.
- Page 152 JUSTE FAUX Image 1. Pour que l’appareil fonctionne correctement, les grilles et pièces du bruleur doivent être positionnées correctement (image 1).
- Page 153 Assurez-vous que la flamme est de couleur bleu et silencieuse. Si lors de l’allumage, la flamme est de couleur jaune et si elle n’est pas silencieuse ; éteignez l’appareil, vérifiez que le bruleur est positionné correctement. Si le problème continue, faite appel à un centre de service agréé. Fonctionnement des bruleurs et niveau de puissance Pour allumer un des brûleurs, tournez le bouton correspondant dans le sens inverse des aiguilles d’une montre jusqu’à...
-
Page 154: Utilisation Plaque Electrique
reste pas allumé, attendez au moins une minute avant de répéter l’opération. Pour éteindre les bruleurs : Pour arrêter l’appareil, tourner le bouton vers la droite et positionner le en mode « off ». Coupure automatique du gaz (FFD) FFD est un dispositif de supervision de la flamme qui rend l'utilisation du produit beaucoup plus sure. - Page 155 se peut que la plaque dégage un peu de fumé et d’odeur. Par la suite, ces effets disparaîtront. En dehors de cette première utilisation, ne jamais chauffer la plaque sans récipient sur la surface. Choisissez des récipients à fond épais et bien plat (fond dressé) et utilisez toujours un récipient dont le diamètre est proportionné...
- Page 156 Nous vous conseillons pour réussir vos cuissons de démarrer à l'allure maximale et de ramener ensuite à une allure intermédiaire en tenant compte de la nature des mets et de leur volume. Un avertissement lumineux rouge s’allume lorsque la plaque est mise en marche.
- Page 157 Semi Rapide (SR) Rapide (R) Plaque electrique Pour conserver votre table de cuisson en parfait état, veillez à la nettoyer après chaque utilisation en éliminant tous les résidus d’aliment. Utilisation des grilles et conseils Les grilles support de casserole ont été conçues pour une utilisation sécurisée de la plaque de cuisson.
- Page 158 Ne pas mettre d’ustensile de cuisson directement sur le bruleur. Toujours utiliser les grilles. Toujours placer le récipient au centre du brûleur pour éviter la propagation des flammes. Avec les tables à induction, le récipient doit aussi être placé au centre de la plaque. Le récipient et le brûleur doivent être de la même taille.
-
Page 159: Installation De L'appareil
Ne pas chauffer de récipient vide. Le récipient peut se déformer. La chaleur peut endommager la surface. Ne pas verser de liquide froid sur la surface lorsque l’appareil est chaud. Ne pas poser d’objet pointu sur l’appareil. ... - Page 160 CONSIGNES AVANT INSTALLATION ATTENTION : Veuillez lire attentivement cette notice d'utilisation ainsi que les recommandations et les avertissements qu'elle contient avant de procéder à l'installation et à la première utilisation de l'appareil. Vérifiez que les conditions de distribution locale (nature et pression du gaz) sont compatibles avec les réglages de la table de cuisson indiqués sur la fiche produit.
-
Page 161: Consignes De Montage
Immobilisez la plaque avec les pièces métalliques et vis fournis avec l’appareil. appareils encastrables peuvent être fonctionnement qu'après avoir été installés dans des meubles et des plans de travail homologués et adaptés. CONSIGNES DE MONTAGE L'installation de cette table de cuisson doit être conforme à la réglementation locale. - Page 162 Image 4 La distance entre la table de cuisson et quelconque appareil positionné dessus (ex. hotte) doit être de minimum 700mm (image 5). Pour les tables de cuisson de 60mm monté sur un four encastrable sans système de refroidissement, il est conseillé d’avoir une aération de 300 cm²...
- Page 163 Min. 700 mm 25 mm Image 5 Evacuation des gaz brulés Vous trouverez dans le tableau ci-dessous les données nécessaires pour une bonne aération en fonction de la superficie de la pièce (tableau 1). Les gaz brulés doivent être évacué via une hotte. ...
- Page 164 Table de cuisson Hotte Ventilateur électrique Ouverture de ventilation Image 6 Surface de la piece Ouverture de (m³) ventilation (cm²) Moins de 5 m³ Au moins 100 cm² Entre 5m³ et 10 m³ Au moins 50 cm² Plus de 10³ Pas nécessaire Cave Au moins 65 cm²...
- Page 165 Tableau 1 Montage de l’appareil sur le plan de travail Les plaques de cuisson sont livrées avec un joint souple d'étanchéité à interposer entre elles et le plan de travail. Auto adhésif, ce bourrelet de mousse se fixe sous l'appareil avant l'encastrement.
-
Page 166: Connexion Electrique
Supports de montage Image 8. CONNEXION ELECTRIQUE La connexion électrique doit être faite par une personne qualifiée et compétente. Les câbles électriques ne doivent pas passer dans des zones chaudes. Si le cordon d’alimentation est endommagé, remplacez-le par un autre cordon d’alimentation procuré... -
Page 167: Connexion De Gaz
CONNEXION DE GAZ Ces consignes sont pour un technicien qualifié et agréé. Les équipements utilisés doivent être conforme aux standards et à la réglementation en vigueur. Toutes les opérations doivent être faites hors tension. Coupez l’arrivée de gaz. La plaque signalétique indique le type de gaz pour lequel l’appareil a été... -
Page 168: Convertir La Plaque De Cuisson
Lorsqu’un tuyau flexible est utilisé, veillez à ce qu’il ne touche pas un autre appareil et qu’il ne soit pas écrasé ou coincé. Assurez-vous que le tuyau de gaz ne passe pas dans des zones chaudes. NOTE : Même si le tuyau de gaz n’est pas endommagé, renouvelez-le toutes les 4 - 5 ans. - Page 169 Le remplacement / changement de la plaque de gaz doit être effectué par un technicien qualifié Toutes les opérations doivent être faites hors tension. Figure 1 Figure 2 Soulevez le chapeau et la couronne du bruleur. Remplacez les injecteurs avec des injecteurs correspondant, en respectant les informations du tableau qui suit.
-
Page 170: Caracteristiques Techniques Bruleur Gaz
CARACTERISTIQUES TECHNIQUES BRULEUR GAZ Bruleur Bruleur Bruleur Auxiliaire (A) Semi Rapide (R) (3,3 kW) (3,8 kW) Rapide (SR) G 30-30 G 30-30 G 30-30 G 30-30 G 30-30 mbar GPL mbar GPL mbar GPL mbar GPL mbar GPL (0,50 mm) (0,65 mm) (0,85 mm) (0,89 mm) -
Page 171: Rendement Energetique De L'appareil
RENDEMENT ENERGETIQUE DE L’APPAREIL Pour diminuer la consommation énergétique de votre plaque de cuisson, suivez les conseils ci-dessous : Si possible, couvrez toujours les récipients de cuisson avec un couvercle pendant la cuisson. Déposez toujours le récipient sur la zone de cuisson avant de mettre celle-ci en fonctionnement. - Page 172 Si la plaque est chaude, attendez qu’elle refroidisse. Utilisez des produits de nettoyage adaptés. N’utilisez pas de produits de nettoyage trop abrasif. La plaque doit être régulièrement nettoyé pour assurer un usage a long terme. Pour ne pas endommager le système automatique d’allumage, n’essayez pas d’allumer le bruleur sans chapeau et couronne.
- Page 173 Pour la plaque en verre et les grilles, utilisez des produits de nettoyage adaptés. Ne versez pas de liquides froids sur la plaque lorsqu’elle est chaude ; le plaque en verre peut se fissuré ou se cassé a cause du choc thermique.
- Page 174 Les bruleurs, composés de 2 pièces, peuvent être nettoyés avec un détergent adapté. Séchez les bruleurs avant de les replacer. Pour les modèles avec allumage électronique, veillez a toujours garder l’électrode propre. Pour les modèles avec soupape de sécurité, nettoyez la soupape pour assurer le bon fonctionnement de l’appareil.
- Page 175 Cet appareil est marqué selon la directive européenne 2012/19/EU concernant les appareils électriques et électroniques usagés (déchets des équipements électriques et électroniques DEEE) La présence de substances dangereuses dans les équipements électriques et électroniques peut avoir des effets potentiels sur l’environnement et la santé humaine dans le cycle de retraitement de ce produit.
-
Page 176: Product Fiche
(UE) n ° 66/2014 complétant la directive du Parlement européen et du Conseil 2009/125 / CE. Information pour les plaques de cuisson à gaz domestiques Information pour les plaques de cuisson à gaz domestiques Silverline Silverline Marque Marque CS 5246 AS 5271 Modèle... - Page 177 Information pour les plaques de cuisson à gaz domestiques Information pour les plaques de cuisson à gaz domestiques Silverline Silverline Marque Marque CS 5234- CS 5234 W- CS 5303 AS 5276- AS 5279 Modèle Modèle Plaque de cuisson encastrables Plaque de cuisson encastrables...
- Page 178 Information pour les plaques de cuisson à gaz domestiques Information pour les plaques de cuisson à gaz domestiques Silverline Silverline Marque Marque AS 5238 AS 5287 Modèle Modèle Plaque de cuisson encastrables Plaque de cuisson encastrables Type de plaque Type de plaque...
- Page 179 Information pour les plaques de cuisson à gaz domestiques Information pour les plaques de cuisson à gaz domestiques Silverline Silverline Marque Marque AS 5239 CS 5222 Modèle Modèle Type de plaque Plaque de cuisson encastrables Type de plaque Plaque de cuisson encastrables...
- Page 180 Information pour les plaques de cuisson à gaz domestiques Silverline Marque CS 5264 Modèle Plaque de cuisson encastrables Type de plaque Symbole Valeur Unité Nombre de brûleurs à gaz Le rendement énergétique de la 56,9 gaz brûleur combustion L'efficacité énergétique pour les...
- Page 181 Information pour les plaques mixtes domestiques Marque SILVERLINE Identification du modèle CS 5309 Type de plaque Plaque encastrable gaz et électrique Symbole Valeur Unité Nombre de zones / surfaces de cuisson électriques Technique de chauffage Plaque solides Pour les zones de cuisson électriques circulaires Ø...
- Page 182 Information pour les plaques mixtes domestiques Marque SILVERLINE Identification du modèle AS5324X01 Type de plaque Plaque encastrable gaz et électrique Symbole Valeur Unité Nombre de zones / surfaces de cuisson électriques Technique de chauffage Plaque solides Pour les zones de cuisson électriques circulaires Ø...
- Page 183 Üretici Firma / Manufacturer / Fabricant SILVERLINE EV GEREÇLERİ Satış ve Pazarlama A.Ş. Orta Mah. Topkapı Maltepe Cad. No:6 Silkar Plaza Kat: 3 Bayrampaşa/ İSTANBUL Tel: 0212 484 48 00 (pbx) Fax: 0212 481 40 08 E mail: contact@silverline.com...
Need help?
Do you have a question about the CS 5222 and is the answer not in the manual?
Questions and answers