Advertisement
Quick Links
Technical Support and E-Warranty Certificate
www.vevor.com/support
BATHROOM MASTER
USER MANUAL
We continue to be committed to provide you tools with competitive price.
"Save Half", "Half Price" or any other similar expressions used by us only represents an
estimate of savings you might benefit from buying certain tools with us compared to the major
top brands and does not necessarily mean to cover all categories of tools offered by us. You
are kindly reminded to verify carefully when you are placing an order with us if you are
actually saving half in comparison with the top major brands.
Advertisement

Related Manuals for VEVOR BATHROOM MASTER


Summary of Contents for VEVOR BATHROOM MASTER
- Page 1 Technical Support and E-Warranty Certificate www.vevor.com/support BATHROOM MASTER USER MANUAL We continue to be committed to provide you tools with competitive price. "Save Half", "Half Price" or any other similar expressions used by us only represents an estimate of savings you might benefit from buying certain tools with us compared to the major top brands and does not necessarily mean to cover all categories of tools offered by us.
- Page 2 This is the original instruction, please read all manual instructions carefully before operating. VEVOR reserves a clear interpretation of our user manual. The appearance of the product shall be subject to the product you received. Please forgive us that we won't inform you again if there are any technology or software updates on our product.
- Page 3 READ & SAVE THESE INSTRUCTIONS TABLE OF CONTENTS Package Contents Safety Information Preparation Installation Instructions Maintenance Troubleshooting TYPICAL INSTALLATION - 2 -...
- Page 4 PACKAGE CONTENTS - 3 -...
- Page 5 Safety guidelines Please be sure to comply with : 1. Power off before maintenance. 2. This product is not suitable for maintenance and use by individuals with disabilities, intellectual disabilities, or mental disorders, or those lacking experience or common sense (including children), unless used under the care or guidance of someone responsible for their safety.
- Page 6 Installation precautions NOTE: For installation personnel to read WARNING Must be grounded. Otherwise, when there is a malfunction or leakage, electric shock may occur. During installation, maintenance, and upkeep, the power supply must be disconnected. Otherwise, it may cause electric shock. Installation must be carried out by professionals or trained personnel with equivalent professional knowledge and skills in accordance with national wiring regulations.
- Page 7 It is prohibited to use power sources other than the rated voltage (120V~, 60Hz). Otherwise, it may damage this product and cause a fire. To avoid danger caused by incorrect reset of the thermal circuit breaker, the product cannot be powered through external switching devices.
- Page 8 Safety Information Please read and understand this entire manual before attempting to assemble, operate or install the product. Always disconnect the power supply prior to servicing the fan, motor or junction box. Installation work must be out by a qualified person(s) in accordance to all local and safety codes including the rules for fire-rated construction.
- Page 9 15. Duct work should be installed in a straight line with minimal bends 16. Duct work size must be the same size as the discharge and should not be reduced. Reducing the duct size may increase fan noise. 17. Prior to servicing or cleaning this unit, shut off power supply at the panel and lock to prevent the power from being turned on.
- Page 10 Installation Instructions Choose the location for your fan in the ceiling. For best possible performance, use the shortest possible duct run and a minimum number of elbows. Cut an opening measuring 11.3 inches x 10.3 inches at the selected location. ( See the Fig.1.) Fig.1.
- Page 11 Loosen the screws and remove the power box cover, pass the power cord through the ceiling. Connect the power cord according to the wiring diagram, and then lock the power box cover with screws. (See the Fig.3.) Fig.3. WIRING DIAGRAM: - 10 -...
- Page 12 Push the fan housing into the ceiling hole and secure it with 8 wooden screws (locked through two layers of ceiling). ( See the Fig.4.) Fig.4. Install the plastic plate into the duct connector. Then install the duct connector into the fan housing and tighten the screws. ( See the Fig.5.) Fig.5.
- Page 13 Install a circular 4 in. duct (not included) and secure it with duct tape or clamps (neither included). Finish ceiling work. Ceiling hole should be aligned with edge of fan housing.( See the Fig.6.) Fig.6. Carefully connect the light wires. ( See the Fig.7.) Fig.7.
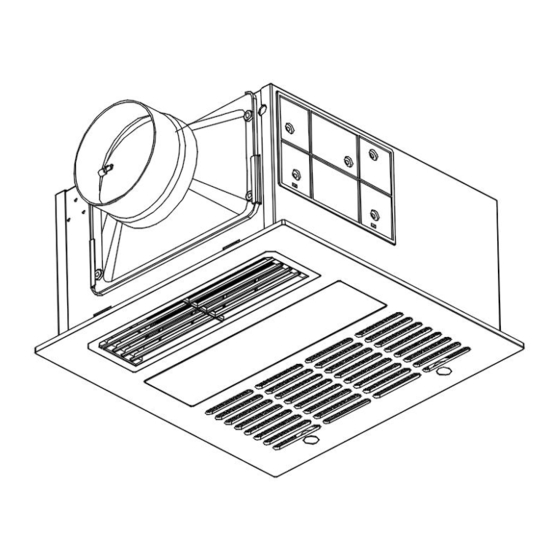
- Page 14 Align the two clips of the grille with the slots on the fan housing and snap them in. ( See the Fig.8.) Fig.8. Align the two screw pillars of the grille with the two screw pillars in the fan housing, push the grille to level with the ceiling, and finally lock it with two M4x 12 screws.
- Page 15 11. Press the silicon sheet plug into the two screw holes. All installations completed. ( See the Fig.10.) Fig.10. Remote Control Instructions NOTE: Please refer description diagram. 1. Main switch: 1.1. The initial state of the "Main switch" is off by default: the power is off; 1.2.
- Page 16 4. Light brightness adjustment: Turn on the light and use the "Brightness adjustment" button to adjust the brightness when the light is on; 4.1. Use the "+" button on the "Brightness adjustment" button to increase brightness; 4.2. Use the "-" button on the "Brightness adjustment" button to reduce brightness;...
- Page 17 5. Energy saving day and night light switching: Use the "Day and night light" button to switch between day and night lights; 6. Fan OFF: Regardless of the current state of the fan, pressing the “Fan OFF” button will stop the fan from operating. If in the heating mode, press the "Fan OFF"...
- Page 18 Care and maintenance WARNING: Disconnect power supply before servicing. See SAFETY INFORMATION before proceeding. Routine maintenance should be done at least once a year. • Wash grille with mild soap and water, dry with a cloth. • Remove excess dirt and dust from the fan housing with a vacuum cleaner.
- Page 20 Technical Support and E-Warranty Certificate www.vevor.com/support...
Need help?
Do you have a question about the BATHROOM MASTER and is the answer not in the manual?
Questions and answers