Advertisement
Quick Links
VENTILATION FAN
USER MANUAL
We continue to be committed to provide you tools with competitive price. "Save
Half", "Half Price" or any other similar expressions used by us only represents
an estimate of savings you might benefit from buying certain tools with us
compared to the major top brands and doses not necessarily mean to cover all
categories of tools offered by us. You are kindly reminded to verify carefully
when you are placing an order with us if you are actually saving half in
comparison with the top major brands.
Advertisement

Related Manuals for VEVOR BT-FL14A


Summary of Contents for VEVOR BT-FL14A
- Page 1 VENTILATION FAN USER MANUAL We continue to be committed to provide you tools with competitive price. "Save Half", "Half Price" or any other similar expressions used by us only represents an estimate of savings you might benefit from buying certain tools with us compared to the major top brands and doses not necessarily mean to cover all categories of tools offered by us.
- Page 2 - 1 -...
- Page 3 This is the original instruction, please read all manual instructions carefully before operating. VEVOR reserves a clear interpretation of our user manual. The appear- ance of the product shall be subject to the product you received. Please forgive us that we won' t inform you again if there are any technology or software updates on our product.
- Page 4 【Contents】 SAFETY PRECAUTIONS Ⅰ、 PRODUCT DESCRIPTION Ⅱ、 INSTALLATION Ⅲ、 DIMENSION AND SPECIFICATION Ⅳ、 POWERING AND SETUP Ⅴ、 Ⅵ、CLEANING PROGRAMMING Ⅶ、 Ⅷ、FAQ Ⅸ、ATTENTIONS SAFETY PRECAUTIONS Improper operation may cause personal injury. WARNING Improper operation may cause damage to the machine. Improper operation may cause others object damage. The symbol indicates that the user should pay high attention to and pay attention to the drawing shows the situation to be noted, and the left figure shows "Be careful of electric shock"...
- Page 5 BE CAREFUL DO NOT use fan in window. Rain may create electrical hazard. Do not damage or arbitrarily change the original power cord, and do not bend, forcibly pull, bind or press the power cord under heavy objects.This will damage the power cord, causing electric leakage fire or electric shock If the machine is not used for a long time, please unplug the power cord from the socket...
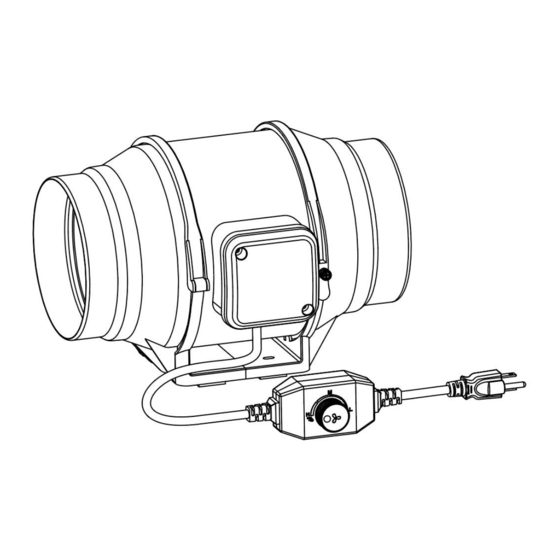
- Page 6 PRODUCT DESCRIPTION TECHNICAL PARAMETER Brand Model BT-FL14A BT-FL16A BT-FL18A Voltage 120 V 120 V 120 V Frequency 60 Hz 60 Hz 60 Hz Power 31 W 60 W 126 W Speed 2550 RPM 2600 RPM 2500 RPM Duct Size Φ100/Φ125 Φ150/Φ160...
- Page 7 INSTALLATION Prepare tools in advance: Cross screwdriver, Hammer - 6 -...
- Page 8 Installation method: Step 1: 1、Unscrew and loosen the plastic buckle using a Phillips screwdriver See the(Fig.1.) 2、Remove the motor box assembly from the flange bracket.See the(Fig.2.) 3、Use the flange bracket to set your desired fan position. Mark the four mounting holes.See the (Fig.3.) 4、Drill four holes into the marked locations.
- Page 9 Step 2: 1、If you are mounting onto anything other than a wood support or stud, insert the included four wall anchors into the drilled mounting holes. You may need to use a hammer to secure them through the holes. See the (Fig.5.) 2、Paste the cushion onto the flange bracket to ensure that the hole of the cushion is aligned with the hole of the flange bracket.
- Page 10 5、Place the plastic clamps back onto the flanges and tighten the screws back to secure the motor box. See the (Fig.9.) Fig.9. Step 3: 1、If installing ducting, purchase a suitable duct and duct clamp and secure it to both ends of the fan to ensure tight sealing. Finally tighten the air duct clamp with a screwdriver.See the (Fig.10.) 2、If installing with rope hangers, loop the ropes around the flanges and tighten the rope to secure the fan.See the (Fig.11.)
- Page 11 DIMENSION 1 、 Dimension - 10 -...
- Page 12 HOW TO USE Speed control The controller has a button, and the fan speed is stepless.Turn the button to adjust the wind speed from the highest to the lowest, and select the wind speed you need.See (Fig.12.) Fig.12. Tip:Slight motor sound is normal when running at low speed MAINTENANCE 1.
- Page 13 CLEANING Step 1: Remove the motor box from the mounting flange.(Refer installation steps 1 to learn how to of the mounting installation section to learn how to remove the motor box). (Fig.13.) Step 2: Use a damp cloth to clear the impeller and fan blades of any dust and debris. Remove the wind circle in between the motor box and input flange.
- Page 14 ATTENTIONS - 13 -...
- Page 15 This product is subject to the provision of Europe an Directive 2012/19/EC. The symbol showing a wheelie bin crossed through indicates that the product requires separate refuse collection in the European Union. This applies to the product and all accessories marked with this symbol. Products marked as such may not be discarded with normal domestic waste, but must be taken to a collection point for recycling electrical and electronic devices.
- Page 16 E-mail: CustomerService@vevor.com - 15 -...
Need help?
Do you have a question about the BT-FL14A and is the answer not in the manual?
Questions and answers