Advertisement
Quick Links
Support and E-Warranty Certificate
https://www.vevor.com/support
SOLAR ROOF EXHAUST FAN
USER MANUAL
We continue to be committed to offering tools at competitive prices. "Save Half", "Half Price",
or any other similar expressions used by us only represent an estimate of savings you might
benefit from buying certain tools with us compared to the major top brands and do not
necessarily mean to cover all categories of tools offered by us. You are kindly reminded to
verify carefully when placing an order with us if you are saving half in comparison with the top
major brands.
Advertisement

Related Manuals for VEVOR JBSF-320G


Summary of Contents for VEVOR JBSF-320G
- Page 1 Support and E-Warranty Certificate https://www.vevor.com/support SOLAR ROOF EXHAUST FAN USER MANUAL We continue to be committed to offering tools at competitive prices. "Save Half", "Half Price", or any other similar expressions used by us only represent an estimate of savings you might benefit from buying certain tools with us compared to the major top brands and do not necessarily mean to cover all categories of tools offered by us.
- Page 3 CustomerService@vevor.com This is the original instruction, please read all manual instructions carefully before operating. VEVOR reserves a clear interpretation of our user manual. The appearance of the product shall be subject to the product you received. Please forgive us that we won't inform you again if there are any technology or software updates on our product.
-
Page 4: Ⅰ.safety Precautions
Contents Ⅰ. Safety Precautions Ⅱ. Product Description Ⅲ. Installation Guide Ⅳ. Function Description Ⅴ. Faults and Maintenance Ⅰ.Safety Precautions Indicates a hazardous situation that, if not avoided, could WARNING result in death or serious injury. Indicates a hazardous situation that, if not avoided, will DANGER result in death or serious injury. -
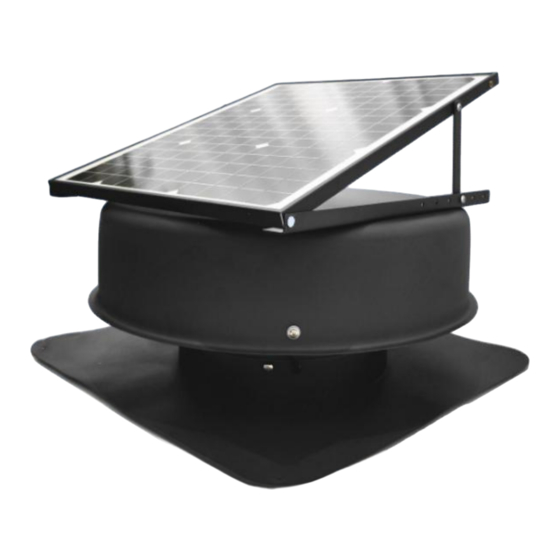
Page 5: Ⅱ.product Description
DANGER: Do not use a power supply that does not meet the rated voltage. The use of non-compliant power supplies can cause fire or electric shock. CAUTION: 1.Disconnect the fan when moving from one location to another. 2.If the machine emits smoke, odor, motor noise and other abnormal conditions, please do not use it. - Page 6 Solar roof exhaust fan functions in several ways to keep your place cool and comfortable. Its design includes the following features: • It keeps your home cooler in the summer by extracting 20 times more air than a Whirly Bird. •...
-
Page 7: Technical Parameter
TECHNICAL PARAMETER JBSF-320G Model DC 15V 40W Motor Solar Panel Type Monocrystalline PV, Heavy Duty Frame, 3mm Tempered Glass Solar Panel Output 40Watts, 15 VDC 300mm Balanced Blade (×5), with Low Resistance AC 100~240V 50 / 60Hz Inverter Voltage Ⅲ.Installation Guide... -
Page 8: Metal Roof Installation
Please read this installation guide carefully to install the solar roof exhaust fan. Depending on the roof type, you may follow installation steps for the best result. Please make sure the work area is dry before installing. Do not install during or after rain. I. - Page 9 Remove 2 ridge capping screws and slide the top edge of the flashing up under it as shown in the figure. It is important to position the lashing, so it does not cover any roofing screws. The roofing screws running from the top to the bottom of the roof are where the rafters are located. Once positioned, mark a circle on the inside edge of the flashing.
- Page 10 Note: Take care not to cut into any battens/rafters under the roof sheet when cutting. STEP 4 Slide the flashing back up under the roof capping, refit the 2 ridge capping screws through the flashing, and bend the edges of the flashing down on the left and right sides to create a tight fit with the roof.
- Page 11 STEP 5 As shown in the figure here, use a minimum of 8 and a maximum of 12 tech or roof screws with rubber seals along the left, right, and bottom of the flashing to secure the roof. Note : Tech screws and roofing screws are not included. STEP 6 Place the main body of the fan over the flashing as shown below.
- Page 12 STEP 7 Using a powered screwdriver, screw at least 4 small tech screws through the pre-drilled holes in the fan's main body into the flashing, as shown below. Tip: You may not get the top tech screw in place, as the roof angle may prevent this. In this case, you can screw the tech screw into another section where the main body is over the flashing.
- Page 13 To adjust the angle of the solar panels up, just adjust the 2 arms to the correct angle and tighten the screws. Note: An installation option is to fit the fan under the eave vents to the side of the house that is cool in the afternoon.This will allow the cooler outside air to be drawn into the roof space.
- Page 14 GUIDE 1x solar fan up to 1,000 sqft place 2x solar fans up to 2,000 sqft place 3x solar fans up to 3,000 sqft place Note: Shade will affect the fan performance. Number of fans needed may vary depending on the situation.
- Page 15 Ensure you discard this removed tile. Do not leave it on the roof. STEP 3 Lift the tiles above the tile opening, slide the flashing into place as shown here, and then push the tiles back down. This will mold the flashing to the tiles. STEP 4 Fit a minimum of one rafter/batten strap (2 are supplied) as shown.
- Page 16 Note: Rafters run from the top of the roof down to the facial and battens run across the roof directly under the tiles. STEP 5 Once the flashing fitting is complete, run a bead of clear silicone along the top of the flashing that joins with the upper tiles.
- Page 17 Tip: Position the solar panel between the south (north for the southern hemisphere) and west to best suit the sun in warmer months. STEP 7 As shown in the figure, using a powered screw-driver, screw at least 4 small tech screws through the pre-drilled holes in the fan's main body through into the flashing.
- Page 18 STEP 8 You can now adjust the angle of the solar panel to receive maximum sun especially during the midday of the warmer months as shown in the figure. As the pitch of many roofs is already at a good angle for the summer sun, you may just be able to leave the panel in the down position as it is supplied from the factory, without doing anything.
- Page 20 Support and E-Warranty Certificate https://www.vevor.com/support...
Need help?
Do you have a question about the JBSF-320G and is the answer not in the manual?
Questions and answers
can vevor jbsf-320g be mounter on existing 12in roof vent