System Sensor L Series Installation And Maintenance Instructions Manual
Led indoor selectable-output horn strobes and strobes
Hide thumbs
Also See for L Series:
- Installation and maintenance instructions manual (11 pages) ,
- Installation and maintenance instructions (4 pages) ,
- Installation and maintenance instruction (4 pages)
Table of Contents
Advertisement
INSTALLATION AND MAINTENANCE INSTRUCTIONS
ENGLISH
L-Series with LED
Indoor Selectable-Output
Horn Strobes and Strobes
Manual is for use with the following models:
Horn Strobes
Standard Wall Mount Horn Strobes: P2RLED, P2RLED-B, P2WLED, P2WLED-B, P2RLED-P, P2WLED-P, P2RLED-SP, P2WLED-SP
Compact Wall Mount Horn Strobes: P2GRLED, P2GRLED-B, P2GWLED, P2GWLED-B
Standard Ceiling Mount Horn Strobes: PC2RLED, PC2RLED-B, PC2WLED, PC2WLED-B
2-Wire Strobes
Standard Wall Mount Strobes: SRLED, SRLED-B, SWLED, SWLED-B, SRLED-P, SWLED-P, SRLED-SP, SWLED-CLR-ALERT, SWLED-ALERT*
Compact Wall Mount Strobes: SGRLED, SGRLED-B, SGWLED, SGWLED-B
Ceiling Mount Strobes: SCRLED, SCRLED-B, SCWLED, SCWLED-B, SCWLED-CLR-ALERT, SCRLED-P, SCWLED-P
Language designators: "-B" are bilingual (English/French). "-P" are plain versions (no wording). "-SP" are marked "FUEGO"
*Amber lenses are for use in UL applications.
Section 1: Introduction .................................................................................................................................................. 2
1.1 Product Specifications .......................................................................................................................................................2
1.2 Dimensions and Mounting Options ...................................................................................................................................2
1.3 Before Installing ................................................................................................................................................................2
1.4 General Description ..........................................................................................................................................................2
1.5 Fire Alarm System Considerations ....................................................................................................................................3
1.6 System Design ..................................................................................................................................................................3
Section 2: Configurations for Notification Appliances ............................................................................................... 4
2.1 Available Tones .................................................................................................................................................................4
2.2 Available Candela Settings ...............................................................................................................................................4
2.3 Current Draw and Audibility ratings ...................................................................................................................................5
Section 3: Installation .................................................................................................................................................... 7
3.1 Wiring and Mounting .........................................................................................................................................................7
3.2 Wiring Diagrams ................................................................................................................................................................7
3.3 Install Back Box .................................................................................................................................................................7
3.4 Install Mounting Plate and Appliance ................................................................................................................................7
3.5 Remove a Ceiling Model Appliance ..................................................................................................................................8
3.5.1 Mounting Drawings ........................................................................................................................................................8
3.6 Tamper Screw .................................................................................................................................................................10
3.7 Test Points ......................................................................................................................................................................10
LED L-series Indoor Horn Strobes and Strobes - P/N I56-0022-000 8/25/2023
Table of Contents
3825 Ohio Avenue, St. Charles, Illinois 60174
800/736-7672, FAX: 630/377-6495
www.systemsensor.com
1
Advertisement
Table of Contents

Related Manuals for System Sensor L Series


Summary of Contents for System Sensor L Series
-
Page 1: Table Of Contents
INSTALLATION AND MAINTENANCE INSTRUCTIONS ENGLISH L-Series with LED Indoor Selectable-Output 3825 Ohio Avenue, St. Charles, Illinois 60174 800/736-7672, FAX: 630/377-6495 Horn Strobes and Strobes www.systemsensor.com Manual is for use with the following models: Horn Strobes Standard Wall Mount Horn Strobes: P2RLED, P2RLED-B, P2WLED, P2WLED-B, P2RLED-P, P2WLED-P, P2RLED-SP, P2WLED-SP Compact Wall Mount Horn Strobes: P2GRLED, P2GRLED-B, P2GWLED, P2GWLED-B Standard Ceiling Mount Horn Strobes: PC2RLED, PC2RLED-B, PC2WLED, PC2WLED-B 2-Wire Strobes... -
Page 2: Section 1: Introduction
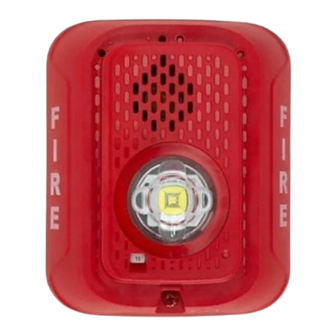
1.4 General Description System Sensor series of notification appliances offer a wide range of audible and visible devices for life safety notification. Our 2-wire horn strobes and strobes come with 8 field selectable tone and volume combinations and 7 field selectable candela settings. The devices are intended for indoor applications and approved for wall-mount and ceiling-mount installations. -
Page 3: Fire Alarm System Considerations
The current draw information for making these calculations can be found in the tables within the manual. For convenience and accuracy, use the voltage drop calculator on the System Sensor website (www.systemsensor.com). -
Page 4: Section 2: Configurations For Notification Appliances
2.1 Available Tones System Sensor offers a wide variety of tones for your life safety needs. Temporal 3 pattern is specified by ANSI and NFPA 72 for standard emergency evacuation signaling: ½ second on, ½ second off, ½ second on, ½ second off, ½ second on, 1½ off, and repeat. -
Page 5: Current Draw And Audibility Ratings
Current Draw and Audibility ratings Configurations for Notification Appliances Figure 4 Vertical Dispersion– Wall to Floor Figure 5 Light output - vertical dispersion, ceiling to walls to floor Degrees* Percent of Rating Degrees* Percent of Rating 5-30 5-25 30-45 *Tolerance of ±1 degree is permitted. *Tolerance of ±1 degree is permitted. - Page 6 Configurations for Notification Appliances Current Draw and Audibility ratings Table 3 UL/ULC Maximum Horn Strobe Current Draw (mA) and Sound Output (dBa) Sound Current Draw (mA RMS), Horn Strobe, Output Candela Range (15-185 cd), FCP* (dBA) 16-33 Volts 16-33 V Volume Tone 110cd...
-
Page 7: Section 3: Installation
Section 3: Installation 3.1 Wiring and Mounting All wiring must be installed in compliance with the National Electric Code (UL applications), (Canadian Electric Code (ULC applications), and local codes as well as the authority having jurisdiction. Wiring must not be of such length or wire size which would cause the notifica- tion appliance to operate outside of its published specifications. -
Page 8: Remove A Ceiling Model Appliance
Installation Remove a Ceiling Model Appliance – Pivot the product into position to engage the terminals on the mounting plate. Make sure that the tabs on the back of the product housing fully engage with the mounting plate. – Hold product in place with one hand, and secure product by tightening the single mounting screw in the front of the product housing. CAUTION: The “hold in place”... - Page 9 Remove a Ceiling Model Appliance Installation Figure 12 Mounting a Ceiling Device Figure 13 Surface Mounting a Ceiling Device (Double-Gang Box) (SBBCRL/SBBCWL) A0610-00 A0609-00 Figure 14 Ceiling Device - Location of Locking Button Locking button A0623-00 Figure 15 Selecting screw location in a ceiling Figure 16 Surface Mount Back Box “Up”...
-
Page 10: Tamper Screw
A0478-03 3.7 Test Points System Sensor L-Series with LED notification appliances come with diagnostic test points for ease of access with use of a digital voltage meter to measure device voltage without removing from the wall or ceiling. Insert digital voltage meter positive probe into (+) test point. - Page 11 The horn may not be heard by persons who are hearing impaired. supplies produce interrupted power. The strobe must have an uninterrupted source of power in order to operate correctly. System Sensor recommends that the horn and NOTE: Strobes must be powered continuously for horn operation.
Need help?
Do you have a question about the L Series and is the answer not in the manual?
Questions and answers