
Related Manuals for Car Solutions QROI-XI


Summary of Contents for Car Solutions QROI-XI
- Page 1 Installation Manual Navigation box on Android 10 for Volvo XC90, S90 2017- OEM Monitors (HW V3.0) QROI-XI_VOLVO car-solutions.com support@car-solutions.com...
-
Page 2: Specification
Specification CATEGORY SPECIFICATION OS Version 10.0 ARM Cortex-A72 + Cortex-A53@2.0GHz (HEXA CORE) ARM Mali-T860 (QUAD CORE) - for GPU 4GB LPDDR4 Internal 32GB eMMC Memory Storage External Micro SD slot (MAX 128GB) Storage 802.11 a/b/g/n/ac (2.4 GHz / 5 GHz) WI-FI Internally on board with Ant. - Page 3 Specification Car Compatibility: 9inch Vertical XC40/XC60/XC90/S60/S90 Cap. T/S monitor Support OEM touch screen function Support PDC split screen car-solutions.com support@car-solutions.com...
-
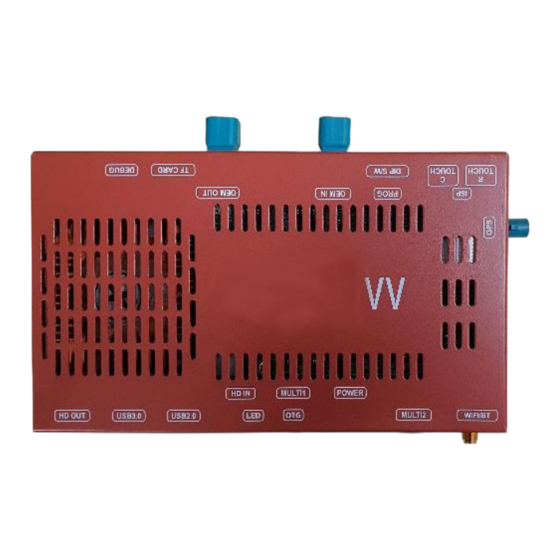
Page 4: Main Board
Components MAIN BOARD POWER CABLE LCD CABLE x2 QCPASS1726 HPOWER0283 HLCDCA0037 MULTI1 CABLE MULTI2 CABLE GPS CABLE HARETC0360 GPSANT0013 HARETC0359 LCD EXTENSION MIC CABLE SPK CABLE QCPASS0638 MICPHO0003 SPEAKER007 IR CABLE BUTTON CABLE REMOTE CTRL. car-solutions.com HIRCAB0002 HARETC0001 REMOTE0001 support@car-solutions.com... - Page 5 Components Wi-Fi/BT Extension Wi-Fi/BT Antenna HARETC0406 ETCETC1238 car-solutions.com support@car-solutions.com...
-
Page 6: Cable Connection
Cable Connection HD OUT: HDMI output USB2.0/3.0: USB host HD IN: HDMI input LED: Red LED on for power input, Blue LED on for android system booting MULTI1: Rear Camera/Front Camera/Remote Control/Toggle Button POWER: connect provided power cable (GND/ACC/B+) MULTI2: SPK OUT/AV OUT/MIC IN/FM-TX ANT/UART [#1 is UART-TX] Wi-Fi/BT: connect provided Wi-Fi/BT extension cable and antenna GPS: connect GPS antenna... -
Page 7: Dip Switch Settings
DIP Switch Settings * ON: DOWN / OFF: UP Please make sure to disconnect the power cable of interface and reconnect to apply dip switch setting whenever changing DIP switch. FUNCTION Dip S/W SELECT No Use (OFF) OFF : Use QDIS GPS Antenna GPS Power ON : Use Original GPS Antenna OFF : HDMI Mode... -
Page 8: Factory Settings
Factory Settings ◀ Long Press: Access to the Factory Menu OK Short Press: Selection or Mode Change ▶ Long Press: Factory Reset ▲ Short Press: Moving Upward ▼ Short Press: Moving Downward MENU Short Press: Back PIP Short Press: Split Screen (RCAM/HDMI/AV) PAS TYPE : PAS ON IMAGE PARK... - Page 9 Factory Settings CAR MODEL : ~2022Y IMAGE PARK CAN TYPE : PASSENGER FUNC HD1 MODEL : SE-TV UTIL INFO FUNCTION CAR MODEL: (~2022Y/2023Y~) -> 2023Y~ has new air conditioner UI at the bottom line and different OEM camera display size CAN TYPE: Select Gear CAN type (OBD/Passenger/Steering) ->...
- Page 10 LCD Cable Connection 1. Unplug Original LCD cable from the back side of the monitor and connect it to the extension board 2. Connect one of the supplied LCD cable from extension board to the interface “OEM-IN” 3. Connect the other supplied LCD cable to the back side of monitor and interface “OEM-OUT”...
-
Page 11: Power Cable
CAN Connection_ OBD * Find OBD cable under the driver’s seat Supplied power cable pin map Behind the OEM OBD CAN-L CAN-H * The color of wires may vary POWER CABLE HPOWER0283 car-solutions.com support@car-solutions.com... - Page 12 CAN Connection_ Under Driver’s Seat In case CAN wires are not located at OBD parts, Plz find below wire Under the driver’s seat (CAN data is same as OBD) Supplied power cable pin map car-solutions.com support@car-solutions.com...
- Page 13 CAN Connection_ Passenger’s Door Frame In case CAN wires are not located at OBD or Under the Driver’s seat, Plz find below wire Under the passenger’s door frame. Violet/White Violet/Green (CAN-H) (CAN-L) Under the passenger’s door frame Supplied power cable pin map car-solutions.com support@car-solutions.com...
- Page 14 CAN Connection_ Under Steering Wheel * You could also find CAN wires under the steering wheel. Please find pin map below. 2019Y XC90 and 2022Y XC40 Under the steering wheel Supplied power cable pin map CAN-H CAN-L car-solutions.com support@car-solutions.com...
- Page 15 ADC Connection to Use OEM Button Behind Monitor Please connect Original ADC(#11pin) wire behind the monitor to the supplied power #10(ADC1) for button use Supplied power cable pin map POWER CABLE HPOWER0283 Press Home button twice -> mode switch Short press -> Back to OEM car-solutions.com support@car-solutions.com...
- Page 16 Split Screen on Rear Camera Mode (CVBS / HDMI) Please press high lighted button for 3secs long or short press PIP button on the remote control to change screen display ratio. ~2022Y Ext. Rear + OEM Rear Ext. Camera Full Ext.
- Page 17 Android10.0 Demo car-solutions.com support@car-solutions.com...
-
Page 18: Split Screen
Split Screen ① ② 1. Press recent app button to select the apps for split screen 2. Drag selected app screen to the top side 3. And select another app screen on the bottom side to complete the split screen mode car-solutions.com support@car-solutions.com... - Page 19 Split Screen Drag center division bar button to change the split screen display ratio car-solutions.com support@car-solutions.com...
-
Page 20: Device Settings
Device Settings Password : 0603 car-solutions.com support@car-solutions.com... - Page 21 Device Settings Version info: check the application and firmware version AP File Update: press AP button and plug in USB memory stick with update.zip file (*AP Update also automatically activated by plugging USB memory stick in 5Secs) FW File Update: press FW button and plug in USB memory stick with FW.QVL file Cooling fan mode: cooling fan operation settings Navigation bar: bottom navigation bar and flying back button display...
- Page 22 AP Update 1. Please copy and paste update.zip file on USB memory stick and insert it to QROIXI USB port (not DEBUG Port) 2. Reset QROIXI power 3. update process will be activated automatically or press AP button in the device setting menu as below car-solutions.com support@car-solutions.com...
- Page 23 FW Update 1. Please copy and paste FW.QVL on USB memory stick 2. connect the USB memory stick to USB port. (not DEBUG port) 3. Please go to Device settings and click FW UPDATE button on the menu. And tap ‘install now’ 4.
- Page 24 Power Cable Drawing Connect provided power wire pin#1 and #2 together to car ACC. car-solutions.com support@car-solutions.com...
- Page 25 Multi1 Cable Drawing car-solutions.com support@car-solutions.com...
- Page 26 Multi2 Cable Drawing * UART-TX is for Touch data transmission. car-solutions.com support@car-solutions.com...
Need help?
Do you have a question about the QROI-XI and is the answer not in the manual?
Questions and answers