Advertisement
Quick Links
Advertisement

Related Manuals for Mercia Garden Products 04DTSTRDAX0406HGS-V1


Summary of Contents for Mercia Garden Products 04DTSTRDAX0406HGS-V1
- Page 1 2mm Drill bit...
-
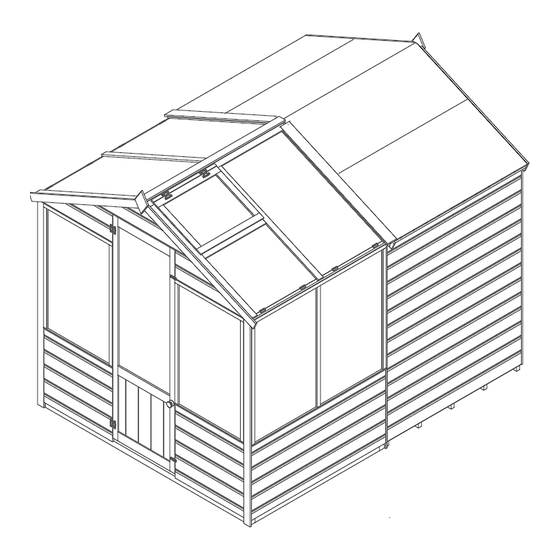
Page 3: Opening Window
Overall Dimensions: Width = 1215mm Depth = 1887mm Height = 2066mm Base Dimensions: Width =1191mm Depth = 1862mm Before assembly please make sure you have a suitable base ready to erect your building Roof Door Opening Window MADE IN GREAT BRITAIN AI-04S21GR2W1218X1037-V1 AI-BSCHGPD550X1720-V1 AI-FW560X460-V1... - Page 4 Window Strip - 12x27x926mm QTY 14 Nail Bag Window Cill 1776mm QTY1 S1227-926mm PI-08-0020 There may be extra screws present in the nail bag Window Strip - 12x27x1776mm QTY 1 Strip - 12x21x560mm QTY 1 30mm Screw x 147 16mm Screws x 16 S1227-1776mm S1221-560mm 40mm Screw x 8...
- Page 5 Step 2 IMPORTANT: Pre-drill before xing screws. Pre Assembly Parts needed - No. 1 QTY 2 No. 34 QTY 2 No. 2 QTY 2 No. 35 QTY 2 Before assembling remove the transportation No. 3 QTY 1 No. 36 QTY 1 blocks from the bottom of each panel.
- Page 6 Step 3 Step 4 IMPORTANT: Pre-drill before xing screws. IMPORTANT: Pre-drill before xing screws. Parts needed - No. 24 QTY 14 Parts needed - No. 2 QTY 1 No. 25 QTY 1 No. 3 QTY 1 No. 26 QTY 2 No.
- Page 7 Step 6 Step 8 IMPORTANT: Pre-drill before xing screws. IMPORTANT: Pre-drill before xing screws. Parts needed - No. 1 QTY 2 Parts needed - No. 4 QTY 1 No. 5 QTY 1 Locate the Door Side (No.1) on top of the base frame at the front corners, between Locate the Plain Gable Top (No.5) on top of the Small Window Sides (No.2) ensuring...
- Page 8 Step 10 Step 12 IMPORTANT: Pre-drill before xing screws. IMPORTANT: Pre-drill before xing screws. Parts needed - No. 17 QTY 1 Parts needed - No. 28 QTY 1 No. 29 QTY 3 Locate the Short Door strip (No. 17) to the No.
- Page 9 Step 13 Step 14 IMPORTANT: Pre-drill before xing screws. IMPORTANT: Pre-drill before xing screws. Parts needed - No. 9 QTY 1 Parts needed - No. 7 QTY 1 No. 18 QTY 2 No. 20 QTY 4 No. 37 QTY 1 No.
- Page 10 Step 16 Step 18 IMPORTANT: Pre-drill before xing screws. IMPORTANT: Pre-drill before xing screws. Parts needed - No. 6 QTY 1 Parts needed - No. 19 QTY 1 No. 7 QTY 1 Fix the Casement stay (No. 19) to the Place the Roof panels (No.
- Page 11 Step 20 Step 21 IMPORTANT: Pre-drill before xing screws. IMPORTANT: Pre-drill before xing screws. Parts needed - No. 8 QTY 1 Parts needed - No. 38 QTY 4 No. 18 QTY 2 No. 22 QTY 2 Locate Corner Trims No. 23 QTY 2 (No.38) onto each corner of the building, as shown.
- Page 12 Step 23 IMPORTANT: Pre-drill before xing screws. Parts needed - No. 16 QTY 1 Locate the Roof trim (No.16) to the top of the building and secure with 4x30mm screws as shown. 4x30mm Screws AFTER TREATMENT: score around protective 30mm cover on glazing and Pre drill screw...
- Page 13 IMPORTANT: Pre-drill before xing screws. Greenhouse and apex shed assembly Step 1a Parts needed - No. 11 QTY 2 (04DTSTRDAX0406HGS-V1 + 01DTSHAX0406SDFW-V1) Internal Door: No. 12 QTY 2 Overall Dimensions: Base Dimensions: Width = 1972mm Width: 1860mm Lay the Base Frames (No.11 & 12)
- Page 14 Step 2a IMPORTANT: Pre-drill before xing screws. Step 3a IMPORTANT: Pre-drill before xing screws. Parts needed - No. 1 QTY 2 No. 34 QTY 2 Parts needed - No. 24 QTY 10 No. 2 QTY 2 No. 35 QTY 2 No.
- Page 15 Step 6a IMPORTANT: Pre-drill before xing screws. Step 4a IMPORTANT: Pre-drill before xing screws. Parts needed - No. 14 QTY 1 Parts needed - No. 2 QTY 2 Internal Door: Locate the Door Frame (No.14) Locate two Small Window Sides onto the base framing between (No.2) on top of the bearers and the Door Sides (No.1).
- Page 16 Step 8a IMPORTANT: Pre-drill before xing screws. Step 10a IMPORTANT: Pre-drill before xing screws. Parts needed - No. 15 QTY 2 Parts needed - No. 6 QTY 1 No. 20 QTY 4 Locate the two Door strips (No. 15) to either No.
- Page 17 Step 12a IMPORTANT: Pre-drill before xing screws. Step 13a IMPORTANT: Pre-drill before xing screws. Parts needed - No. 9 QTY 1 Parts needed - No. 7 QTY 1 No. 18 QTY 2 No. 20 QTY 4 No. 37 QTY 1 No.
- Page 18 Step 15a IMPORTANT: Pre-drill before xing screws. Step 17a IMPORTANT: Pre-drill before xing screws. Parts needed - FROM SHED CONTENTS Parts needed - No. 6 QTY 1 Internal Door: No. 11 QTY 2 No. 7 QTY 1 Place the greenhouse roof frames Place the Roof panels (No.
- Page 19 Step 21a Step 19a IMPORTANT: Pre-drill before xing screws. IMPORTANT: Pre-drill before xing screws. Parts needed - No. 8 QTY 1 Parts needed - No. 19 QTY 1 No. 18 QTY 2 No. 22 QTY 2 Fix the Casement stay (No. 19) to the No.
- Page 20 Step 24a Step 22a IMPORTANT: Pre-drill before xing screws. IMPORTANT: Pre-drill before xing screws. Parts needed - No. 16 QTY 1 Parts needed - No. 38 QTY 2 Locate the Roof trim (No.16) to the top of Locate Corner Trims the building and secure with 4x30mm (No.38) onto the two front screws as shown.
- Page 21 AFTER TREATMENT: score around protective cover on glazing and carefully peel covering back...
Need help?
Do you have a question about the 04DTSTRDAX0406HGS-V1 and is the answer not in the manual?
Questions and answers